
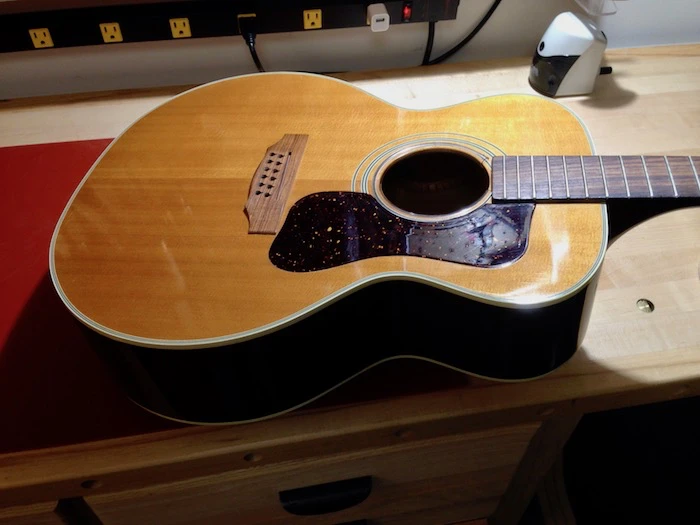
One of my 1975 Guild F-212 12 strings needed a neck reset. This 12 string was very "average" in tone and volume, where nothing really stood out and made you say, "I *have* to play this guitar!"
It seems that, given enough time, many (most) acoustic guitars will present with raised actions, where the strings are uncomfortably high off the fingerboard/fretboard, eventually discouraging their use. Saddle heights get shortened until they can go no lower without severely compromising the tone and volume of the guitar. And sometimes those saddles are taken down even lower where they appear almost buried in the bridge slot. And those guitars typically get quieter and duller. And the strings are still too high off the fretboard to play comfortably. And the guitars end up in their cases, like this one did, and they get ignored, just like this one.
One fateful day I pulled this 12 string out of its case and set on the work bench, thinking I should really tackle that neck reset. To the casual observer, this Guild would have looked to be in remarkably good shape for a nearly-50-year-old guitar. Further inspection, however, would reveal issues that could no longer be ignored.
Famous last words: "I'll just reset the neck and I can play this guitar again."
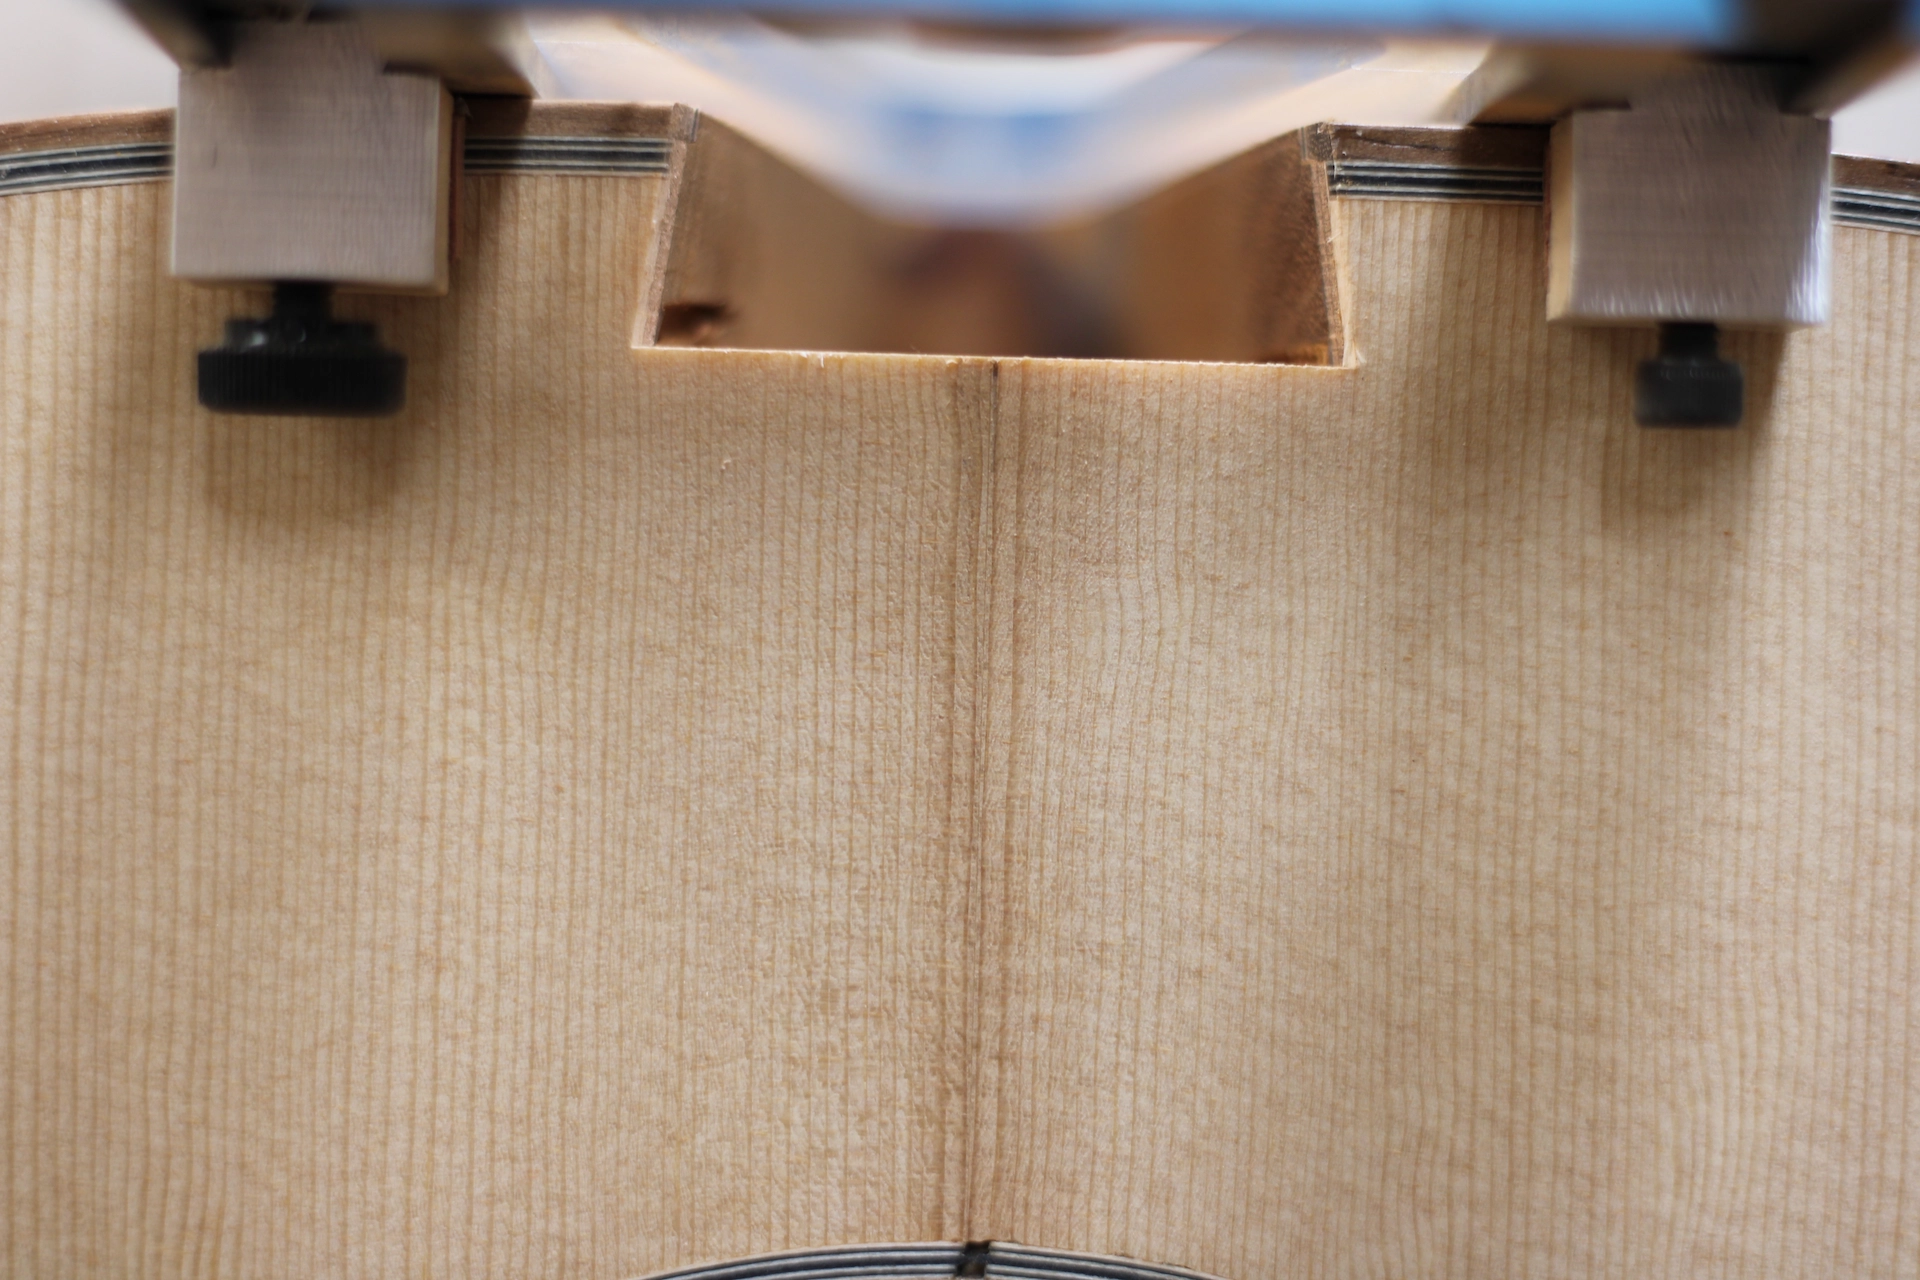
The dreaded neck block shift had occurred at some point in the guitar's recent history, shearing the soundboard along the bass edge of the fretboard extension, from the neck heel and into the soundhole. Admittedly, I can't tell you when that event occurred, as I simply didn't notice it. It wasn't grotesque, but it was visible. Regardless of how it looked, I believe it was largely responsible for the raised action.
My involvement with this guitar just got way more complicated than I was hoping for. A neck block should never shift, and a soundboard should never shear. If either occurs, it is evidence of glue failure and/or insufficient structural reinforcement.
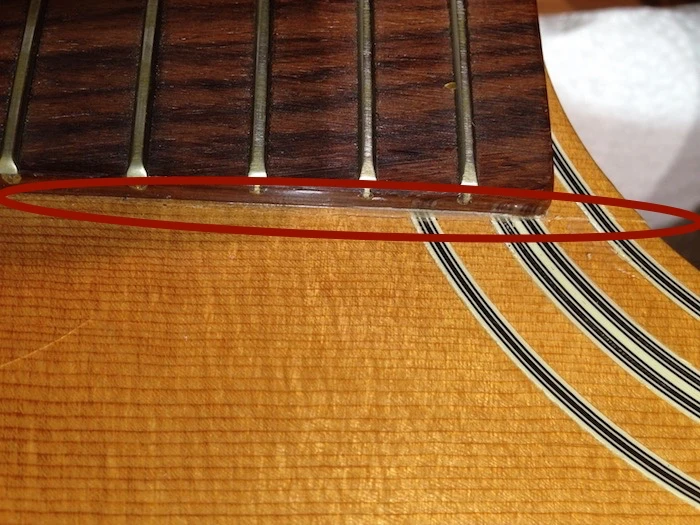
Soundboard shear along the fretboard extension
I have written extensively about the topic of Neck Block Shift and Soundboard Shear, and rather than repeat it all again here, you can read all about it in my article cleverly titled, Neck Block Shift and Soundboard Shear.
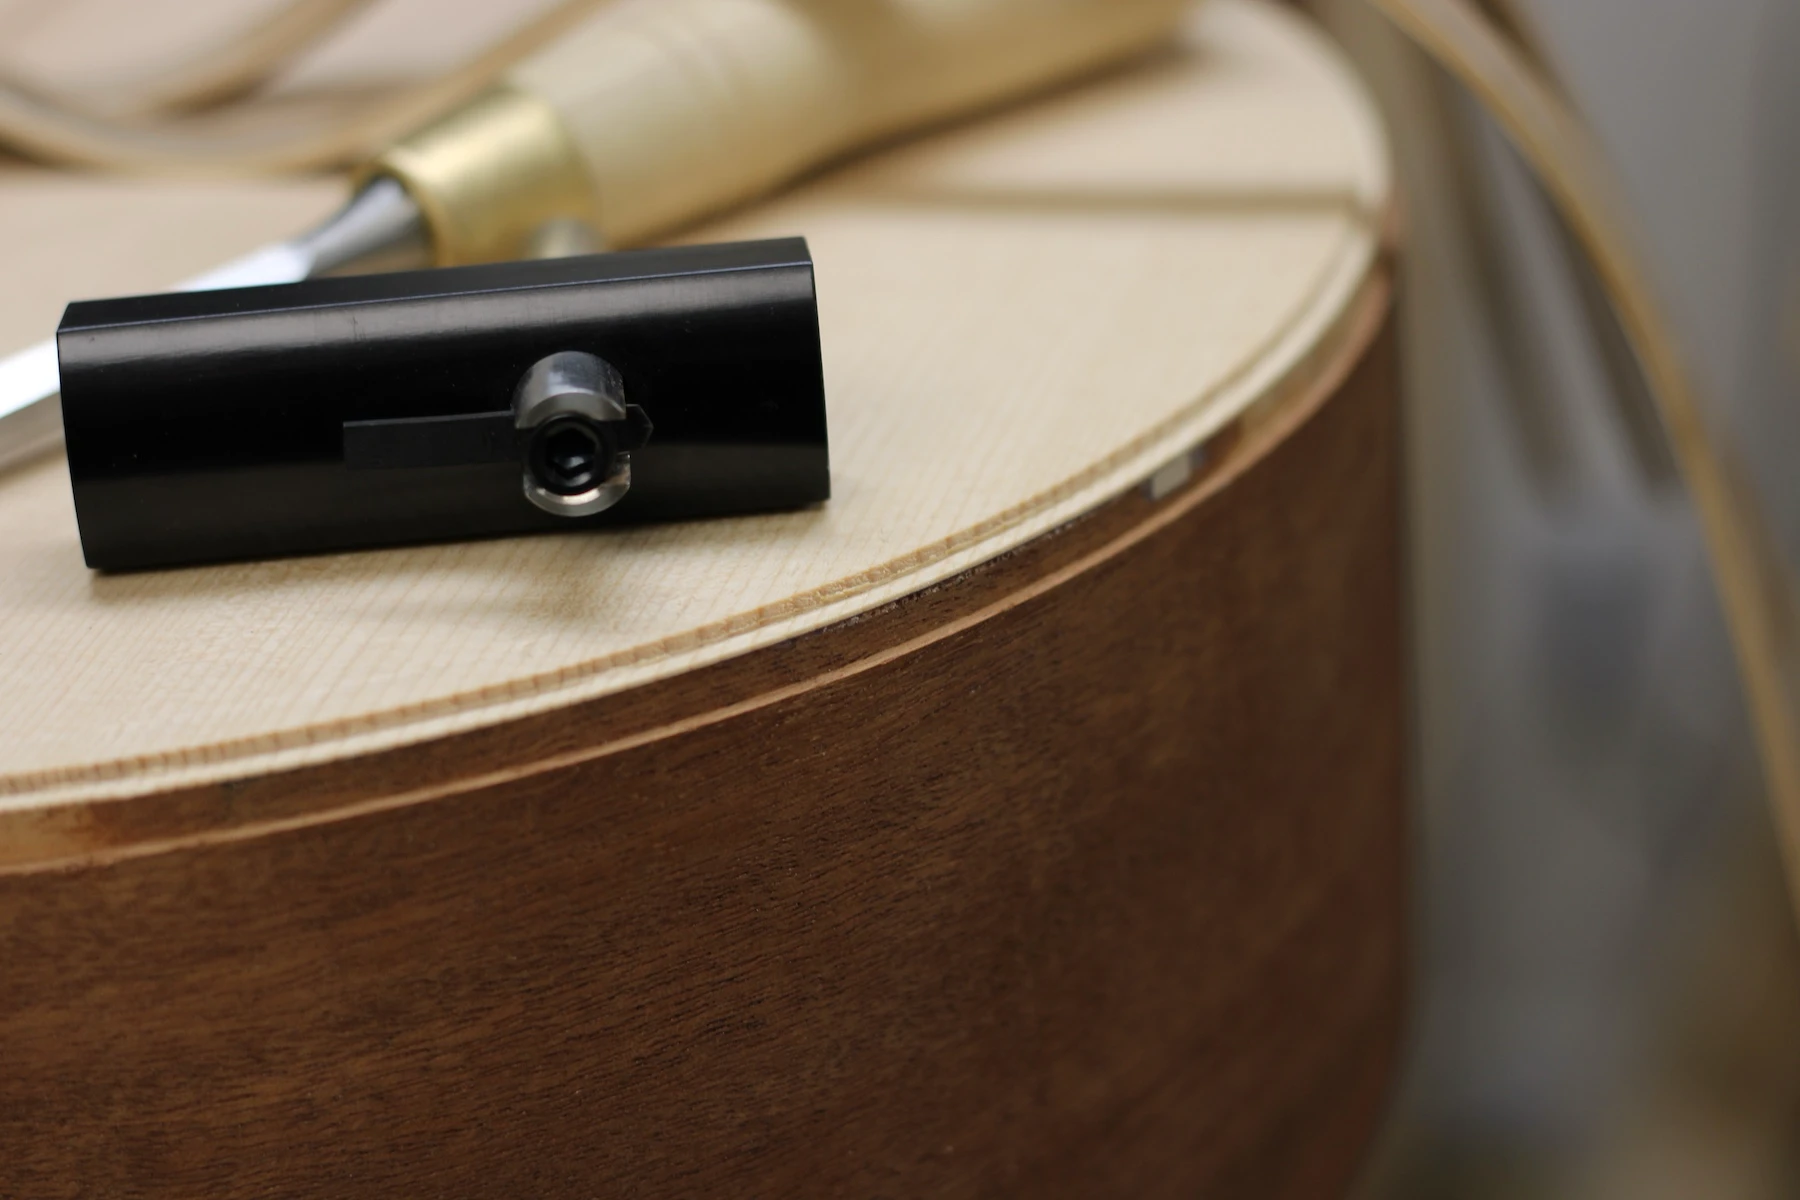
I guess I'll begin with some disassembly, and we'll see how this progresses... {sigh}. At the very least, the bridge will most likely need to be completely replaced, as it is relatively thin, and does not make a great target for neck reset geometry. But, we'll see. Whether I re-use the bridge or not, it should lift off easily with a little heat.
Removing the bridge
The fretboard is also really thin, well worn, and has a lot of divots in it. These shallow gouges are typically a result of some combination of repeated fingernail and/or string contact, and/or a softer fretboard material. They don't technically impede playability as much as they are unsightly. They can be filled (under certain conditions) or the board can be leveled by planing or sanding, which results in thinning the board even further. Over time, if enough material gets removed, eventually the whole thing will need replacing.
The old fretboard
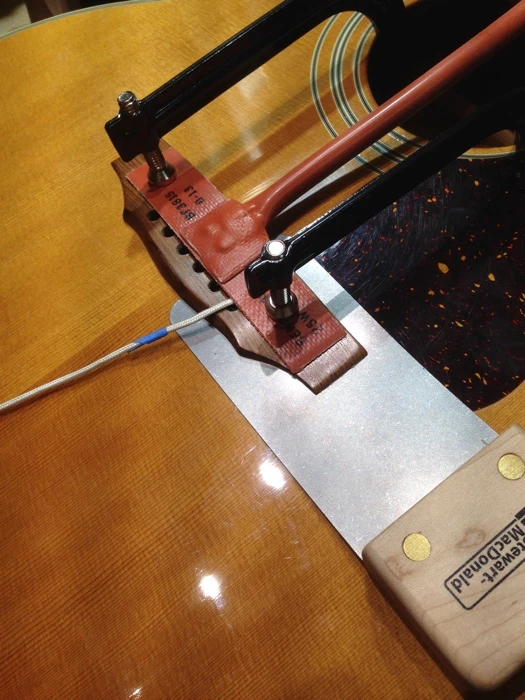
It was now time to take off the neck. I removed the appropriate fret and drilled an angled hole through the fret slot, hoping to emerge in the recess between the dovetail of the neck and the mortise of the neck block. I missed the cavity, burying the drill in solid wood. I tried it again on the opposite side of the fretboard, adjusting the angle slightly. I missed, again! See why neck resets are so much fun?
Drilling into the neck block - missed it by *that* much
Refusing to be beaten, I moved back to the original side, starting the angled hole closer to the center of the fretboard, and SUCCESS! I repeated a second successful hole on the opposite side.
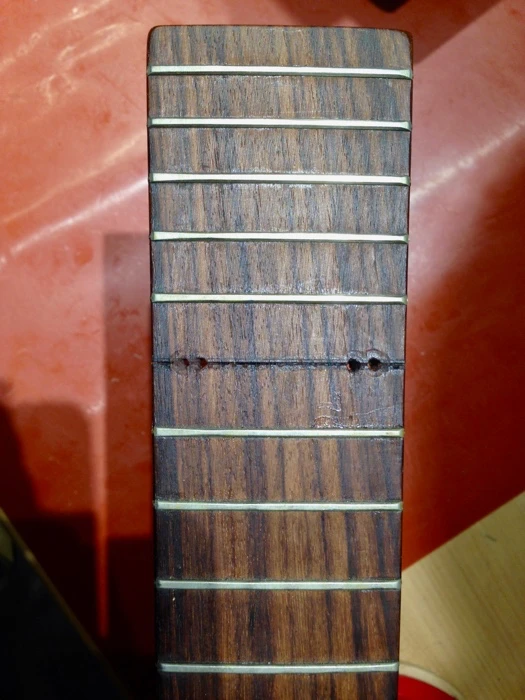
4 holes in fretboard (the 2 inside holes were successful)
If I am steaming off a neck (as opposed to using a heat rod), I like to apply a small amount of steam to both sides of the dovetail, instead of concentrating all the heat and moisture on one side. The second hole into the joint provides for an egress for water, an inevitability as the steam cools immediately on contact with the wood and condenses inside the guitar. If you can hold the instrument fretboard-side down and/or upside down while applying steam, you can prevent the pouring of water into the body - a definite no-no in my book.
If you have one of those guitars with visible white rivulets of powdered residue running down the inside of the back and/or sides, you know what I am referring to. That is old, watered-down hide glue. It is often evidence of a previous (steam-induced) neck reset, or brace repair.
Using a jig that presses against the top rim of the body while simultaneously pressing against the heel cap (I think of it as my reverse steering wheel puller), I pushed the neck up and out of the socket it was glued into. And I experienced another misstep. Note that as substantial as the necks on these Guilds are, the neck heels can be surprisingly thin at the heel cap, not leaving much to push against.
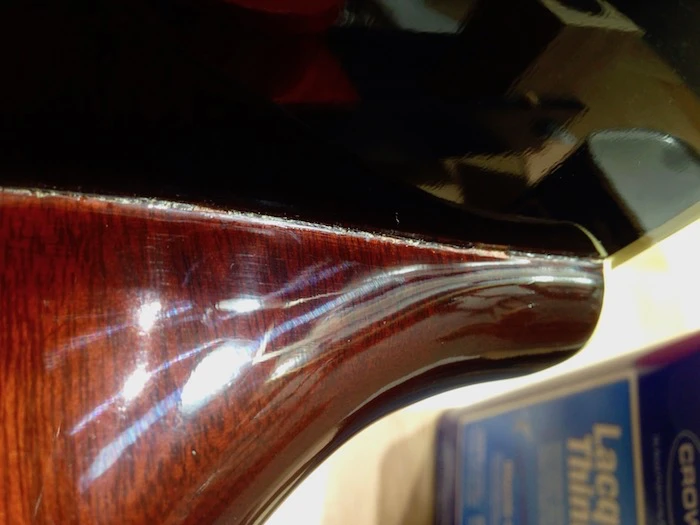
Thin neck heel
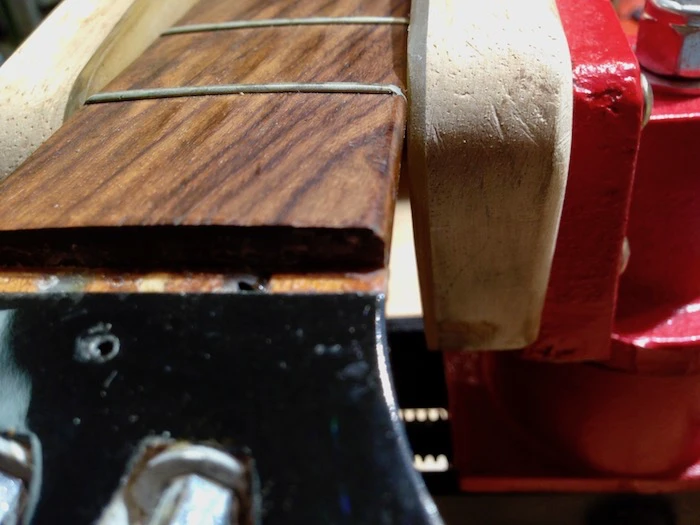
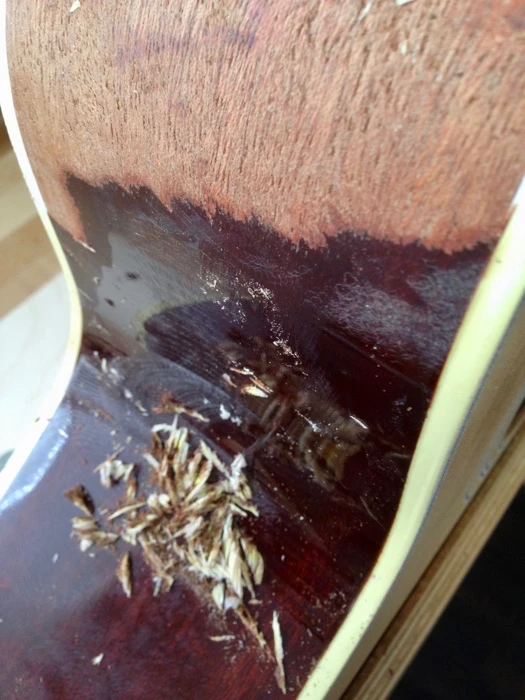
In the days before CNC, guitar necks were made utilizing some combination of sawing, carving, sanding or routing. Fitting a neck having a heel to a body typically requires removing some of the heel material in order to arrive at the correct geometry. I have reset many a Guild guitar neck, and some necks have thicker heels than others. That may be due to deliberate design, or the neck was hand-made, and/or a batch of generally sized necks were fitted to a variety of less-than-consistently-glued-up bodies. This particular neck heel was very thin. Upon adding serious heat in the form of steam, and applying sufficient pressure to the end of the heel, guess what happened? The wood of the neck heel, right at the heel cap, compressed and curled, actually de-laminating slightly.
Neck heel wood has curled
Now that it had curled, I had to make a decision. I could re-cut the heel and thin it even more. Though it doesn't impact the strength of the joint, it isn't a visually attractive option. I could attempt to re-shape the heel, reversing the steam process, and risk greater damage to the neck. Or I could overreact entirely and re-make the neck. I opted to take the easy way out and re-make the neck, leaving this original neck intact as a reference. To be fair, I had thought about doing this for several years in order to significantly lighten the neck. As you may be aware, Guild 12 string necks of this era were constructed using twin steel compression rods. Apart from the discussion of the pros and cons of one-way adjustability, the steel makes for very heavy necks. This would also give me a chance to document the dissection of one of these necks, something I realized I had never done.
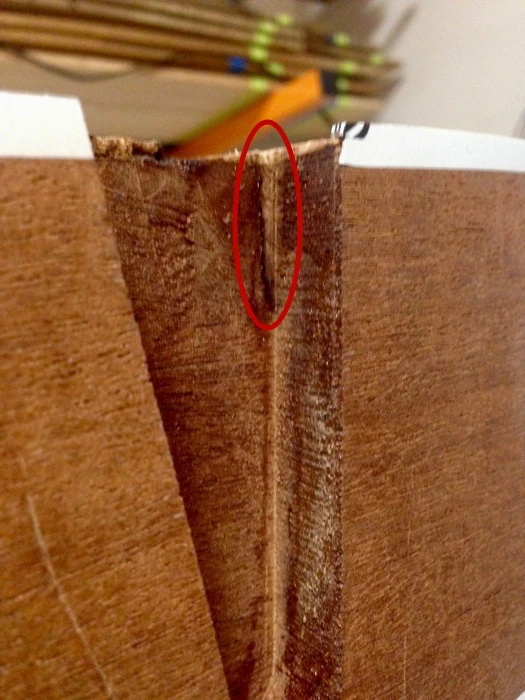
I had carefully and painstakingly removed the neck and I still ended up lifting an entire section of the soundboard off with it, the section beneath the fretboard extension. This can happen if I am being overly aggressive in trying to pry off the neck and have not sufficiently released the fretboard extension from the soundboard by softening the glue, first. But that was not the case, here. The shearing off of this piece of wood revealed severe grain runout in the soundboard (little or no runout would have prevented such shearing under these circumstances). If you look closely at the section within the red circle, you can see how sharply the grain angles downward, away from the surface.
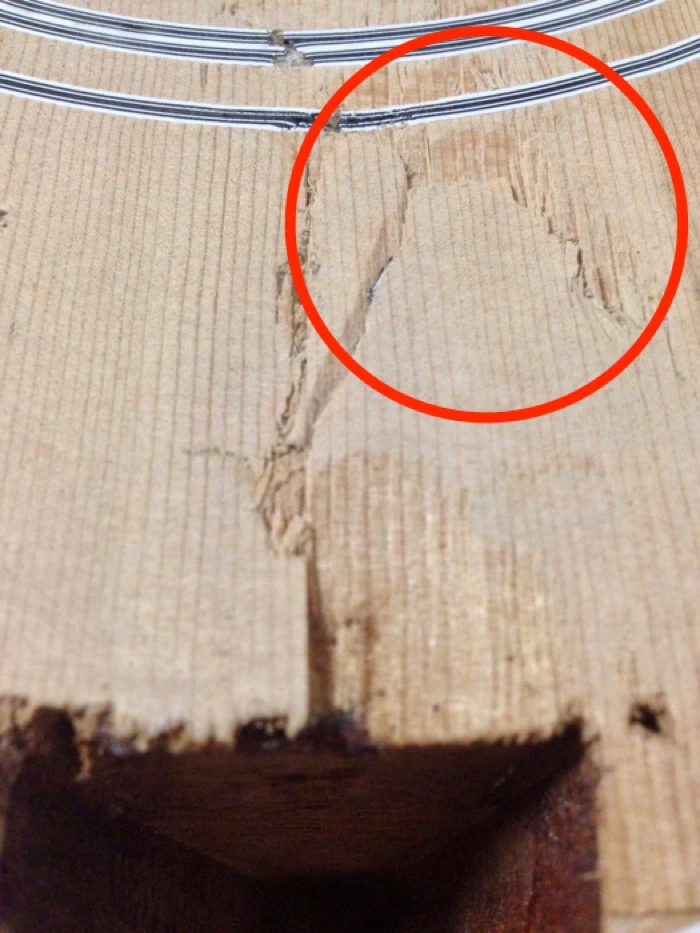
Tearout
If I was simply intending to reset the neck, I could make the necessary corrections, and glue everything back together. If I was simply intending to address the aesthetic issue of the neck block shift/soundboard shear, I might add a patch to the underside of the soundboard. I wouldn't, but some will do this, referring to this effort as "stabilizing" a crack. Once you understand what has actually gone wrong and caused the shearing, it seems a bit beyond naïve to think a small patch could stabilized anything.
I am now well beyond the stage of simply reseting the neck. By the time I would plane the old fretboard down to address the divots, it would be too thin for my liking. Removing the curl on the heel (caused by me) would result in an unattractive heel dimension. I have now convinced myself to recreate a Guild neck.
The soundboard shear alone is reason enough for me to replace the soundboard, but the degree of grain run-out I encountered under the fretboard extension makes it absolutely necessary for me.
With the addition of a new neck AND a new soundboard, I am now definitely going to refinish this guitar. There is a tinted lacquer finish on the neck and back and sides, hiding the underlying wood. What were they hiding? Even if the wood beneath the tinting is not perfect in appearance, I prefer to see the wood grain.
I have removed lacquer finishes many, many times, and I have developed a process that works for me. I first go over the sides and back with an oscillating sander to scratch the surface of the decades-old lacquer, which is now as hard as glass. I am extremely cautious with the sander to only touch certain areas. Using a motorized tool, I am merely attempting to reduce the thousands of strokes necessary to scrape the entire surface by hand (which I have done many times).
I am *not* trying to get down to raw wood with the sander, as there is too high of a probability that I would remove wood. The wood has already been carefully thinned to final dimensions, and removing any more than a few thousandths could/would be dangerous. I pick up my scraper and begin the tedious task of taking the balance of the finish off.
Scraping off the old finish
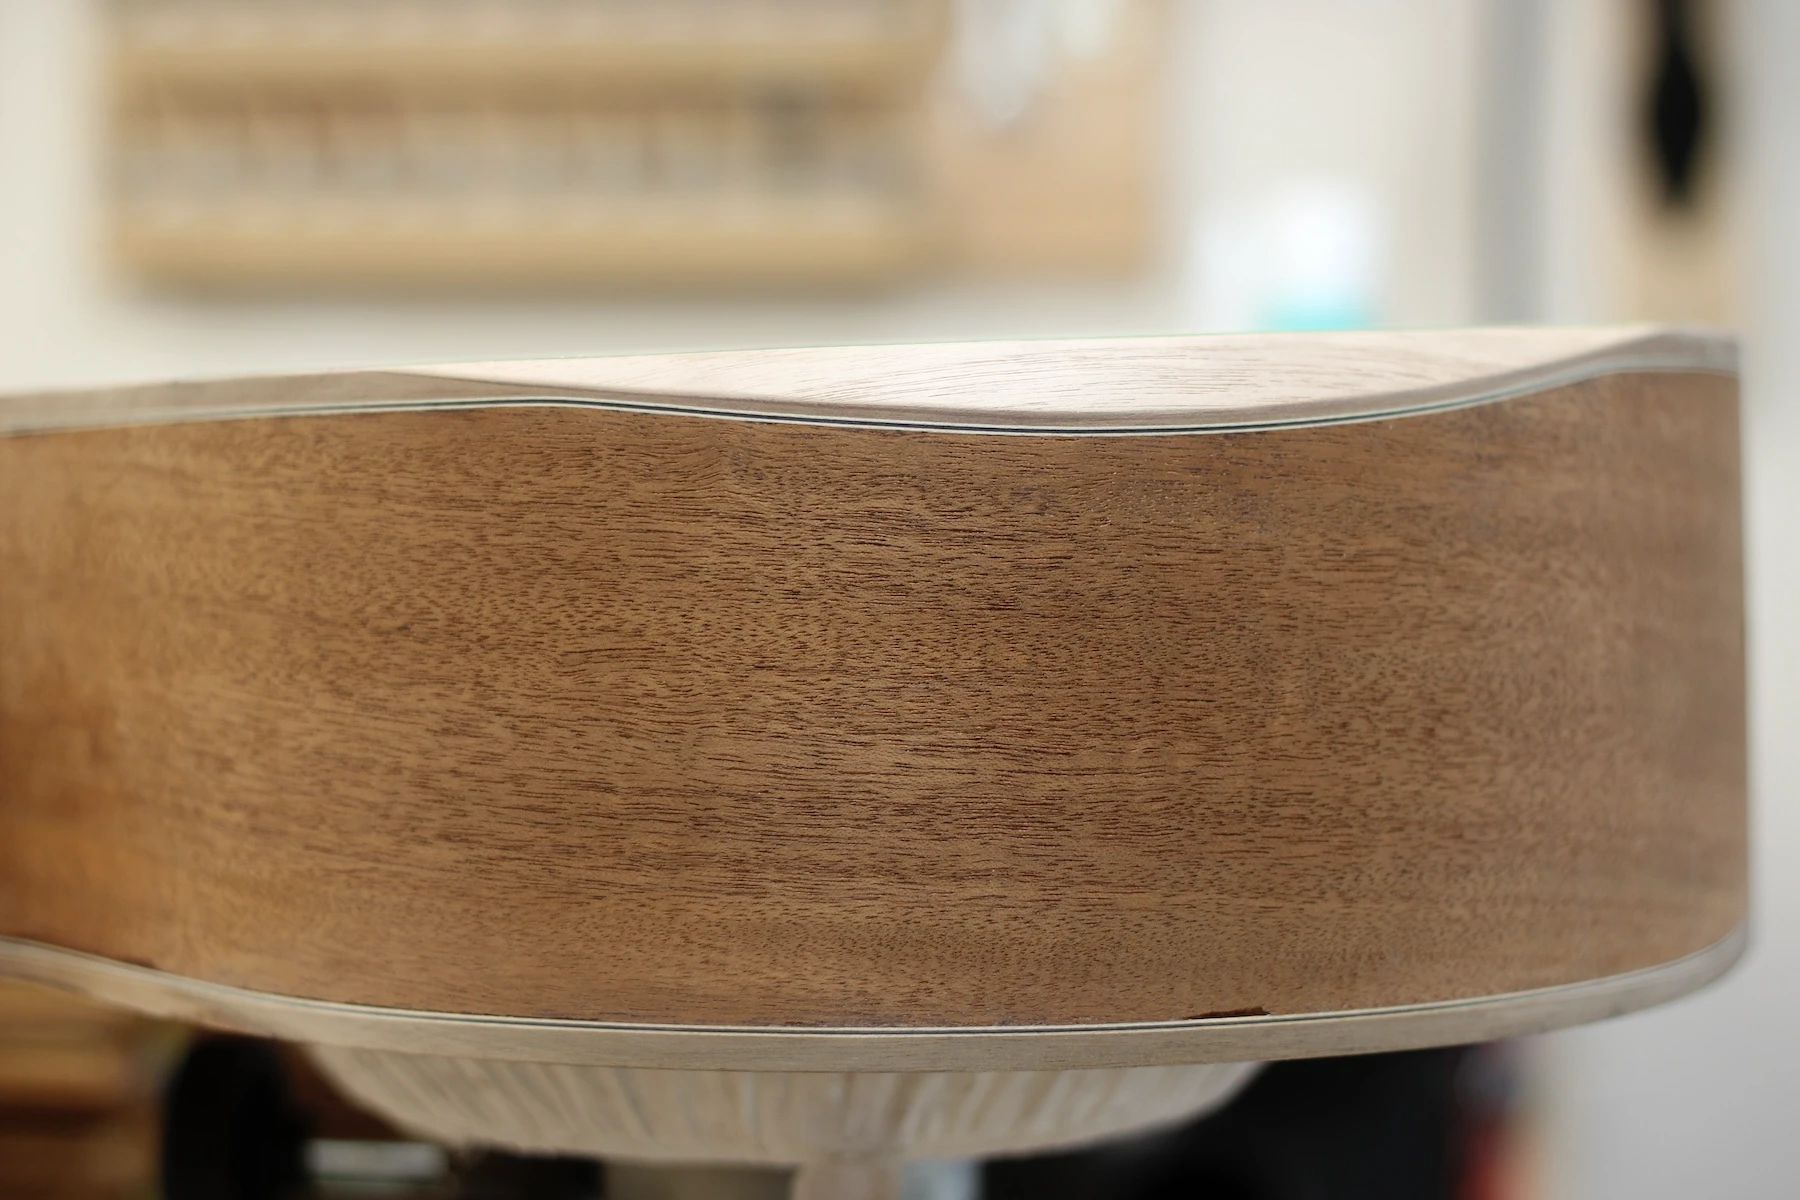
There is often a surprise waiting beneath these dark tinted lacquer finishes; either a painful surprise as I discover exactly why someone chose to paint the guitar, or a pleasant surprise as I uncover really lovely tonewood residing beneath the paint. This guitar did not disappoint. Lo and behold, the underlying Mahogany is quite lovely. I can already envision a new finish on this guitar that showcases that Mahogany!
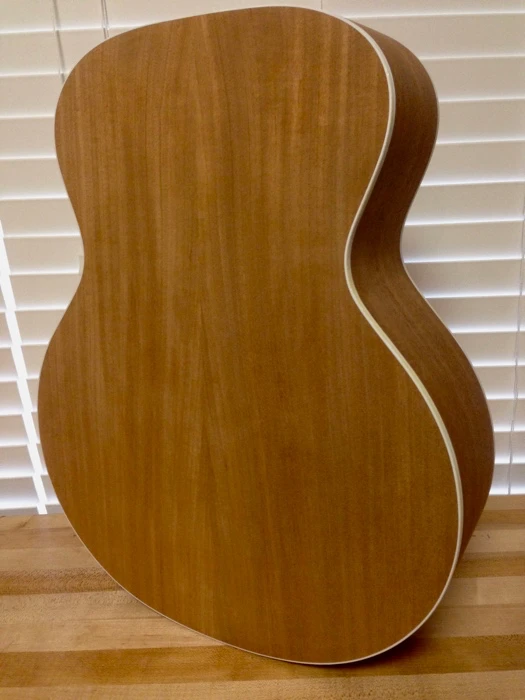
Mahogany Back and Sides
The Mahogany on the back and sides is very pretty, albeit a bit mis-matched. Yet there is insufficient justification for me to color a finish to cover the underlying grain. As a result, I will clear coat this guitar.
The new soundboard will be Bearclaw Sitka, having character to complement the strong visuals of the Mahogany.
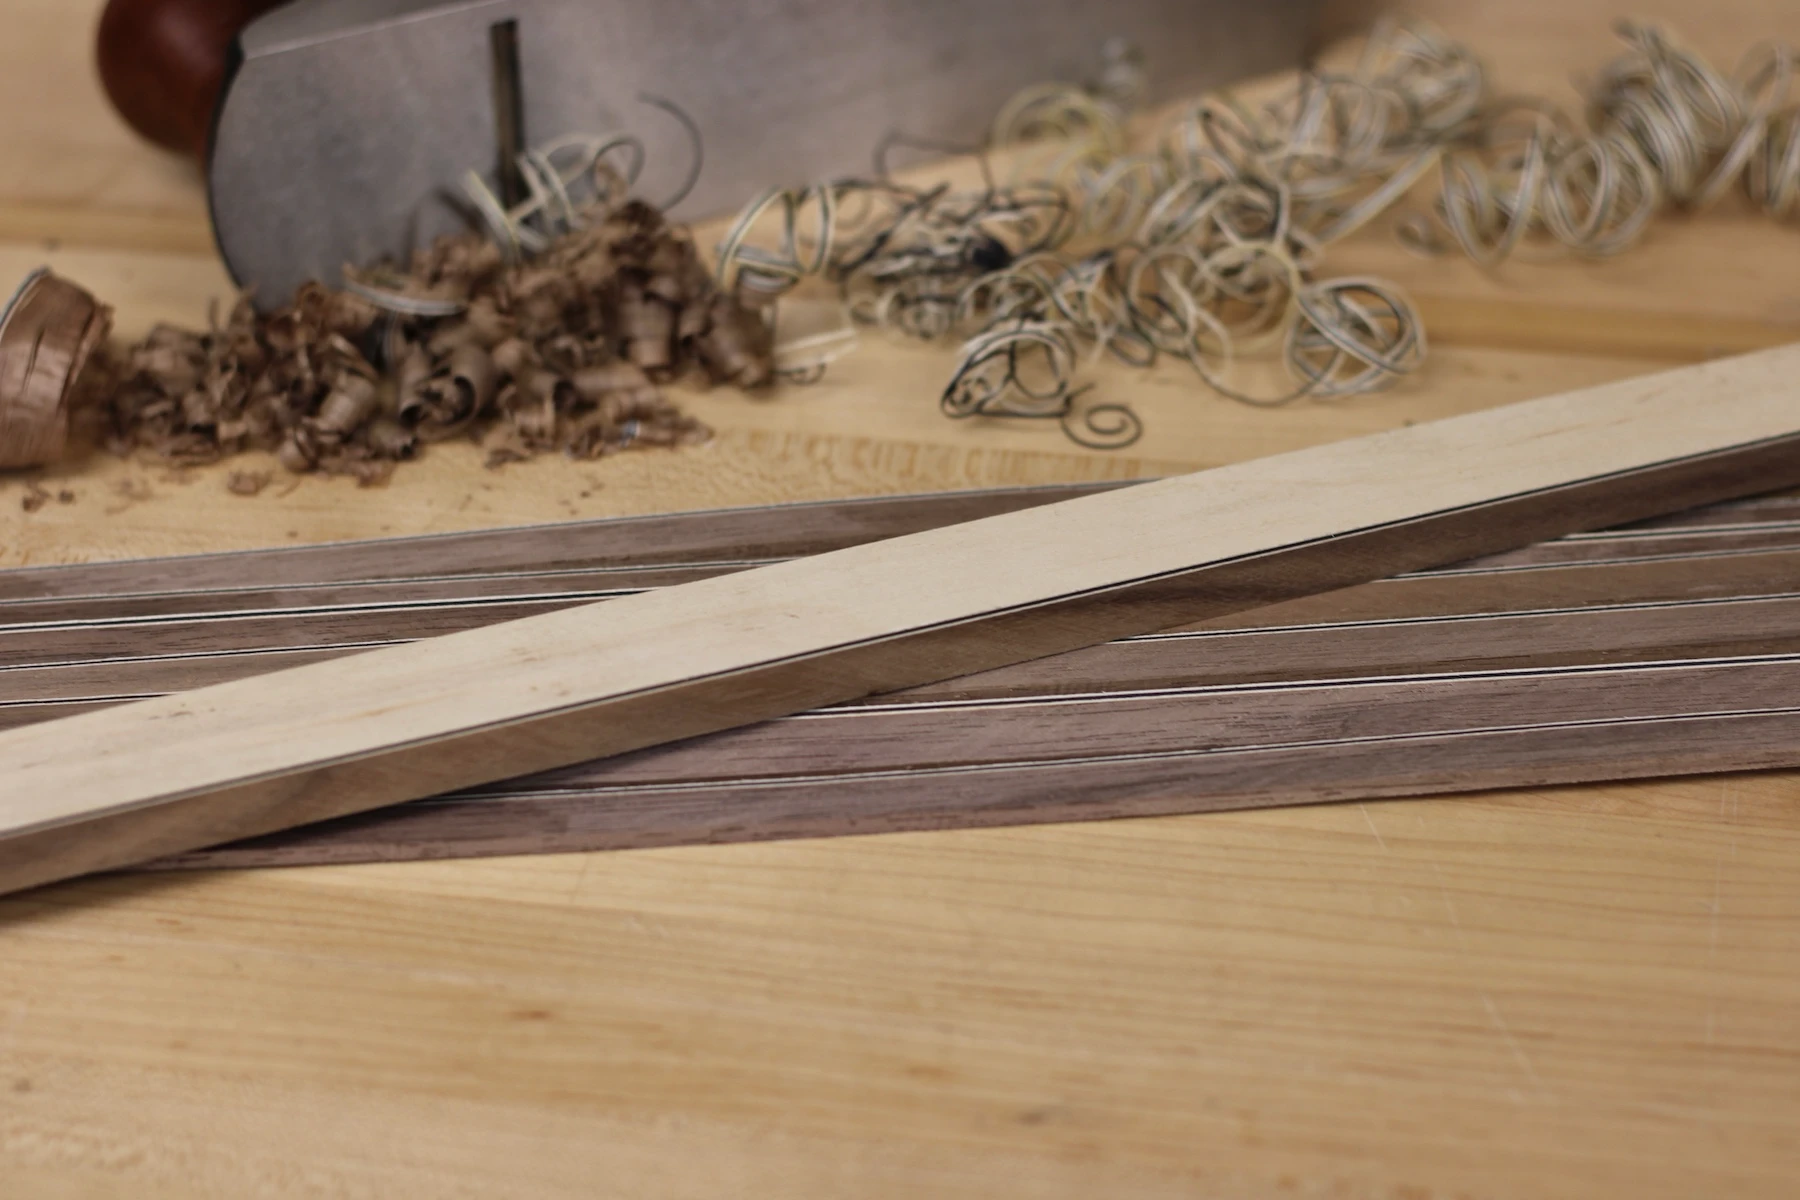
I will bind the body, soundhole, and fretboard in Walnut.
I have a healthy supply of stark white and vivid black wood purfling. I have used this in the past in lieu of the plastic black and white purfling common on these Guilds. But I want a more "woody" appearance for this particular 12 string, and stark white is not going to do it for me. I will use an off-white Maple with the black.
UPDATE: I finally decided to use Ziricote for the bridge, fretboard, headplate, and arm bevel.
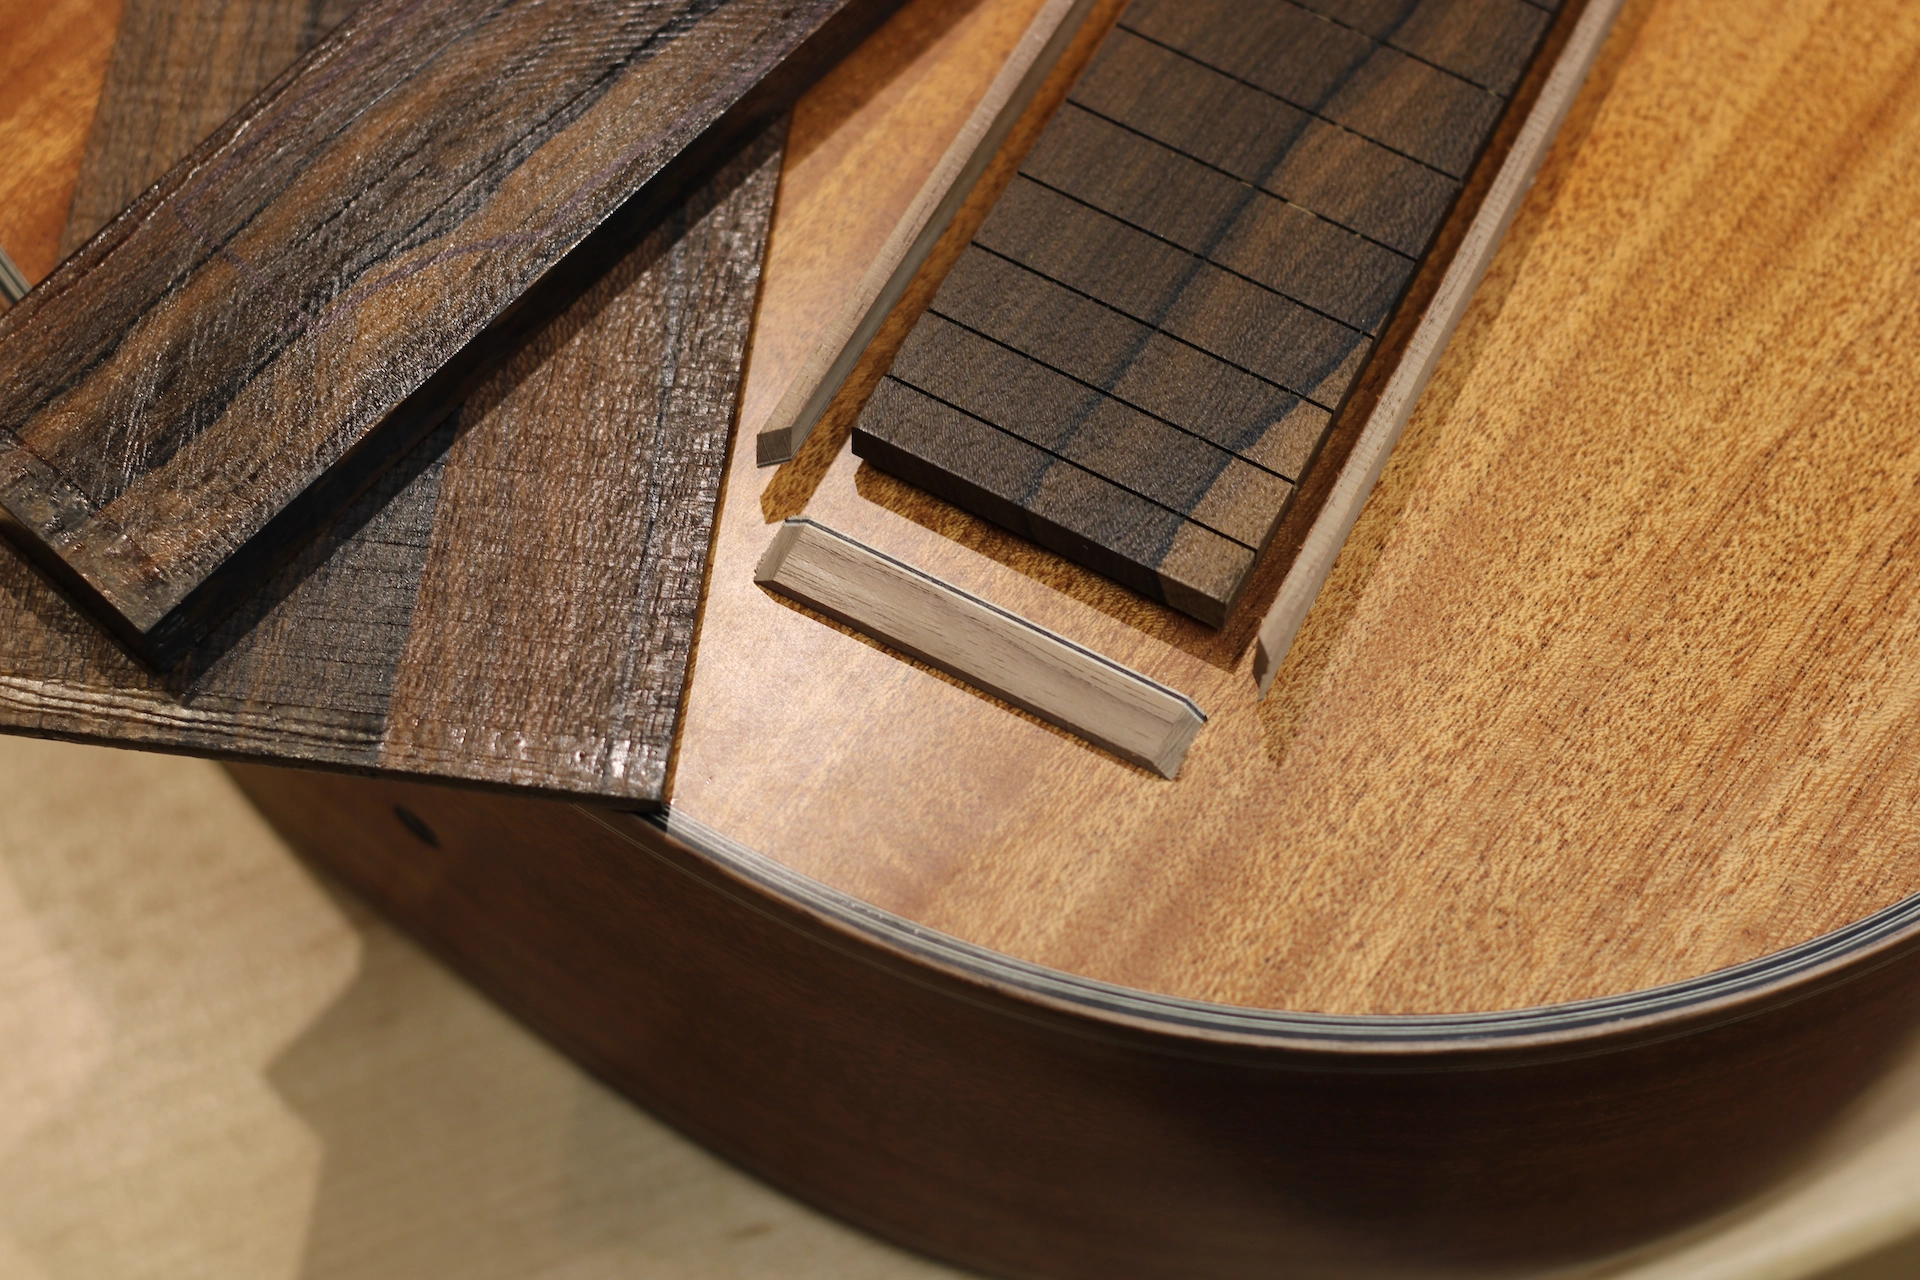
Color Scheme
I carefully removed the old soundboard, intending to preserve it, as it makes for a good reference top. There is very little difference between the soundboards of the 16" mini jumbos and the 17" jumbo 12 strings.
Old Soundboard
An "a-Ha!" moment has occurred. As I took off the soundboard, I noticed a tremendous amount of tension in the body. As I was completing the cut to remove the soundboard, the body of the guitar actually "sprang" open into a distorted shape (as opposed to simply staying put, in a rigid position, while I lifted off the "lid" so to speak). This amount of movement is evidence of the tension the soundboard was under whenever whatever force(s) caused the neck block shift and resultant soundboard shear along the fretboard extension.
I selected a set of wood from a group of really stiff Bearclaw Sitka tops I sawed up ages ago. I thinned the plates, then glued them together. Once the glue had dried, I gave the board a scratch with my fingertips to listen to it "talk" back to me. That sound always puts a smile on my face. As I had hoped, a sharp "rap!" against the board produces a bell-like "Dong..."
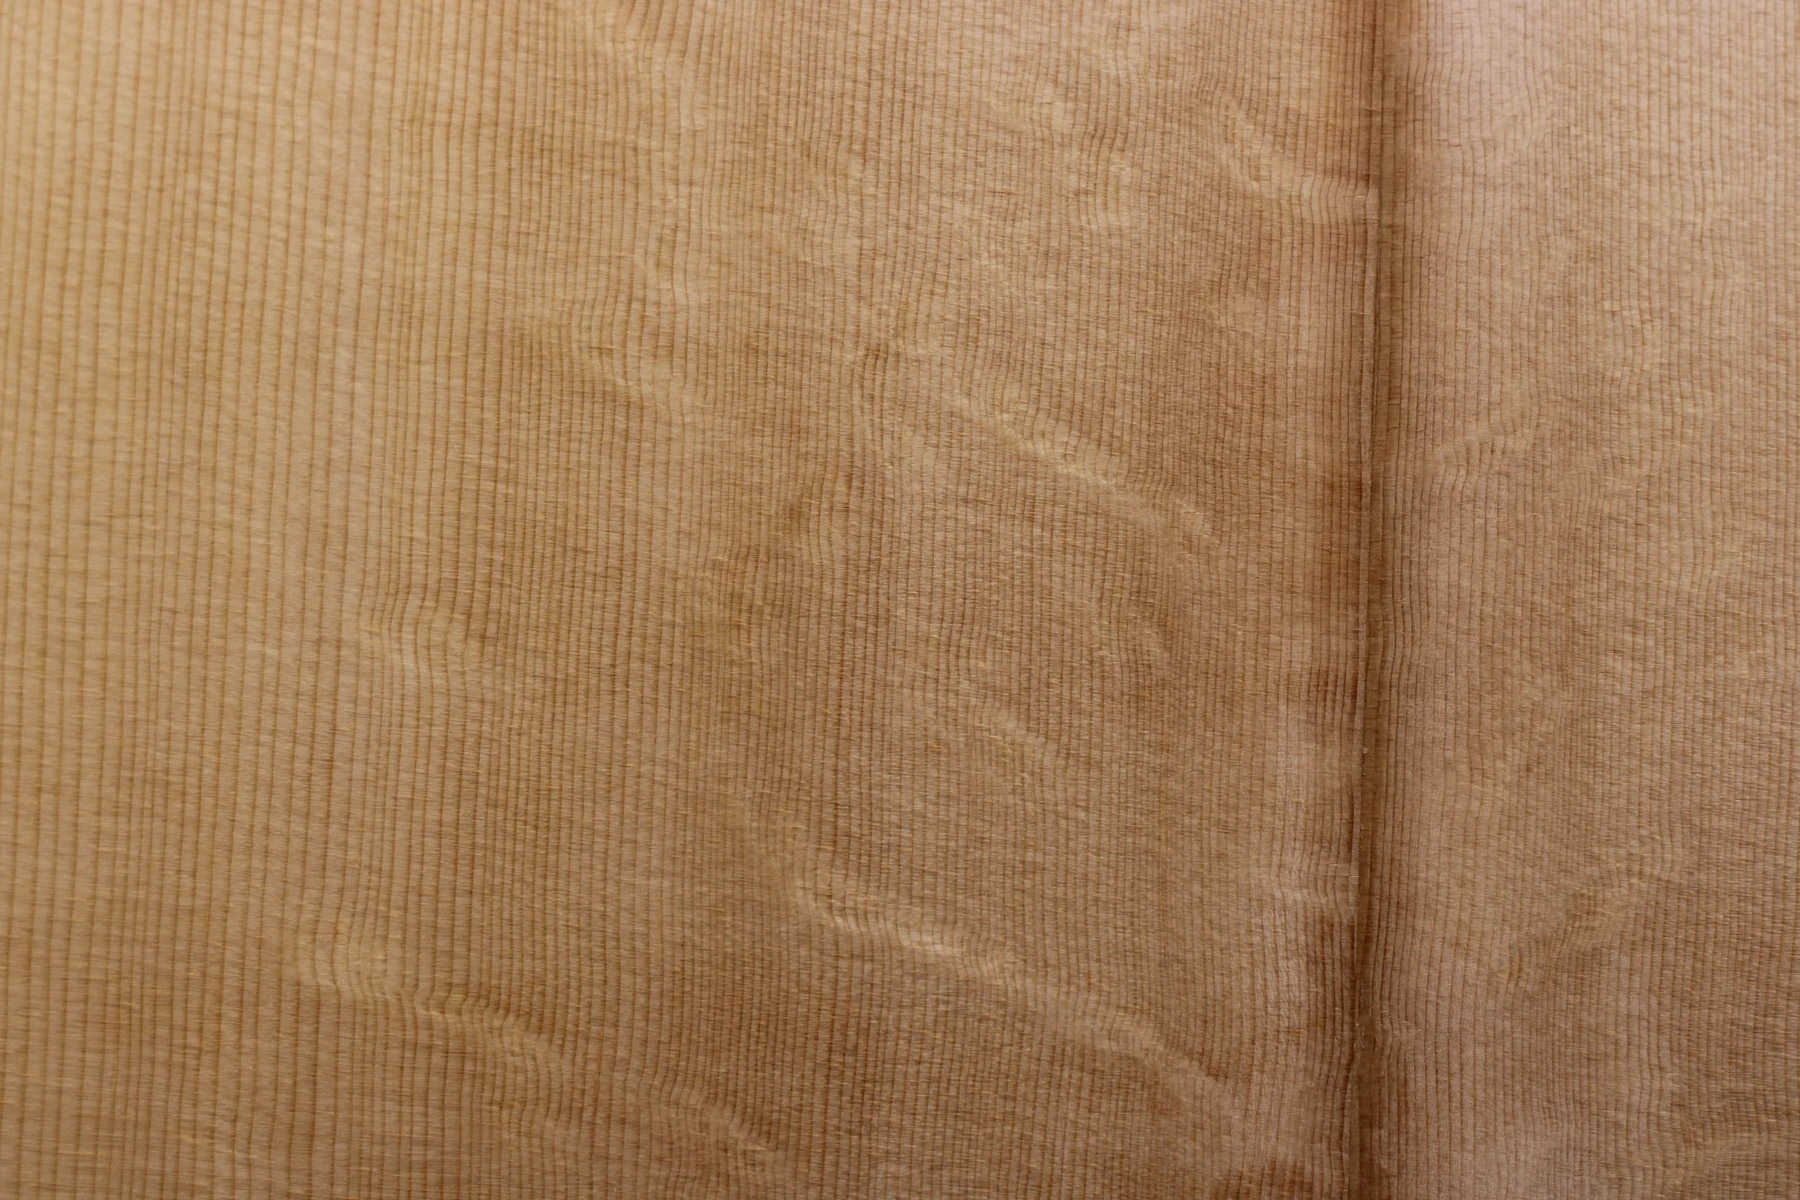
Bearclaw Sitka
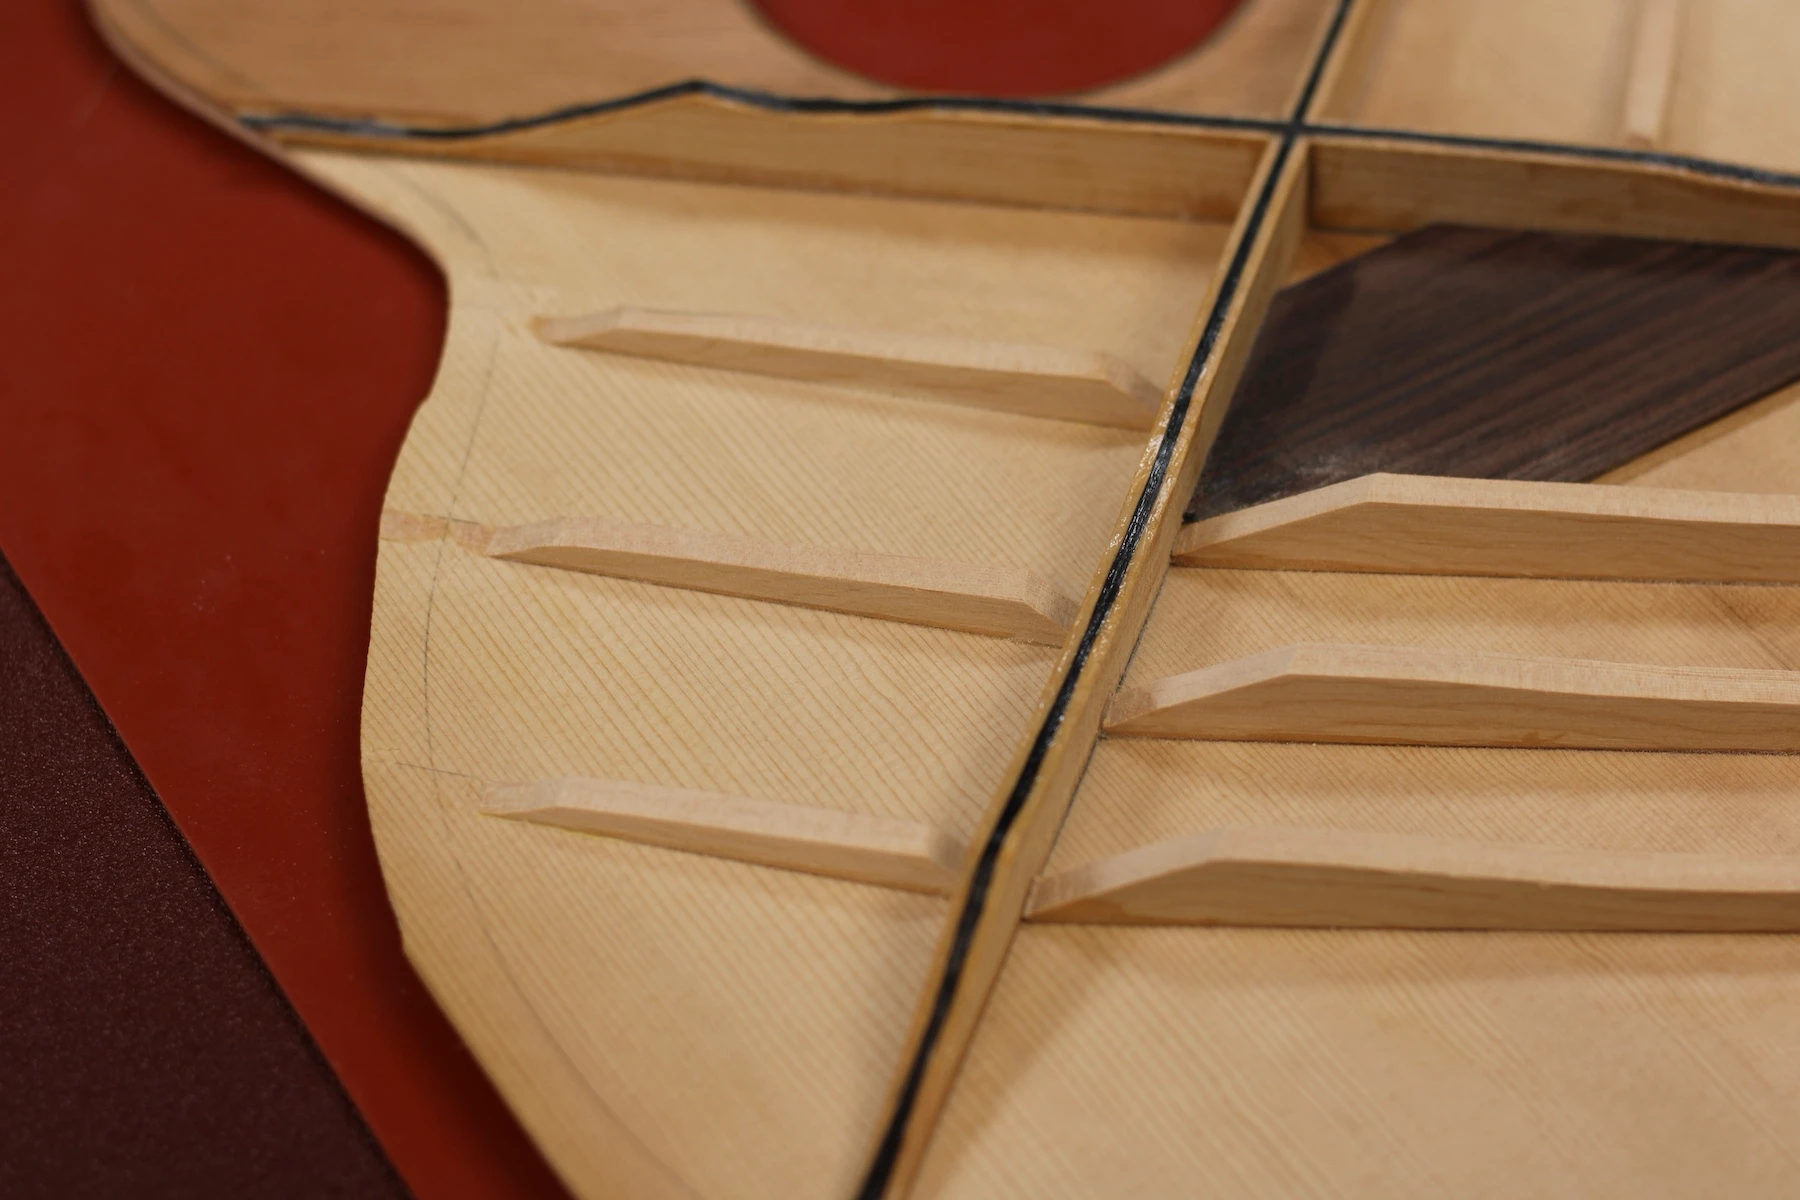
I have some lovely, old Sitka brace wood that I will use. The X-brace will be narrow and tall. I cut several pieces to size and shape them to follow the radius of the top using a router, a flush trim bit, and a template.
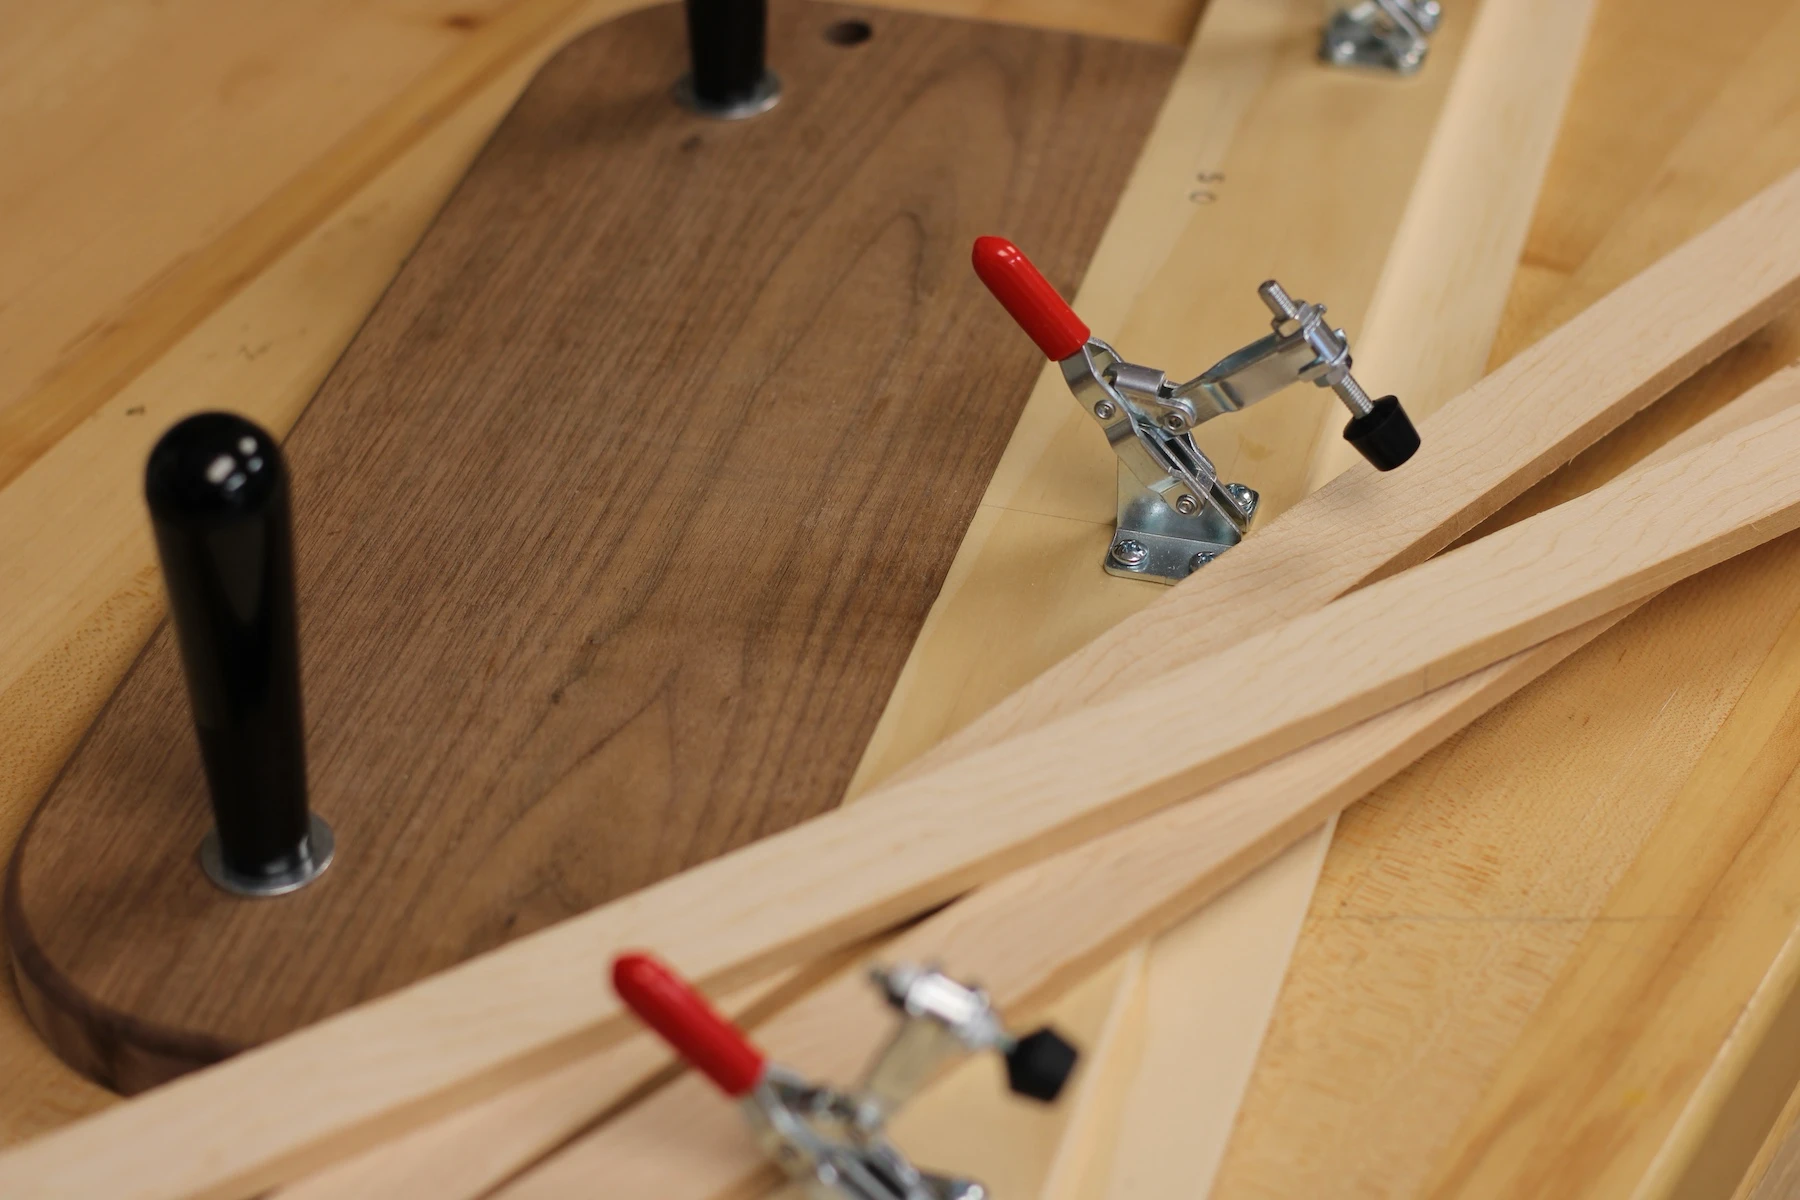
Brace Radiusing Jig
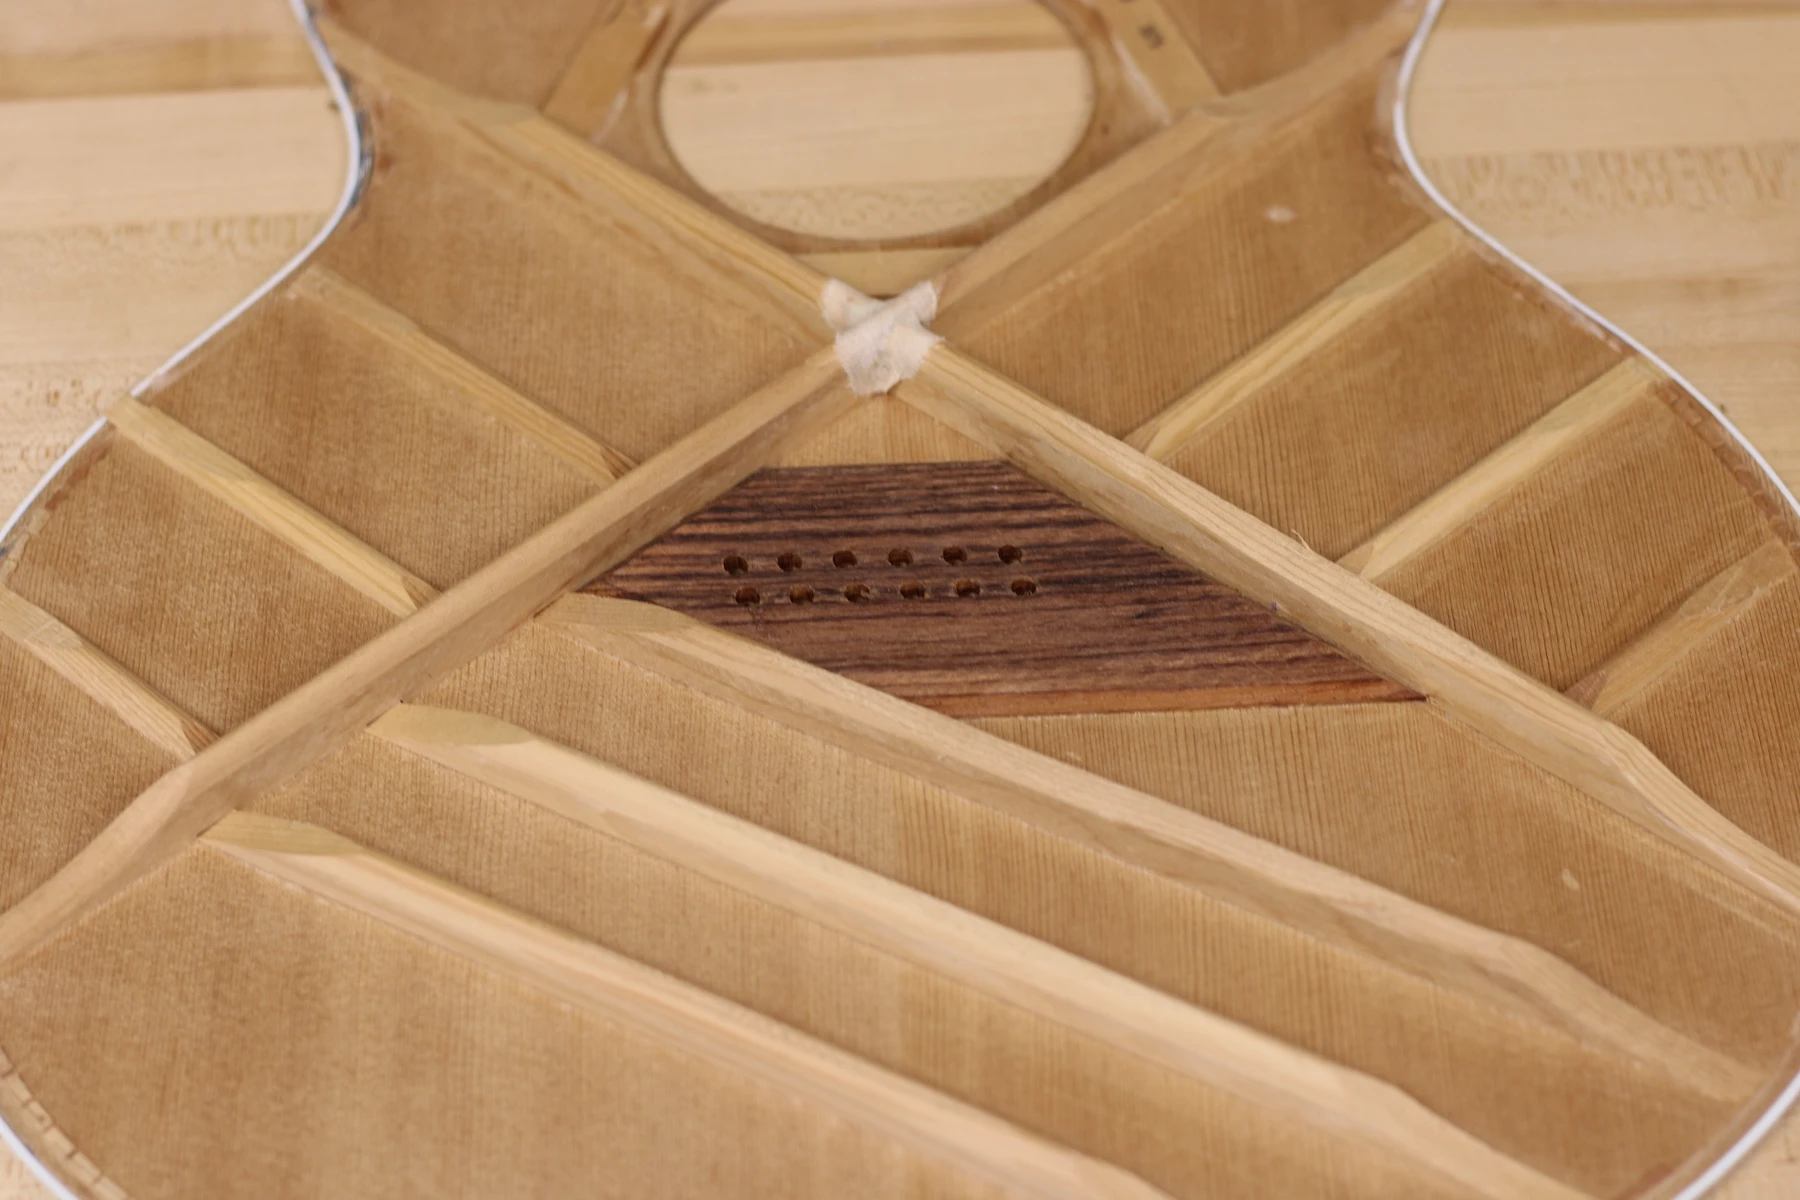
Having repaired, rebuilt, and re-engineered several of these Guild 12 string guitars over many years, I have developed my own bias, my own preferences for the bracing layout. This guitar will be no different, and I will follow the format I have proven to work, and work well.
I will apply carbon fiber tow beneath and atop the X-Brace. This effort significantly (as in, measurably) stiffens the bracing. Too stiff a brace will kill the sound. Too supple a brace will kill the soundboard. I achieve the proper stiffness through an iterative process that includes measuring the deflection of the soundboard under a particular load, removing brace material, and re-measuring. Over the years, I have arrived at optimal target numbers for that deflection depending upon the desired performance of the soundboard.
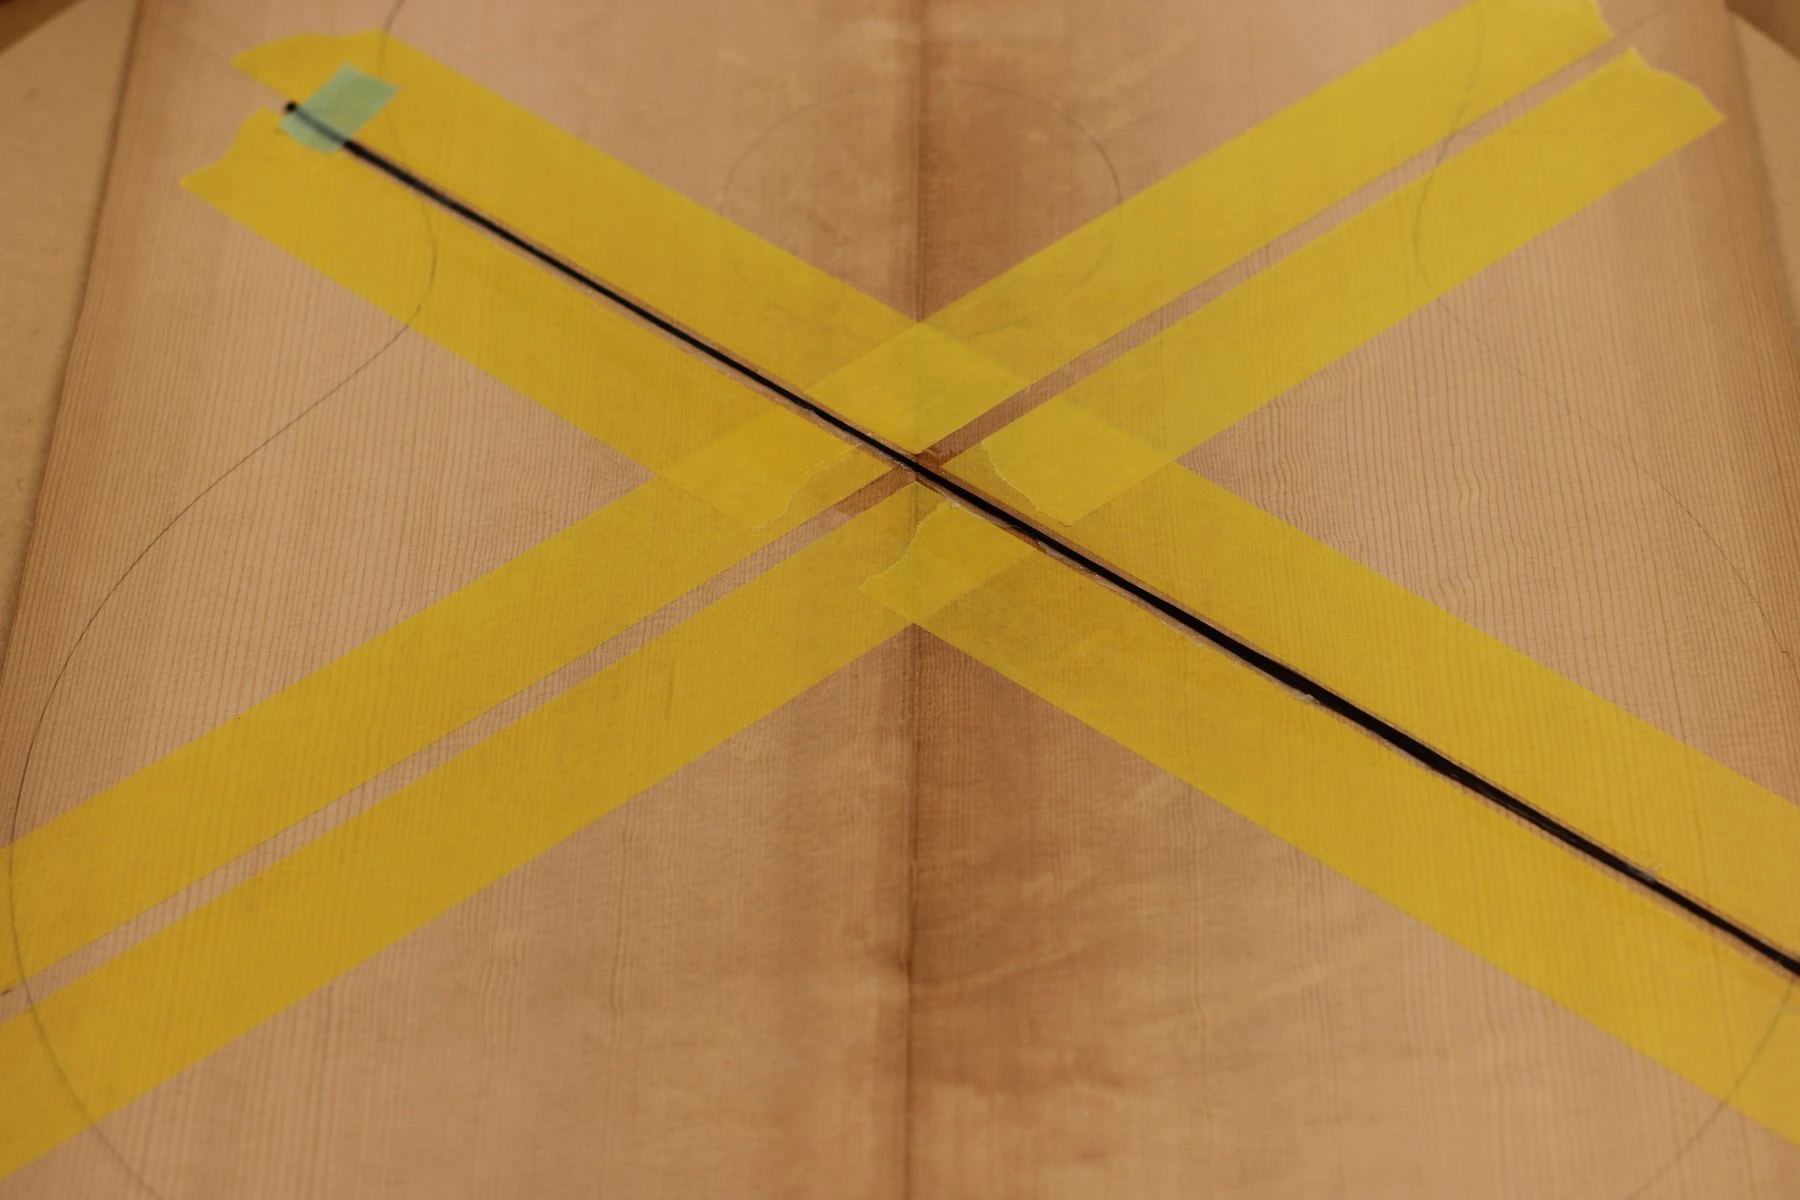
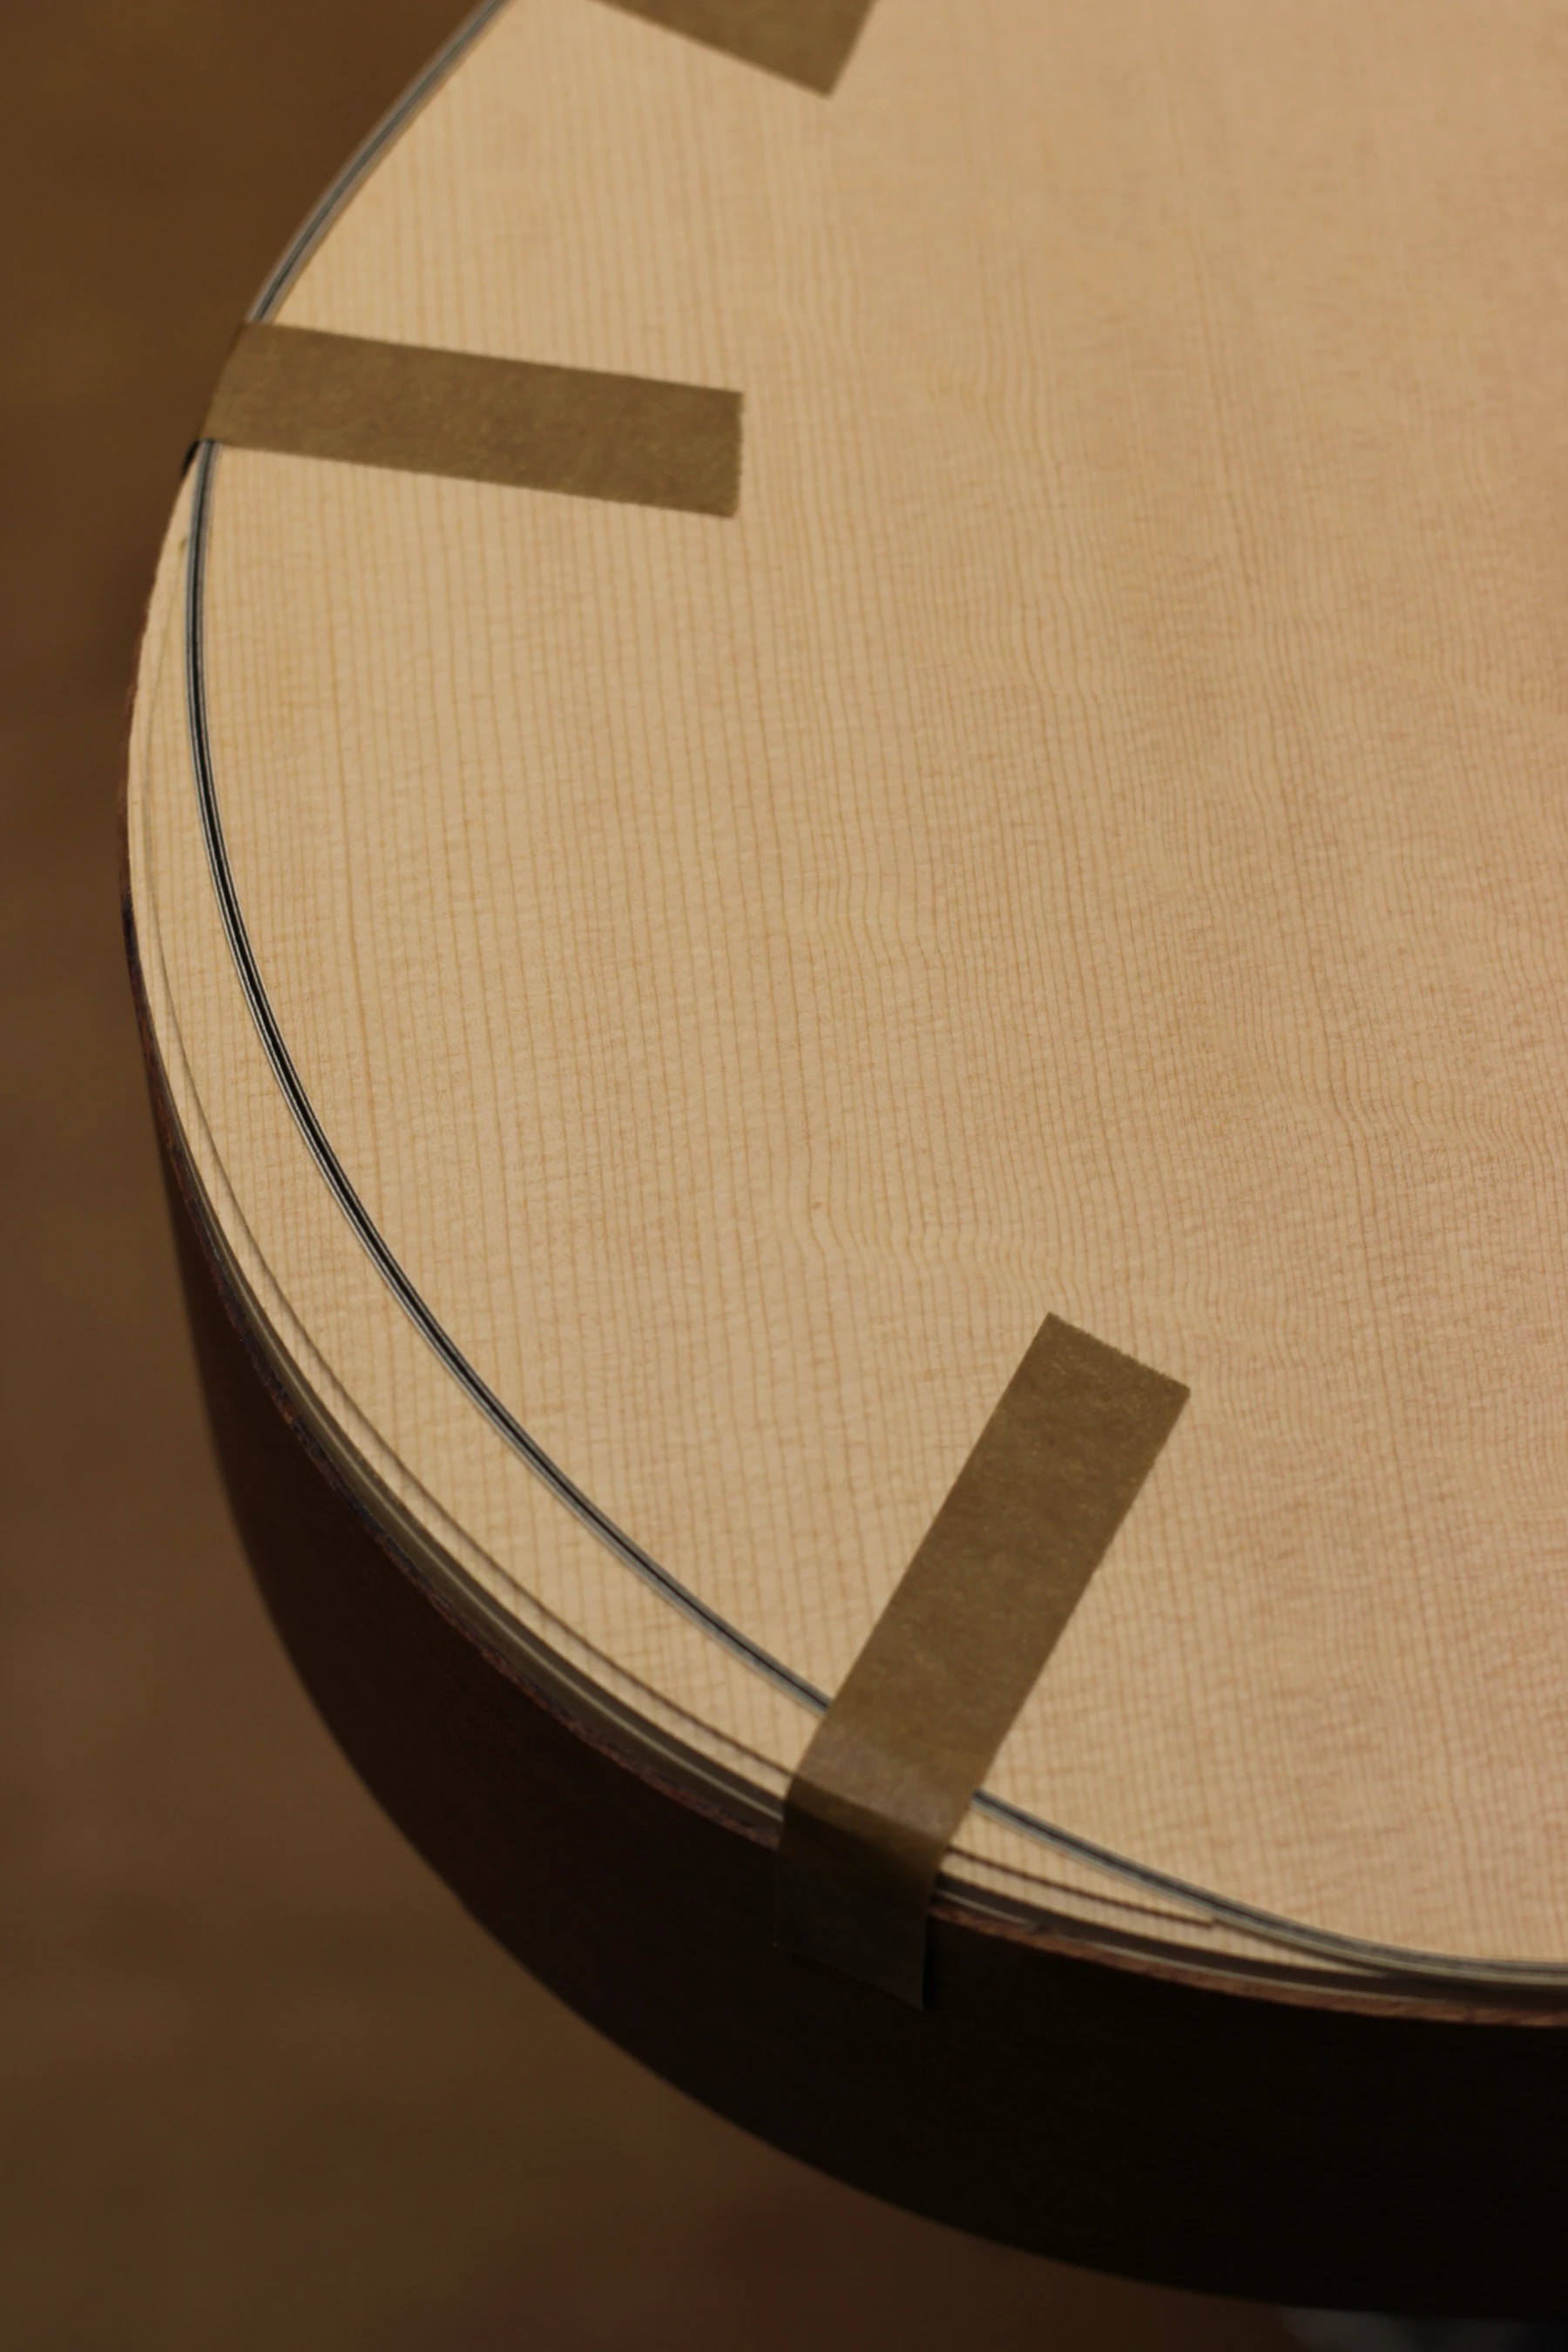
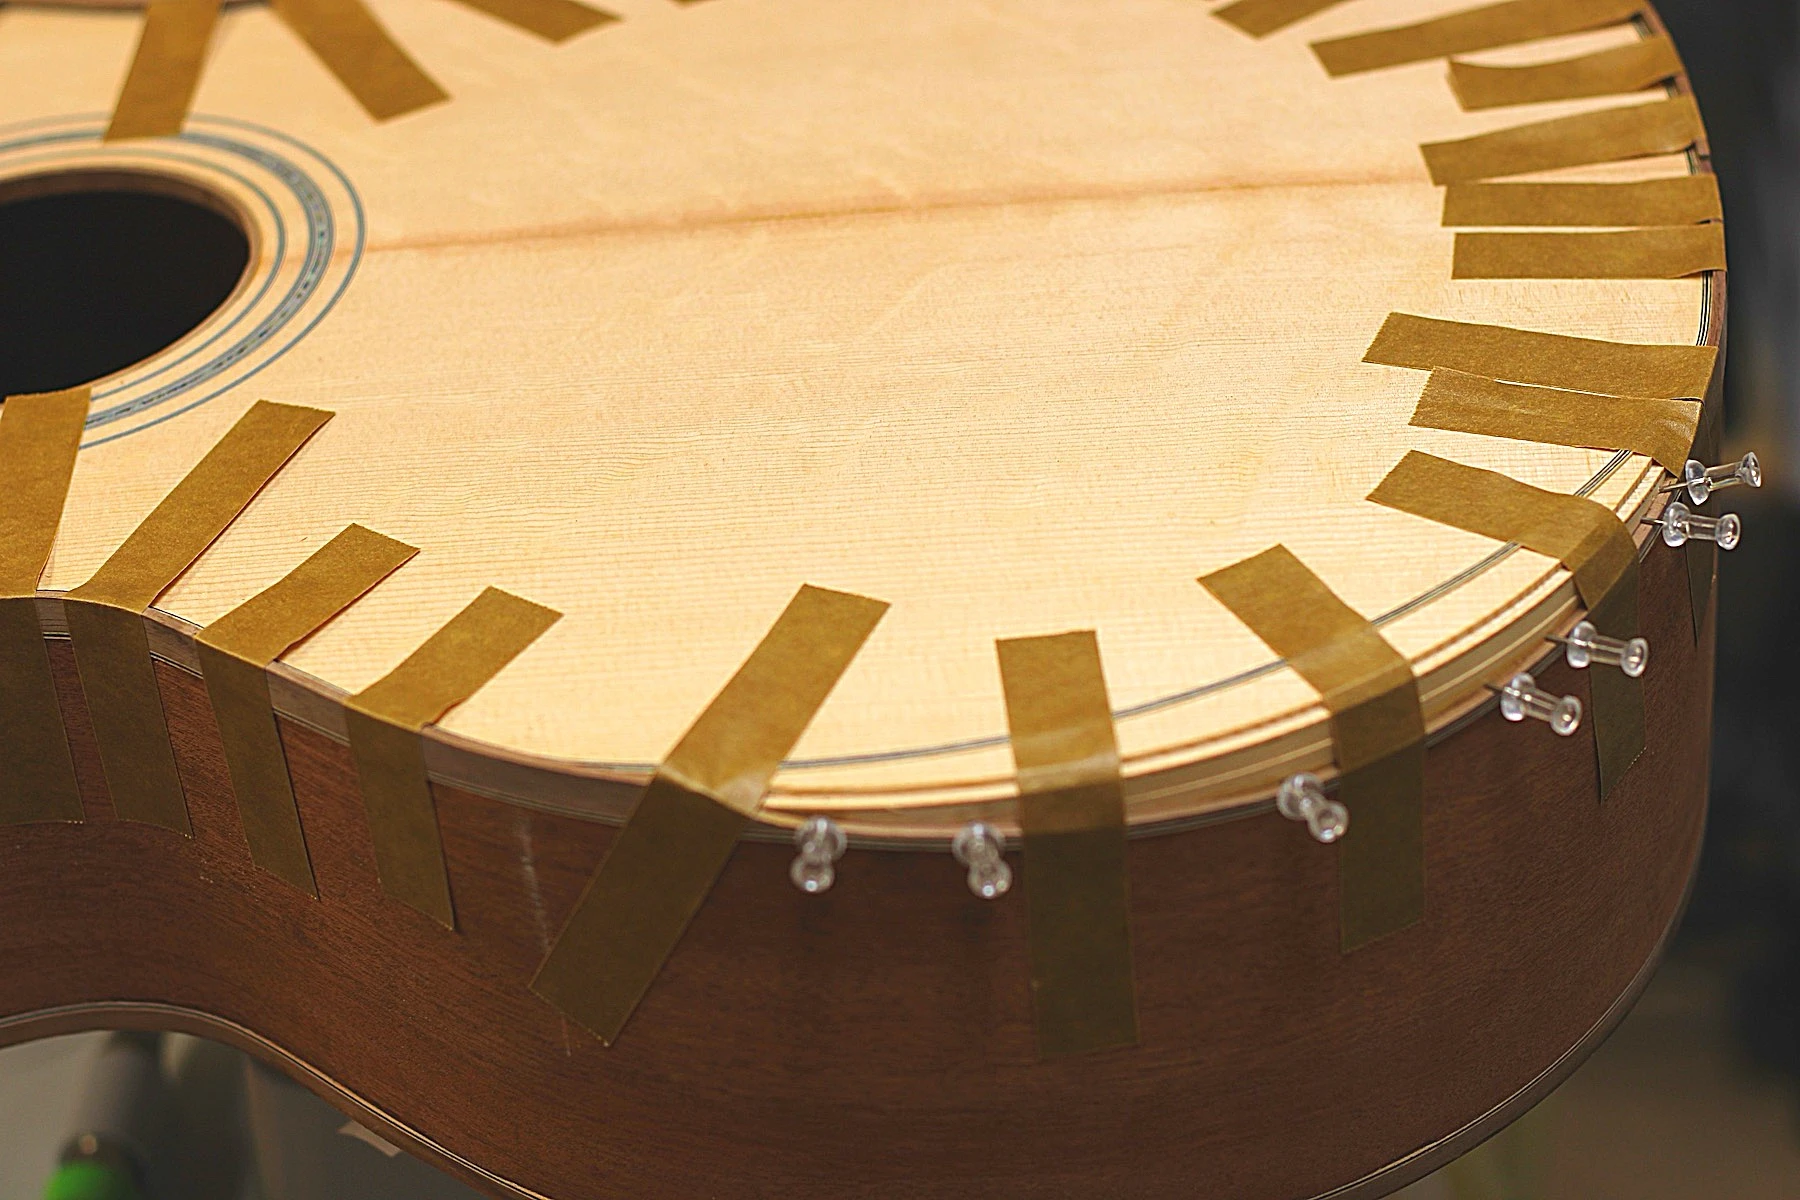
I tape off the soundboard to help position the X-Brace and to assist with cleanup of the glue. The braces and the upper bout reinforcement are all bonded to the soundboard using Superbond epoxy. In addition to adding stiffness, using epoxy virtually eliminates glue failure issues, such as creeping or popped braces. These soundboards produce a bright and crisp response, and I can be confident of their performance over time.
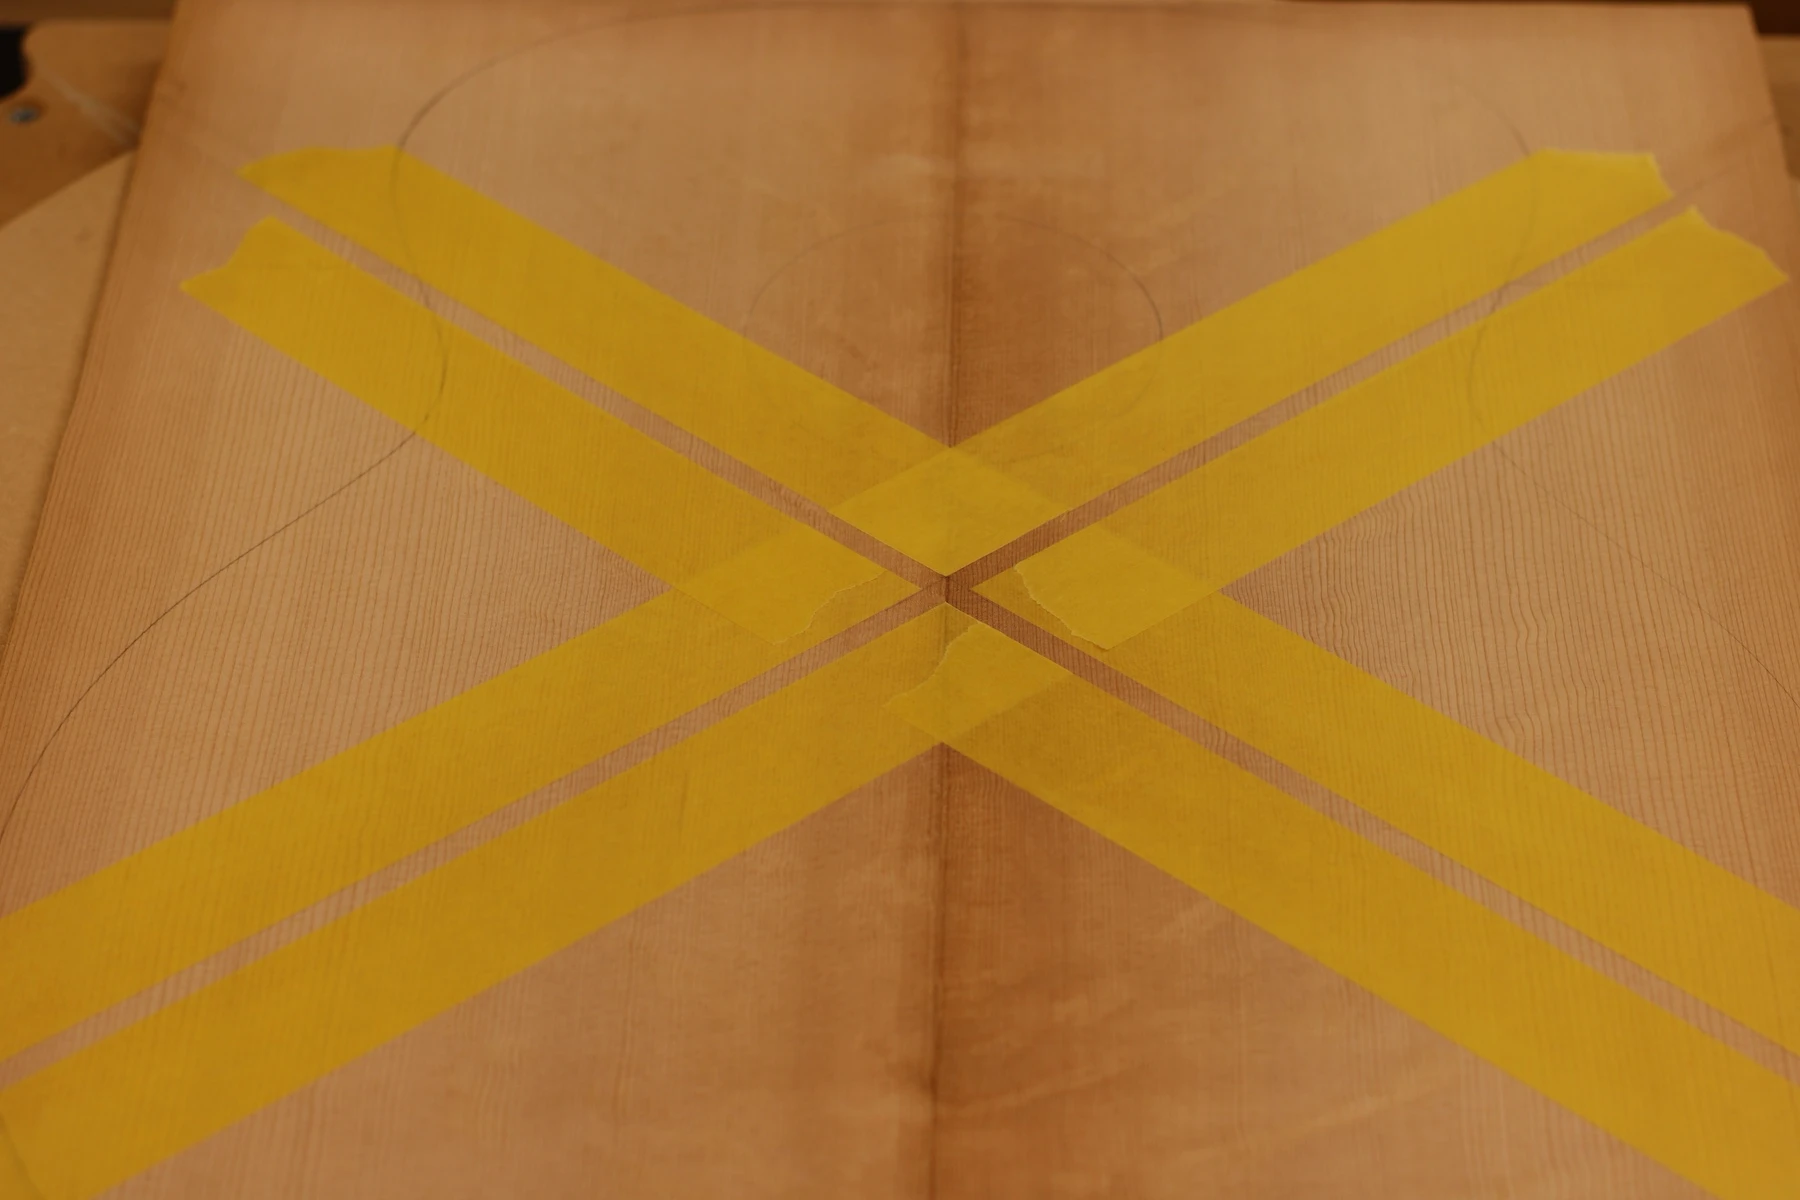
Tape for positioning the X-Brace
First I carefully lay the tow in a bed of epoxy...
Carbon Fiber Tow
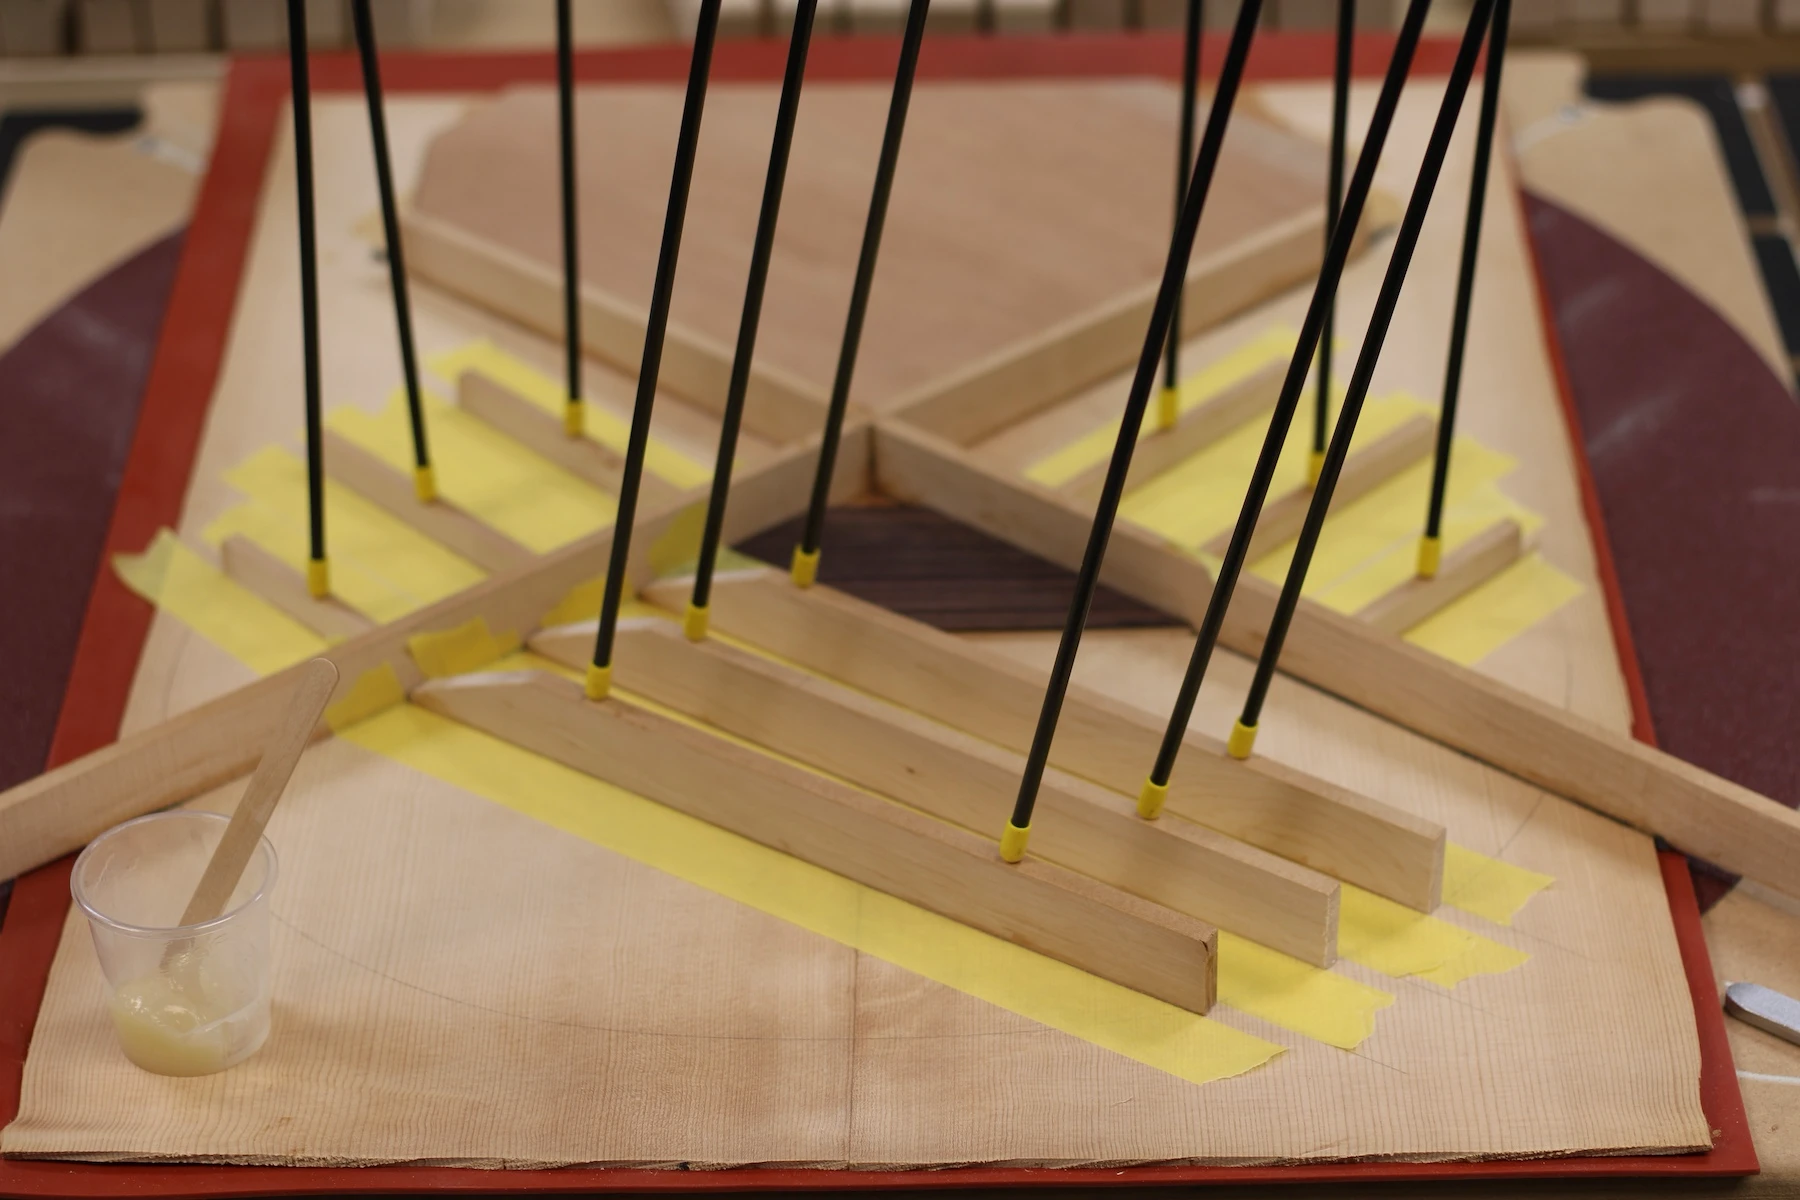
...then I rest the X-Brace on top of the tow, secure the braces using the fiberglass rods in my go bar deck, and wait for the epoxy to cure.

X-Brace Glue-Up
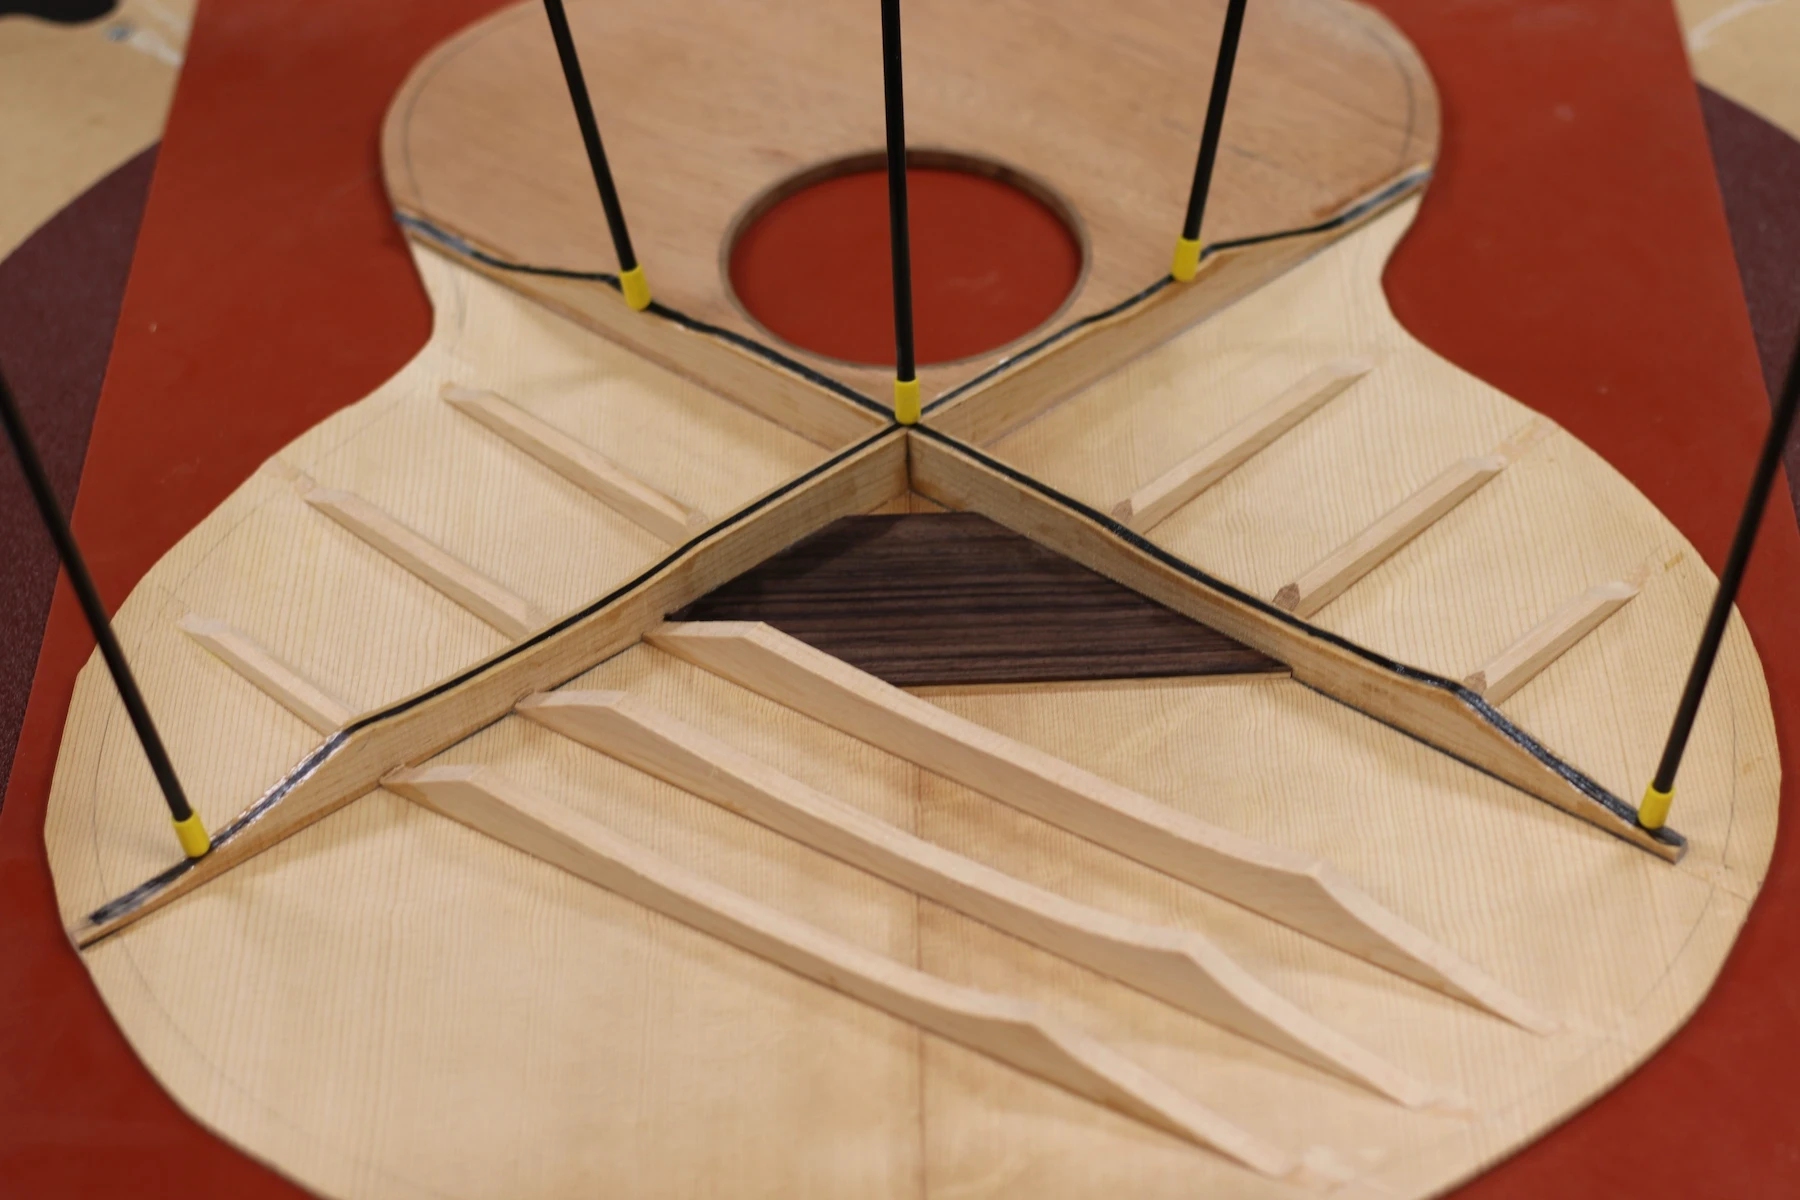
It is now time to add the bridgeplate, butting it up against the lower legs of the X-Brace. Traditionally, Guild used Rosewood bridgeplates on these instruments. I have had such success with my laminated Rosewood and Maple bridgeplates on these guitars that I see no need to alter my technique. I get both the bright response of a Maple bridgeplate and the more gnarly, hard-to-tear-up bridge pin holes of an oily Rosewood bridgeplate.
The so-called "Tone Bars" are braces that extend across the lower bout, touching the lower leg of the X-Brace on the "treble" side and terminating just short of the kerfing on the "bass" side. Guild used three braces for this purpose. While two are sufficient, changing the number of bars definitely alters the sound of a Guild 12 string into something other than the sound of a Guild 12 string, and I do not want to do that.
The "Finger Braces" extend from both lower legs of the X-Brace up toward the waist. The original soundboard tied these small braces into the sides. I have discovered better performance by terminating them short of the sides. This leaves only the four (4) ends of the X-Brace to rest upon the rims of the sides.
Additional Braces
You may have noticed that, up to this point, there is no soundhole visible. Traditionally, the soundhole is cut in the soundboard and any purfling, rosette, or binding work is added prior to flipping the soundboard over and adding any bracing. Because I add reinforcement to the upper bout in the form of two (2) layers of Mahogany (being careful to achieve three (3) separate grain directions), I *can* cut the hole first, laminate the veneers, then re-cut the hole through the veneers, and I will do this on builds where I am not binding the soundhole (see photo, below).
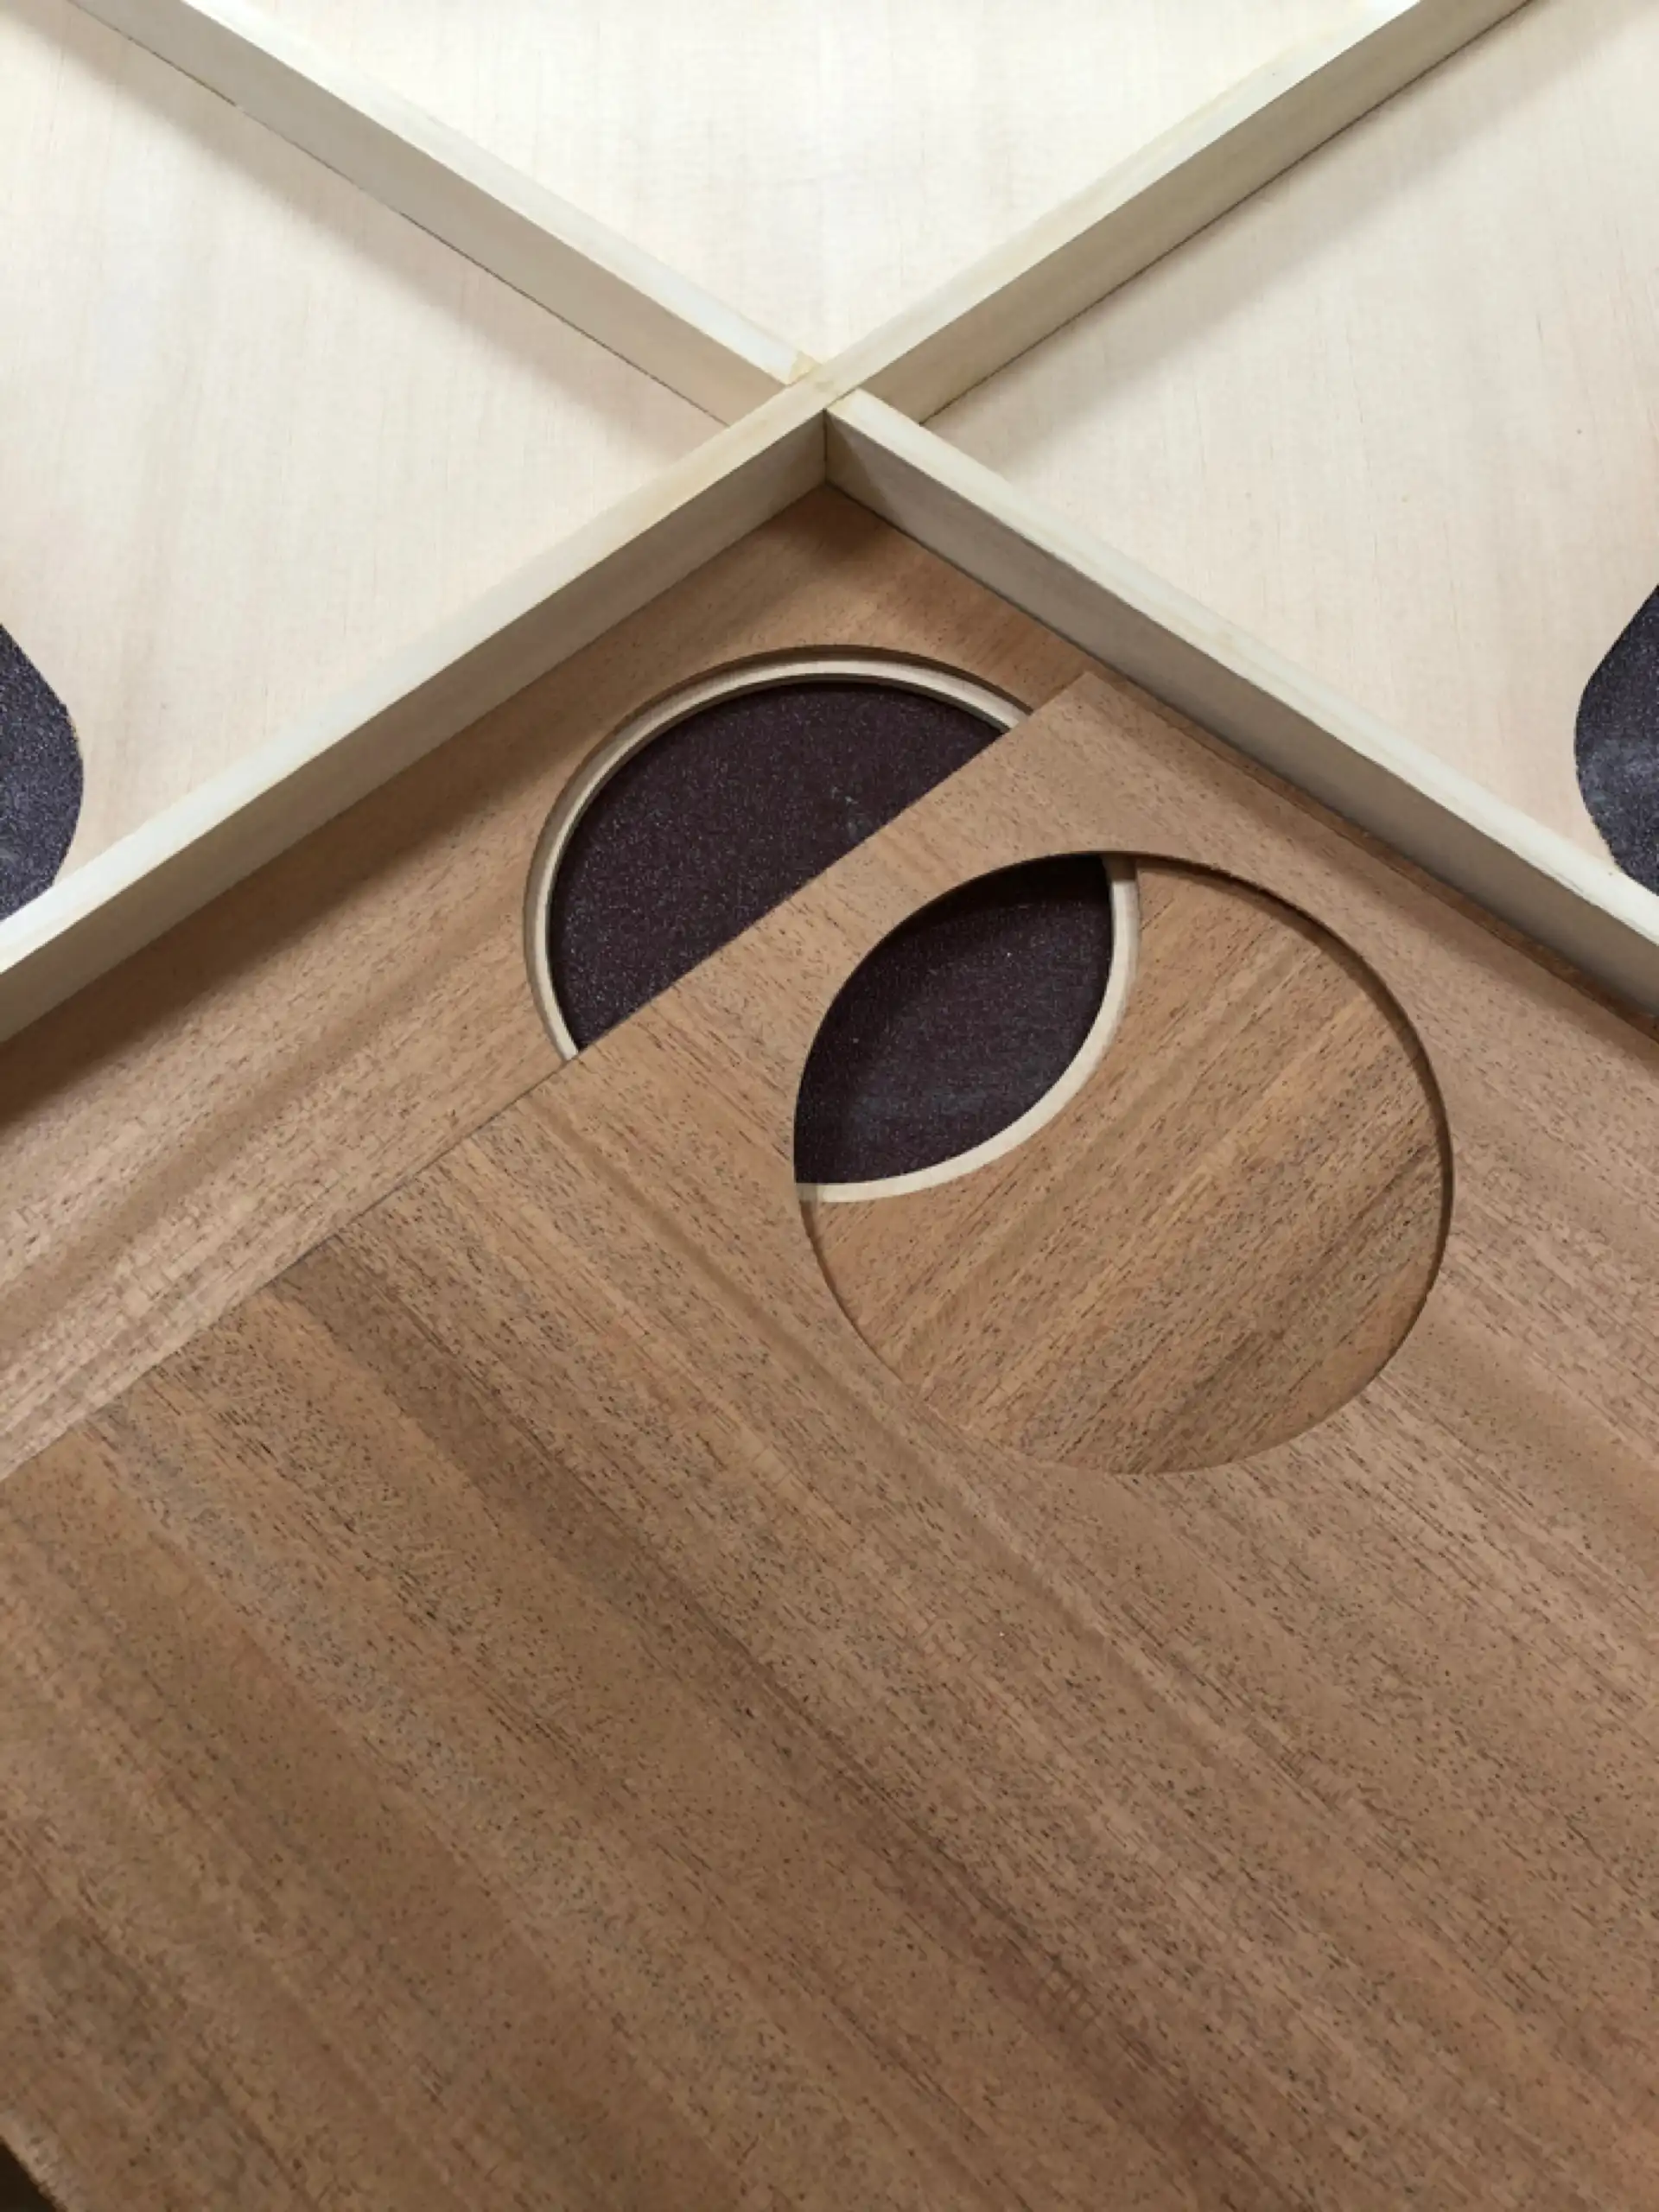
Unbound soundhole cut first, then laminated
For soundboards having bound soundholes, I have found it preferable to first add the X-Brace, then add the veneers, then add the additional braces, then flip the soundboard over to the face side and address the soundhole.
I am appointing this F-212 with Walnut binding instead of plastic, and that includes the binding around the soundhole. Using Paua shell and wood purfling, I approximate the look of the plastic ringed "rosette" used on the original soundboard.
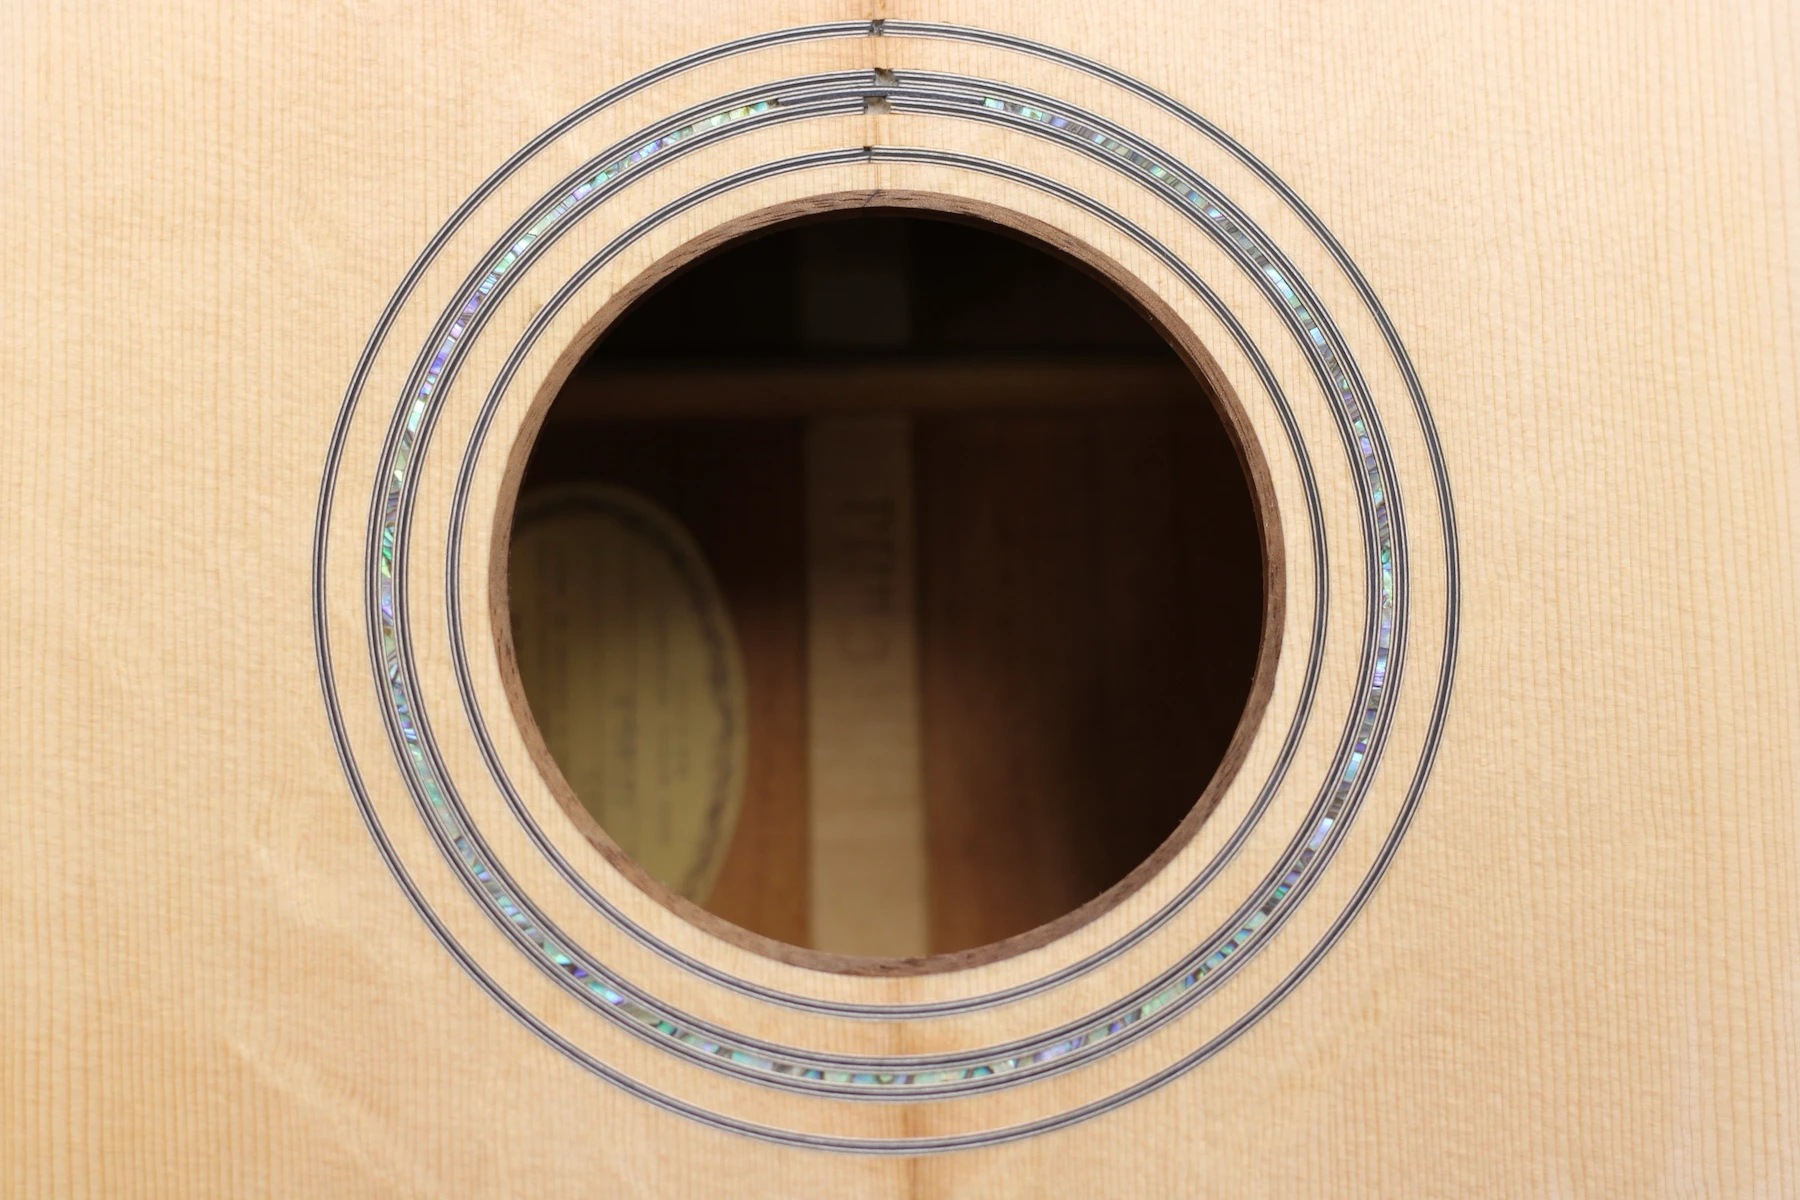
Soundhole
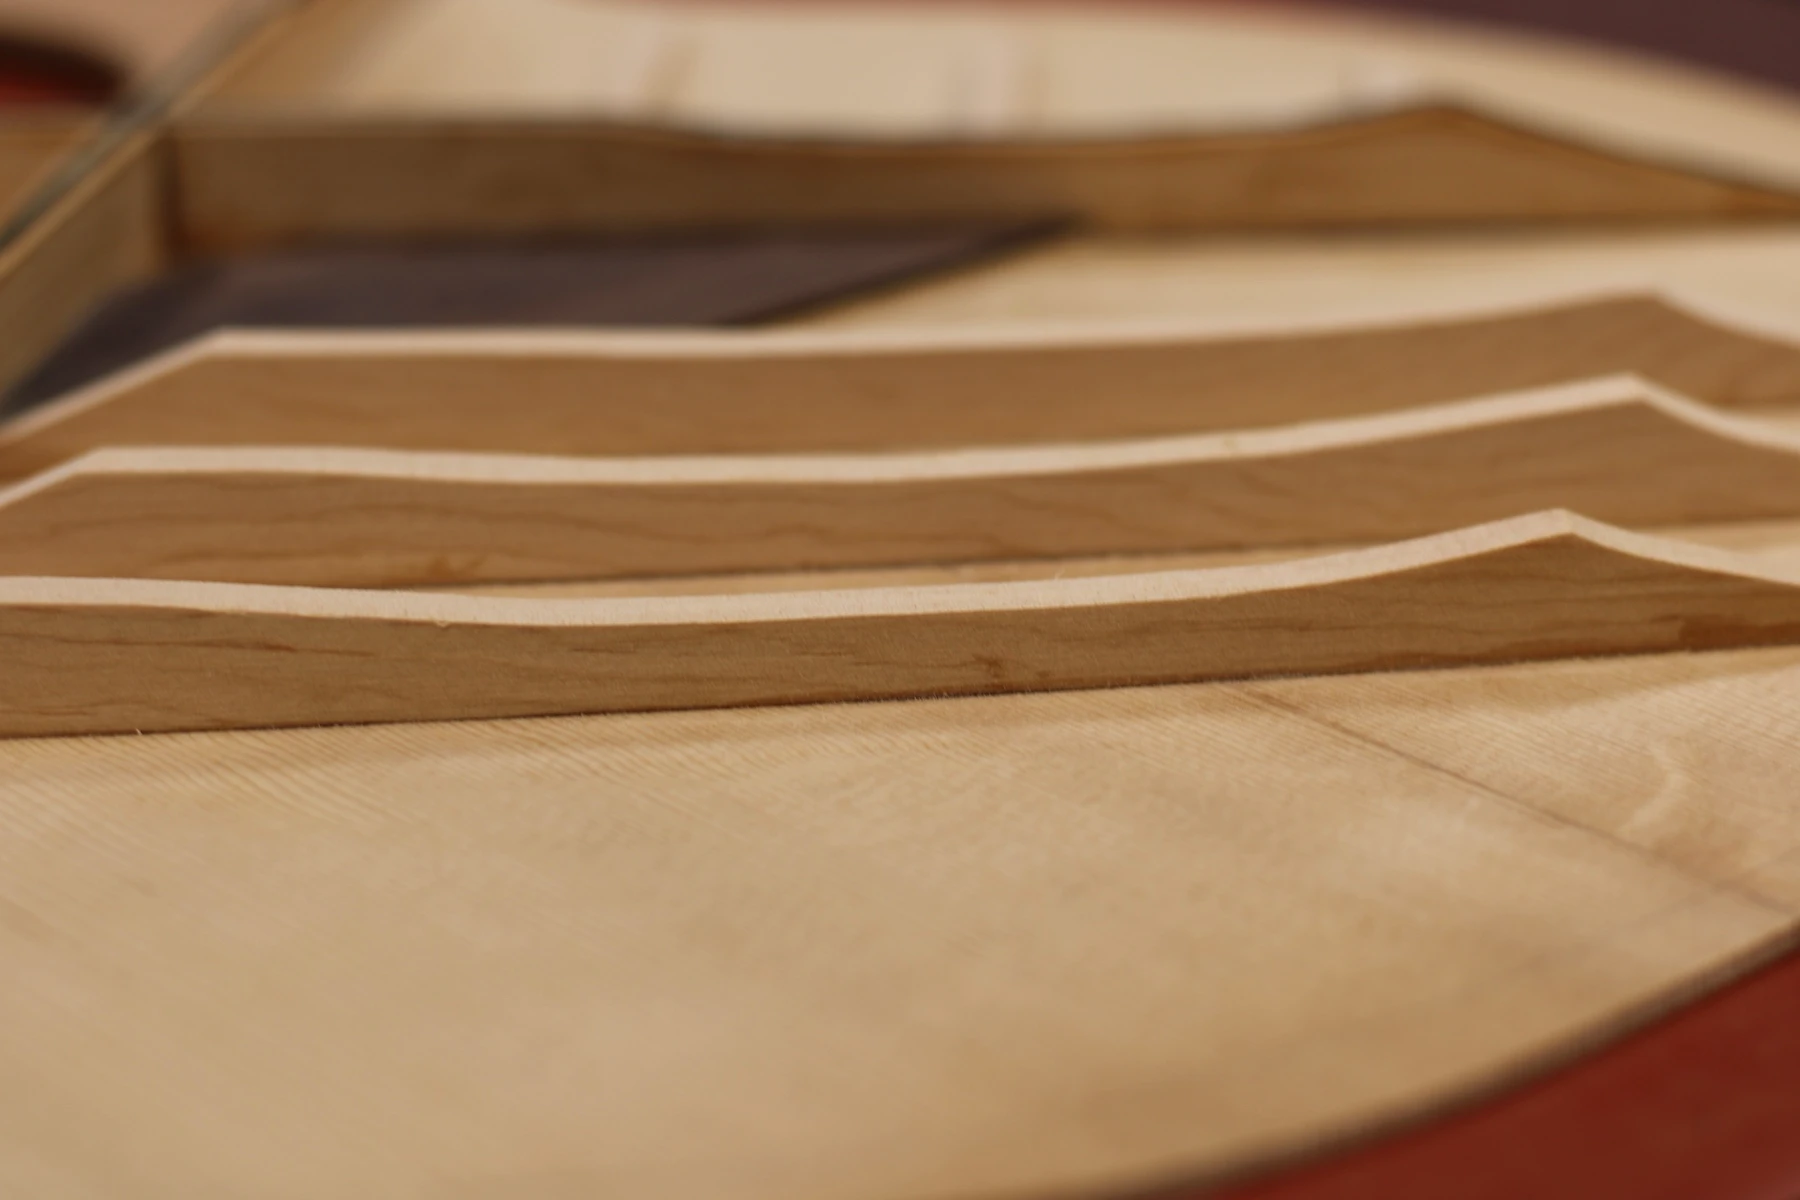
With the soundhole now complete, and before I can add the tow to the top of the X-Brace, I will carve the brace(s), reducing unnecessary material. To determine how much material to remove I suspend the soundboard on the four ends of the X-Brace and, using a weight and a dial indicator, I am able to measure and target the deflection I am looking for. Once the braces are carved, I add the tow to the top surface of the X-Brace.
Is it possible to build a soundboard stiff enough to stand on? Yes, but that is not the objective, as it will produce a lifeless-sounding instrument.
Does shaving a brace weaken it? Absolutely! That is the point. The strength of the brace needs to be relative to the responsiveness expected from the soundboard. Too strong a brace results in deadening the sound. Too light a brace may not provide sufficient structural support to protect the instrument from collapse.
X-Brace Tow
Once the epoxy has cured on top of the X-Brace, the soundboard has stiffened up again (significantly). I continue the iterative deflection test process, in combination with "tapping" the soundboard to hear the response, and remove the rest of the material from the Tone Bars and Finger Braces until I am satisfied.
Carved Tone Bars
The soundboard is now complete.
Soundboard Complete
I assume that the most well-known of the Guild 12 string guitars are the jumbo body styles from the 1960s and 70s, though Guild has offered 12 strings using their dreadnought body shape, as well. The largest of the Guild 12 strings, no longer offered, was the F-612. With an 18" lower bout, this beast could be referred to as a "super-jumbo."
From "The Guild Guitar Book" by Hans Moust:
The body of the 1975 F-212 I am rebuilding measures 16" x 4-7/8". Prior to disassembly this guitar weighed 5-3/4 lbs. It is a testament to the Guild legacy of this era of being built using more wood than is technically needed to structurally support the guitar. However, the extra wood actually contributes to the unique sound of the Guilds of this era.
Guild 12 strings can be heavy guitars to hoist. Both my F-212 XL and F-512 from the same era weigh in at 6-1/2 lbs. And that is after adding lightweight tuners. There are a couple of tuner options out there that add almost another 1/2 pound to the guitar. By way of comparison, my own 17" jumbo guitar bodies, wider, deeper, and longer than this Guild, weigh as little as 35 oz, nearly 1-1/2 lbs less than the mini jumbo Guild body. It all adds up, especially if you intend to perform with the instrument over several hours.
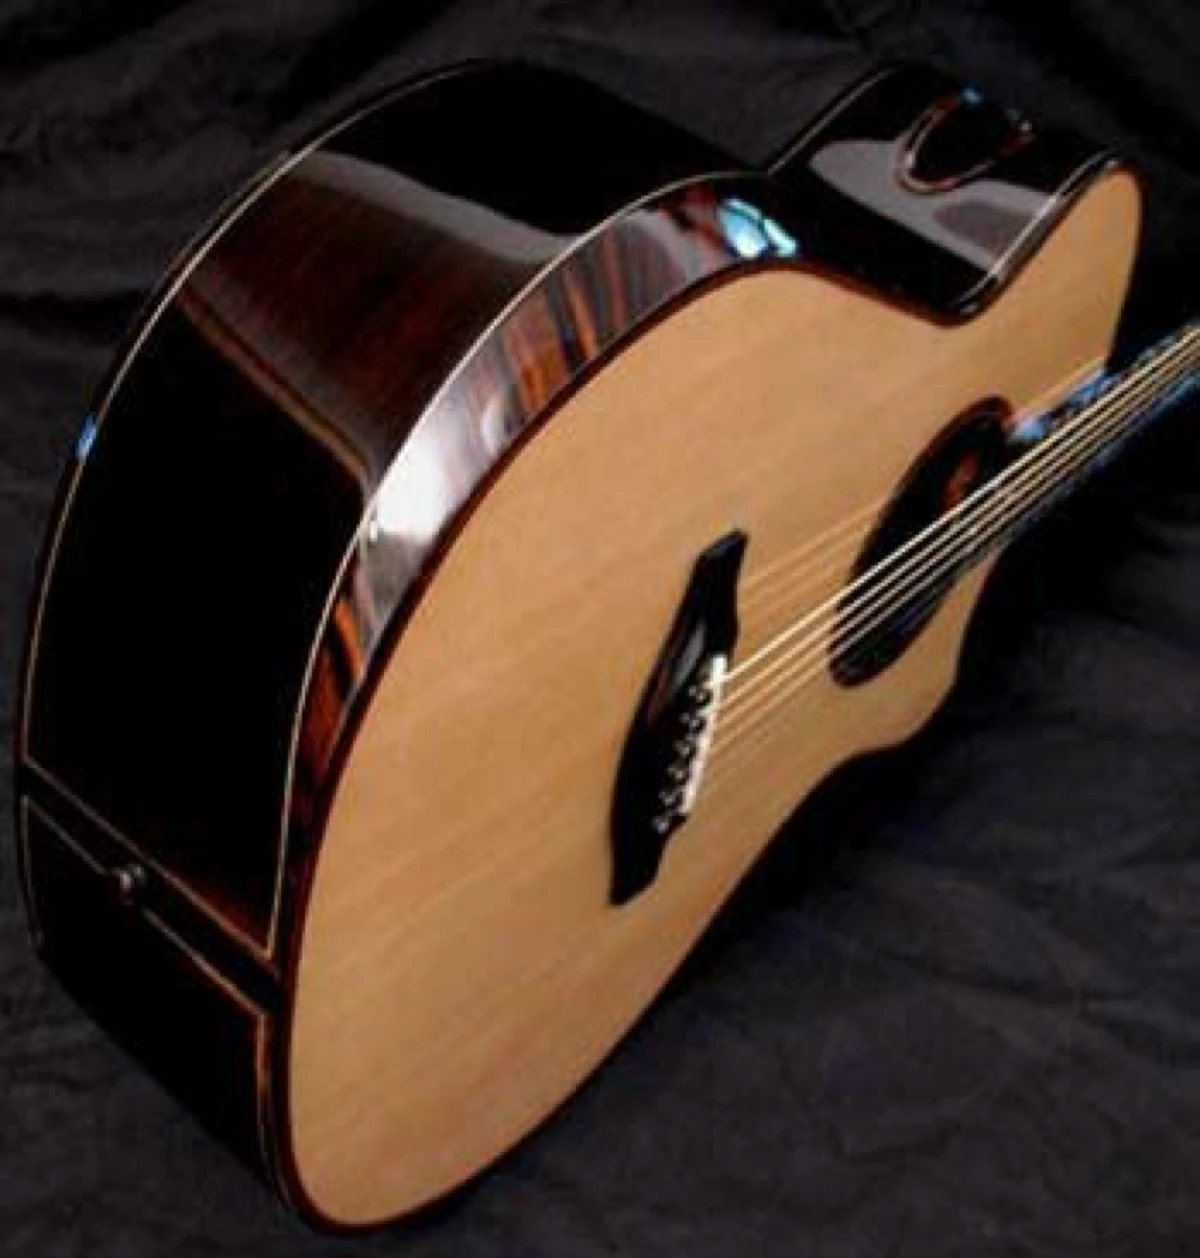
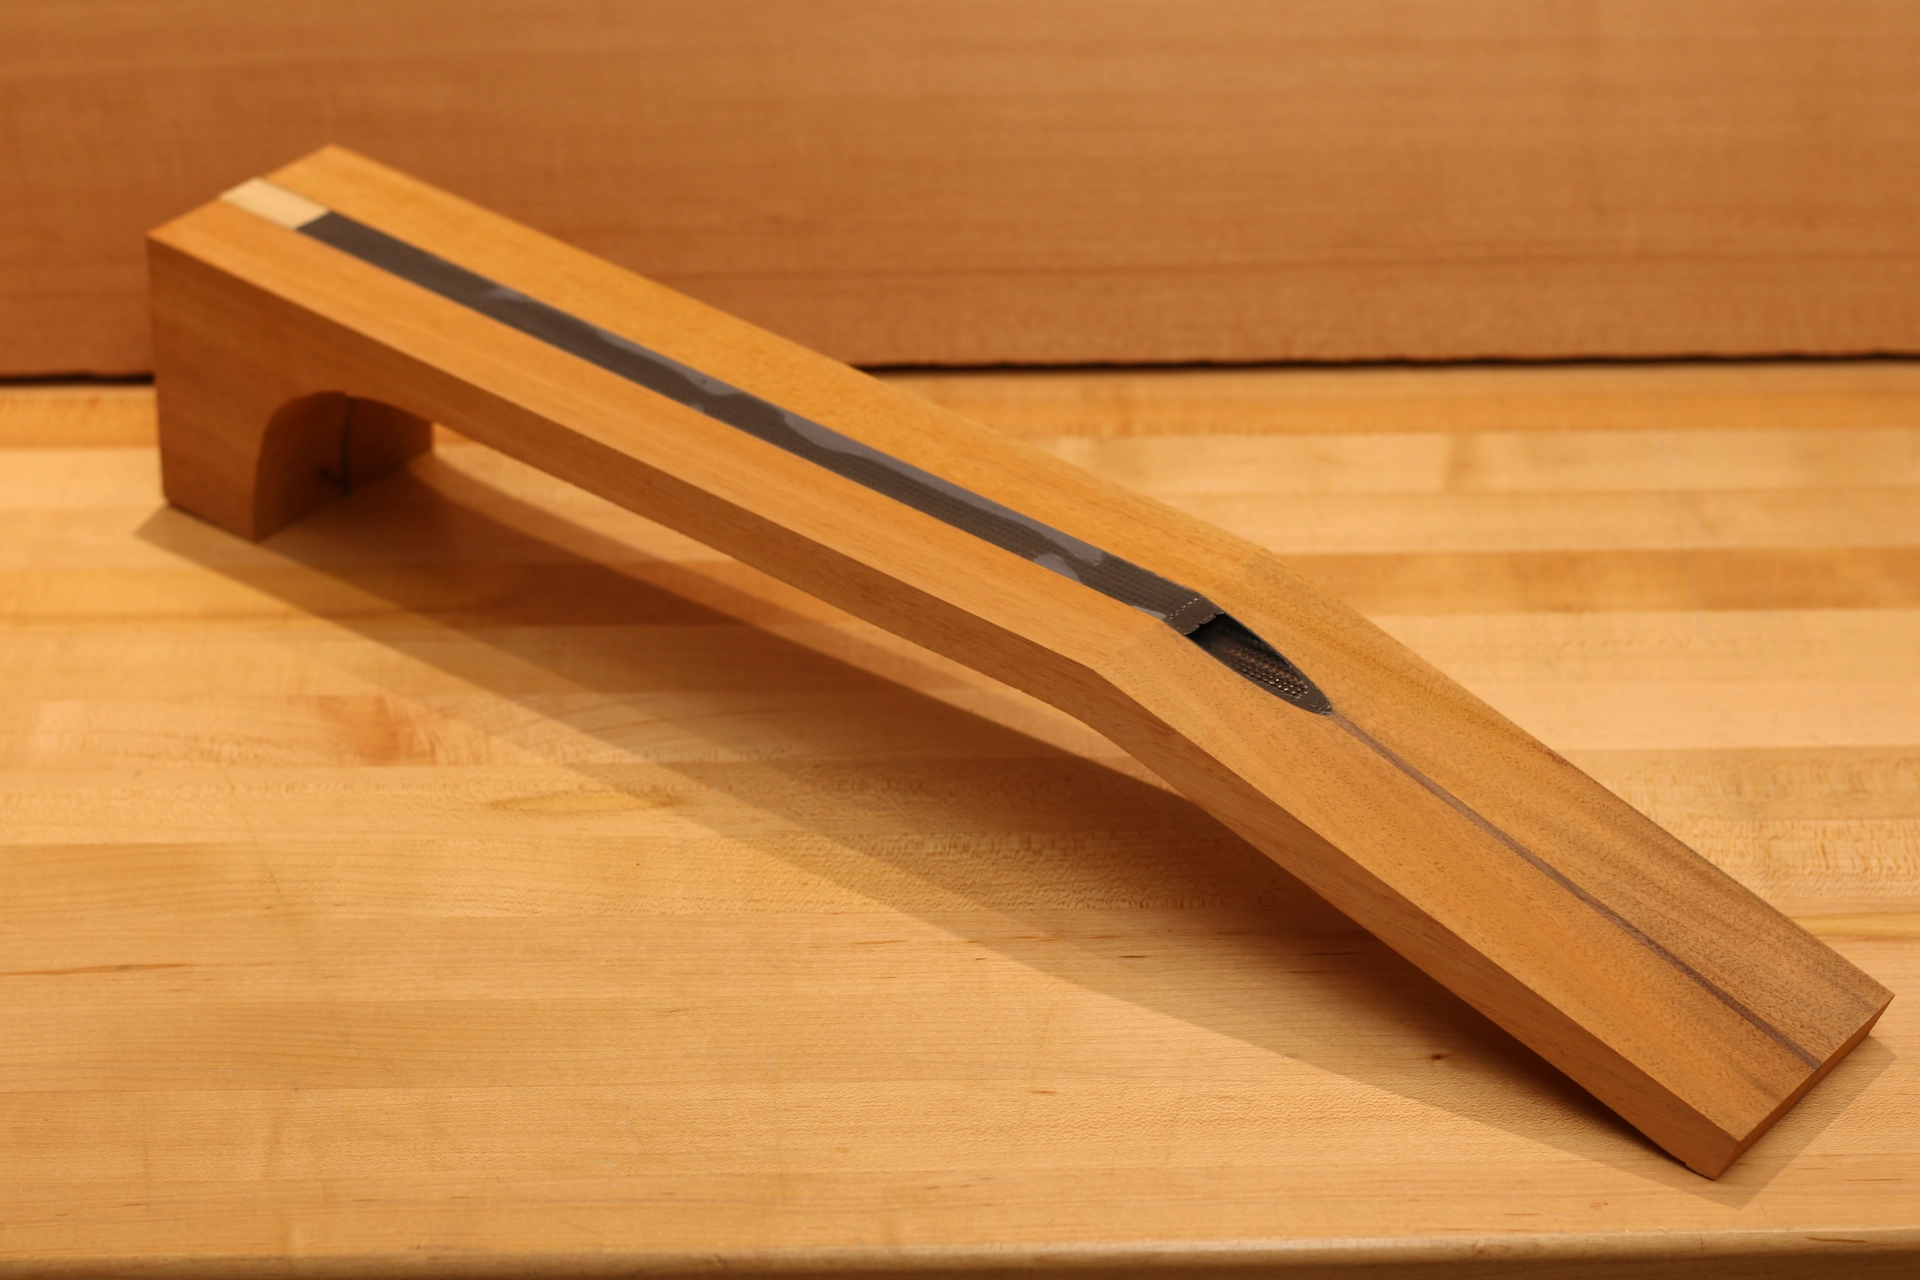
I build very few guitars without arm bevels these days. An arm bevel addresses both a comfort and a health issue. A sharp edge pressing into the underside of my forearm is painful, especially over extended periods of time, and can lead to problems with the wrist and fingers - no thanks! The first guitar I ever played having an arm bevel caused me to take notice of my posture. I found myself resting my arm comfortably on the instrument and, as a result, I wasn't adding that extra tension to my neck, my upper back, and through my shoulder, in an effort to keep the edge of the guitar from digging into my forearm. I was able to sit up straighter, as I wasn't hunching forward as much in an effort to "throw" my arm up and over the body of the guitar. This is much more noticeable with wider, deeper bodies, but it is beneficial for guitars of all sizes.
I will be adding an arm bevel to this 12 string. This feature makes for a more comfortable player experience, especially on wider, deeper-bodied instruments. I have no knowledge of this ever being done on a Guild. Perhaps this is a "first?"
Once the soundboard is removed, I need to cut the curve into the side of the body to accommodate the arm bevel. I rough out the curve with a saw, then use a template to guide a router bit, resulting in a very accurate and smooth line.
I cut a Basswood block to fit the contour of the body and glue it into place inside the body. This block has a dual purpose: it forms a lightweight ledge that will support the soundboard and it provides a base material that I can shape into a bevel.
I add wooden braces to the sides in four (4) specific locations. I also bevel the tail block, removing unnecessary material where the soundboard will rest. Short of replacing the tail block entirely with a laminated equivalent, this step is the next best thing to eliminating that unsightly telegraphing of the rectangular outline of the block, visible in so many soundboards over time.
(If you were wondering about that "notch" in the arm bevel block, I have removed material to receive the lower leg of the X-Brace, as it will no longer extend out onto the rim of the lower bout, but will rest on a shelf.)
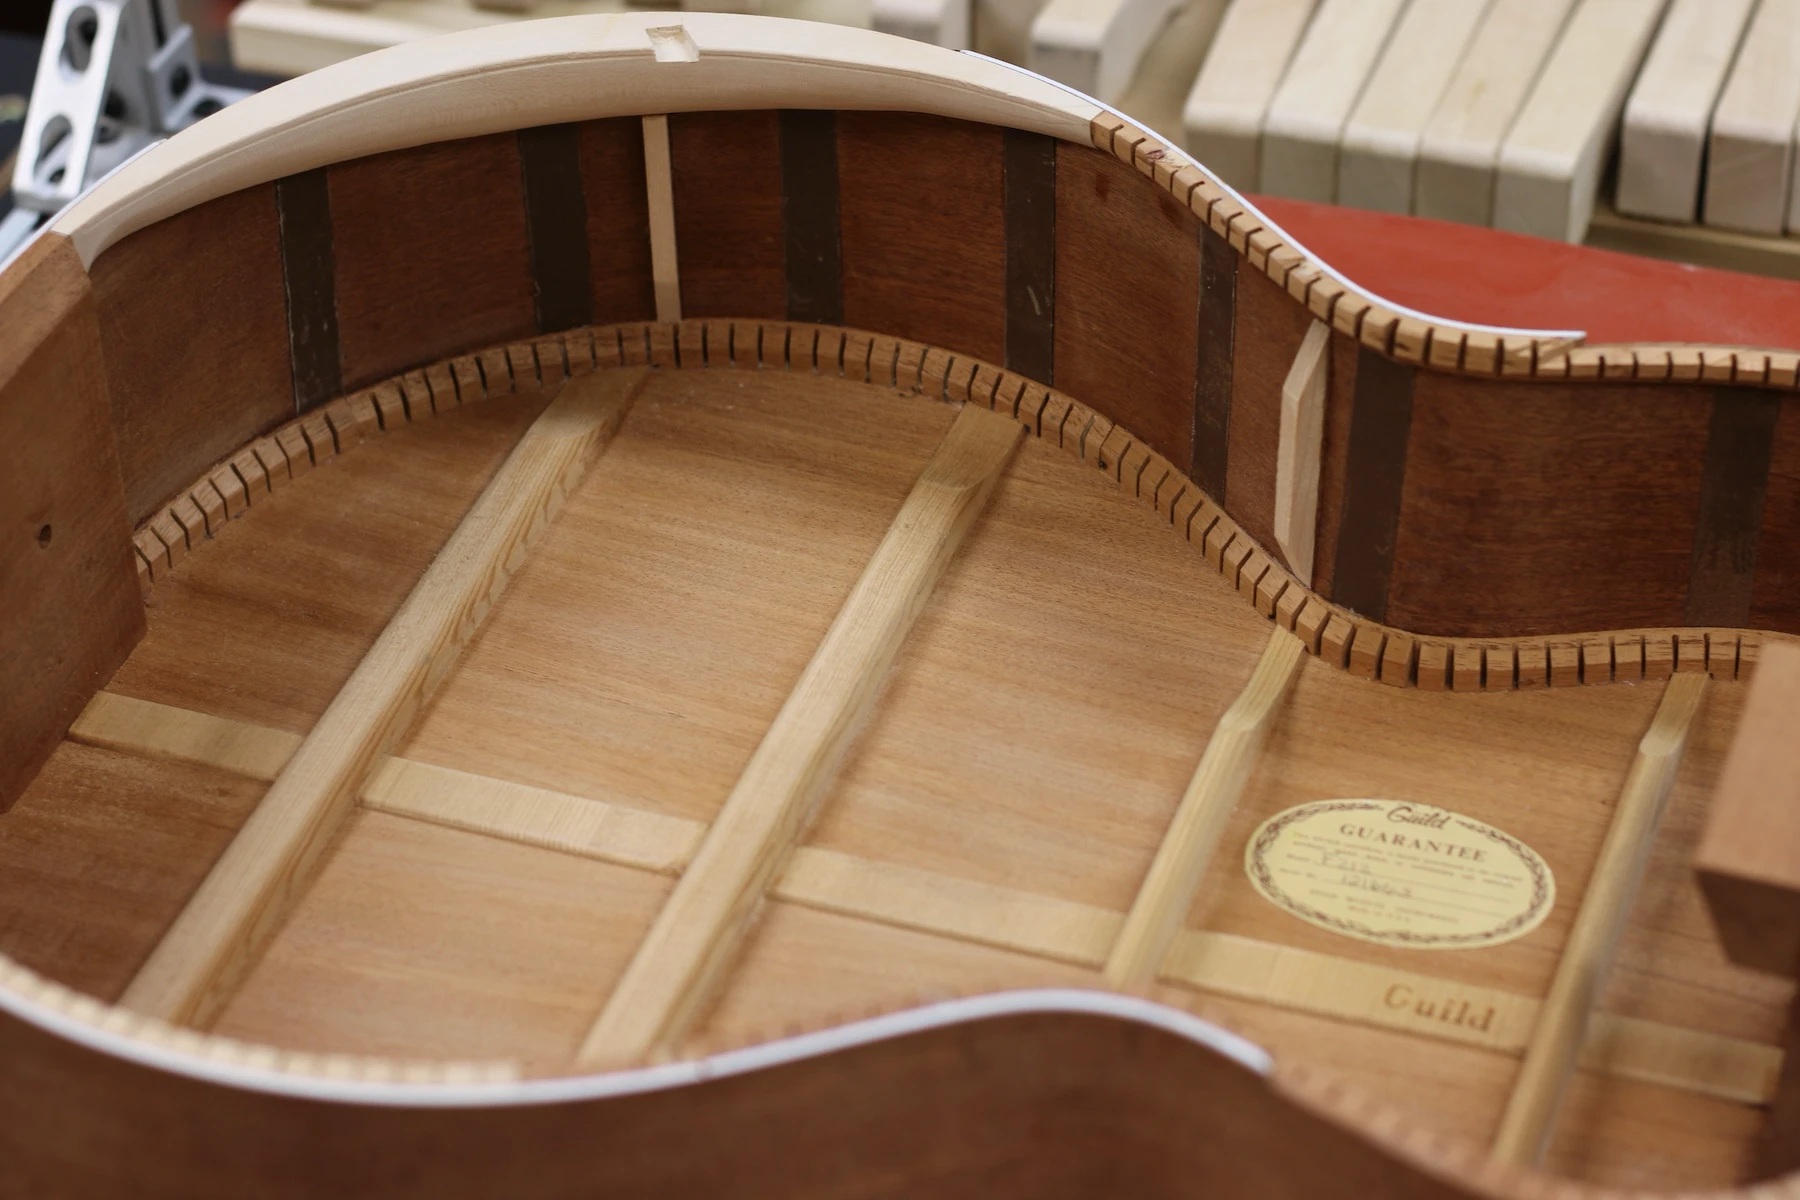
Arm Bevel Block
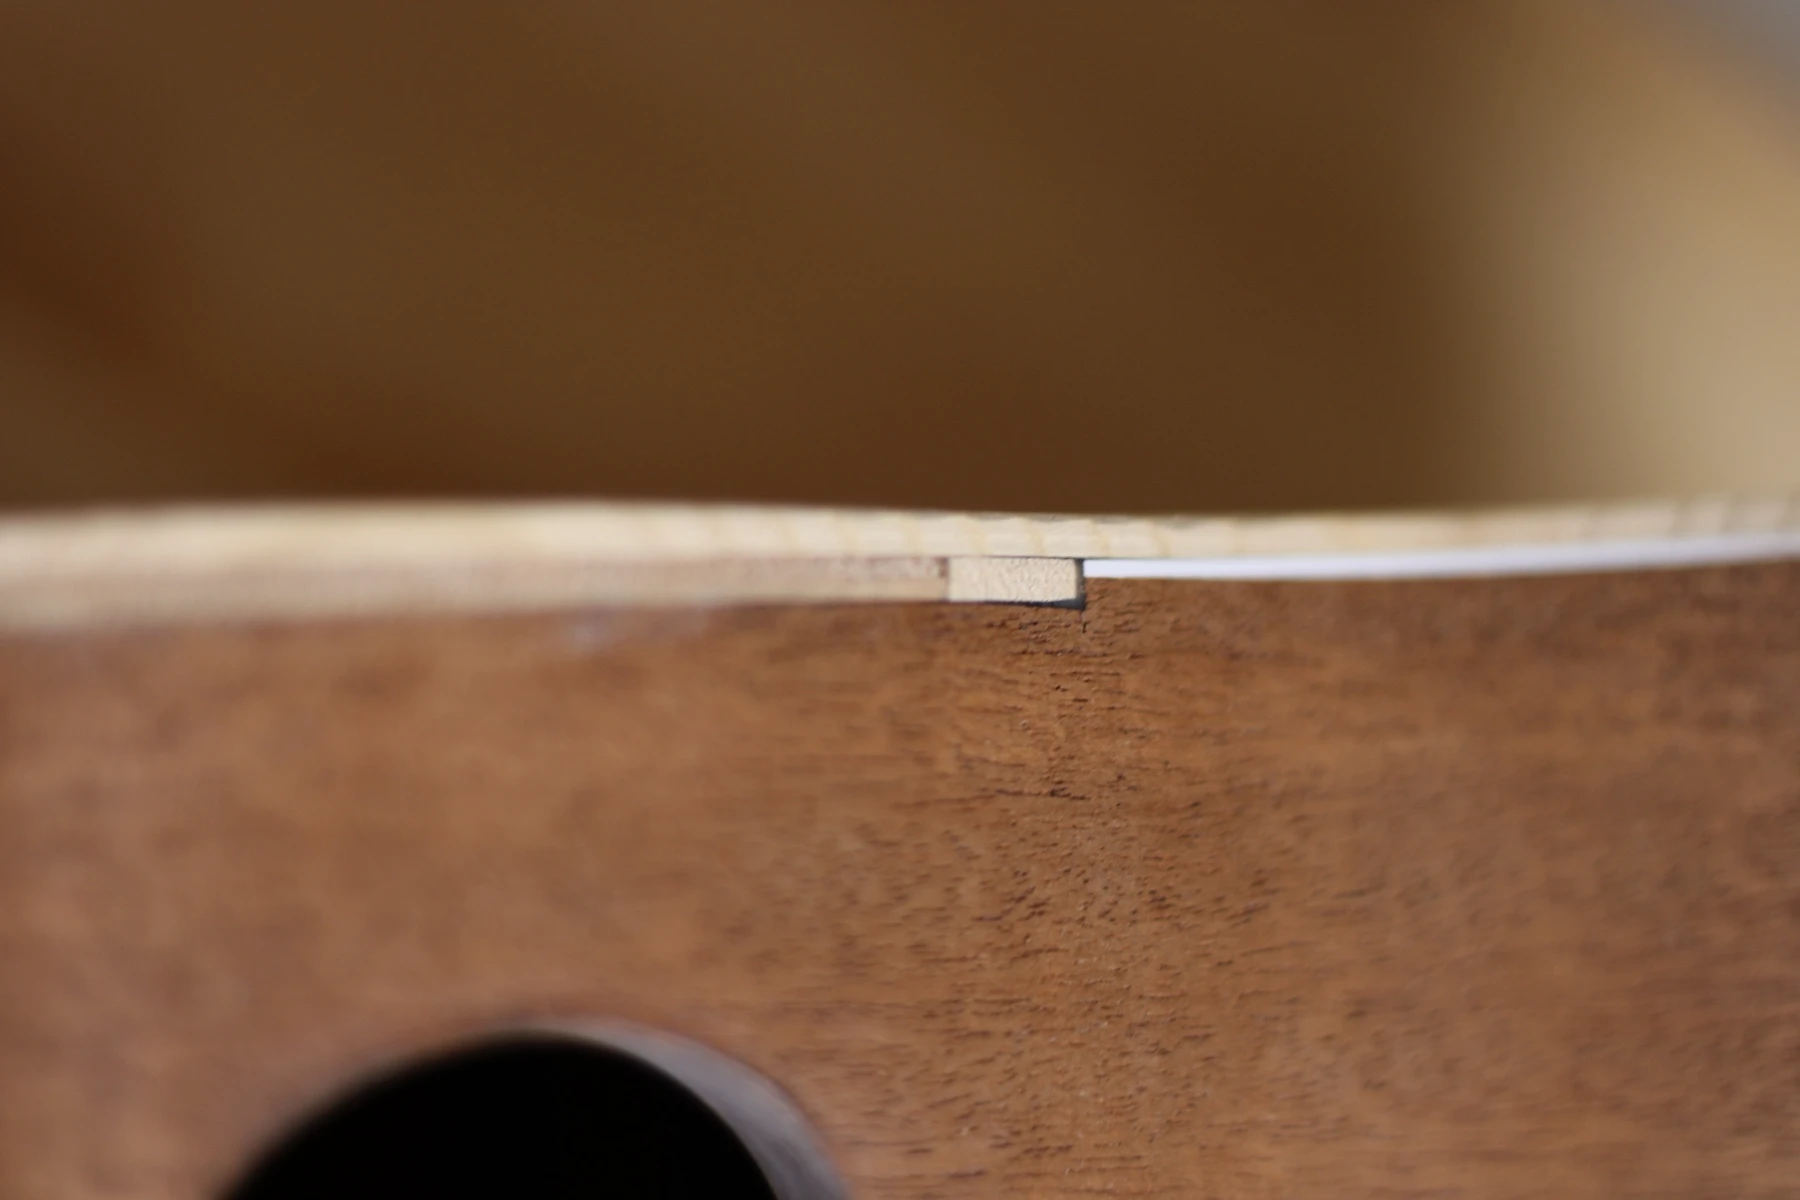
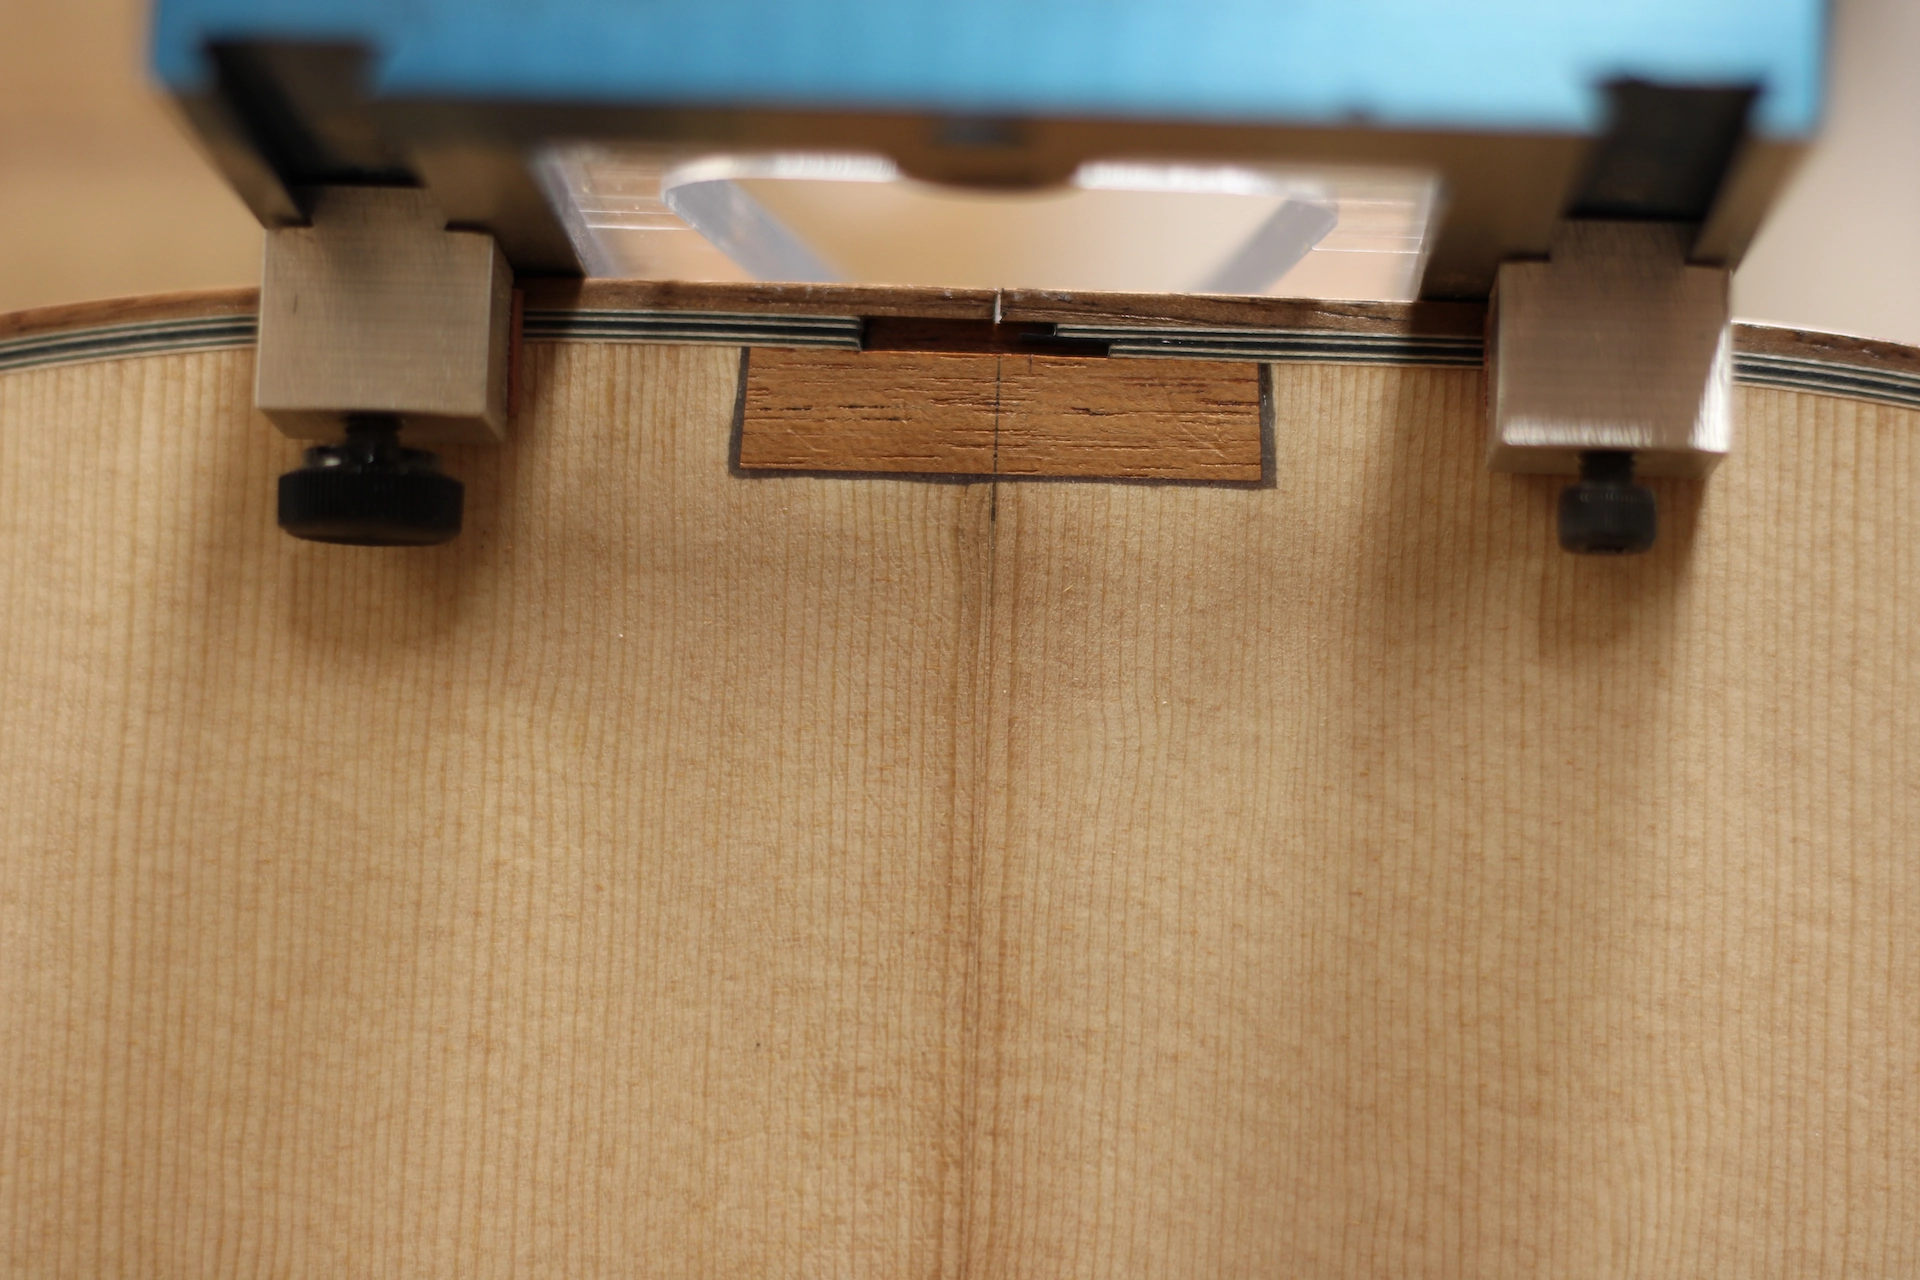
The purpose of adding lamination to the upper bout is primarily to strengthen that critical section of the soundboard that we intend to remove 12-1/2 square inches from by cutting a large hole clean through it. To fulfill my goal of unifying the neck, neck joint, and neck block with the soundboard, forming an immovable unit, I "notch" the upper bout to receive the thicker upper bout section of the soundboard, locking it into place. This notch begins at the point where the upper arms of the X-Brace rest, and extends up and across the neck block, lessening the height of the sides by the depth of the lamination I have added to the soundboard. Once glued in place, this interlocked unit of neck block, back, sides and soundboard eliminates any possibility of neck block shift and/or soundboard shear.
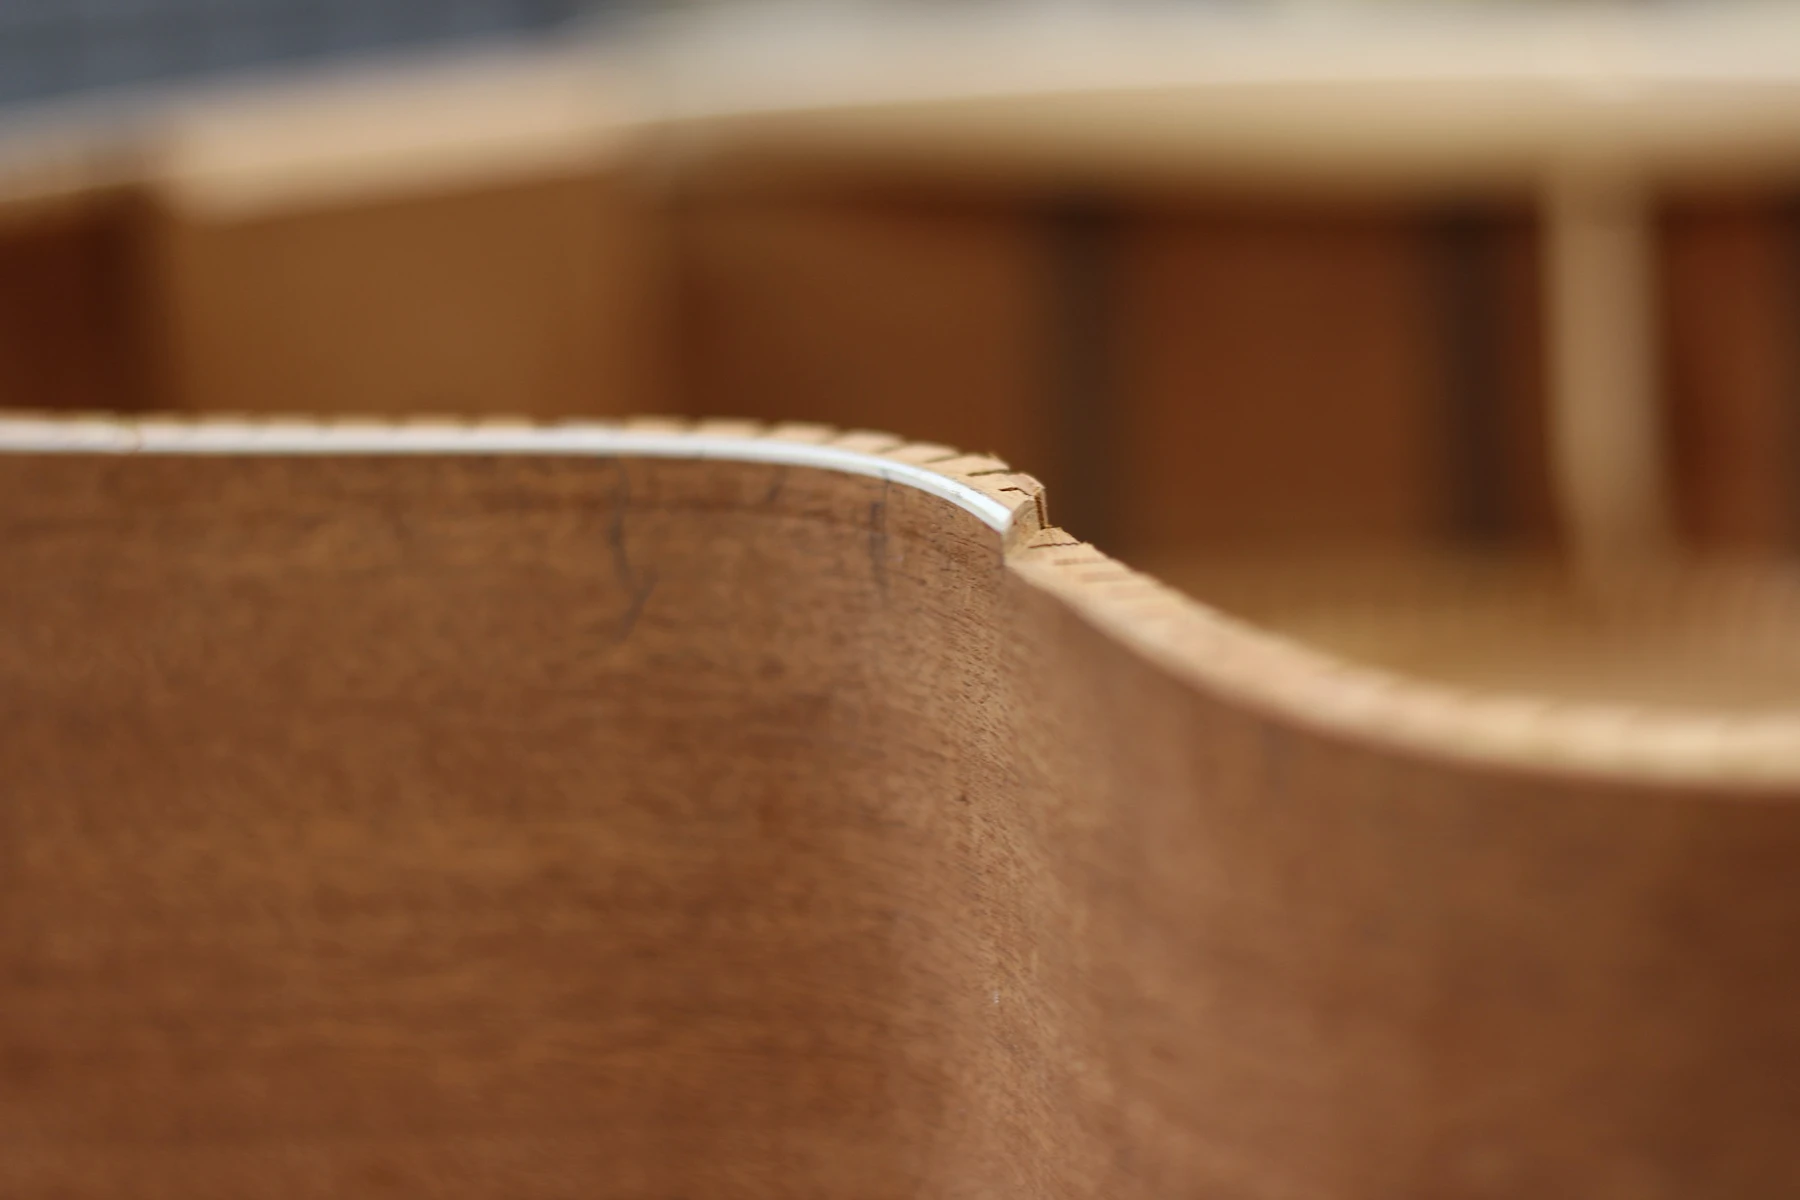
Upper Bout Interlock
Gluing the soundboard to the body is a matter of fitting two puzzle pieces together. It should not involve wrestling parts into place that must then be clamped in order to avoid unsightly gaps. Doing so will introduce unwanted tension into the guitar. Instead, an iterative process of fitting, trimming, and fitting again is necessary until the soundboard and body mate perfectly.
Soundboard Attached
After the soundboard was attached and trimmed, I decided to add a simple Side Port. These ports demonstrably improve the player experience, and have no deleterious effect on the audience experience. Frankly, I think they should be added to all acoustic guitars. Once again, I am unaware of this feature ever being added to a Guild, so this may be another "first."
Rather than just cut a hole in the side in the upper bout area, I prefer to add a reinforcing block of wood to the side. It would have been ideal to have added the reinforcing block PRIOR to attaching the soundboard, as access to the inside of the guitar is easier. But this is the same process I use when retrofitting/incorporating a Side Port into a completed guitar, so it is not a big issue. In addition to strengthening/supporting the thin side in the area around the hole (which a piece of veneer laminated to the side would also achieve), I believe a wooden block can improve the visual interest/aesthetics.
After determining where my Side Port will be positioned, I fashion the wooden reinforcing block and carefully glue it into place. Once the glue is dry, I drill a hole through the side and block, removing the majority of waste material. I mount a jig to the upper bout and, using a router fitted with a template guide and downcut bit, I trace around the Acrylic pattern mounted to the jig to complete my Side Port.
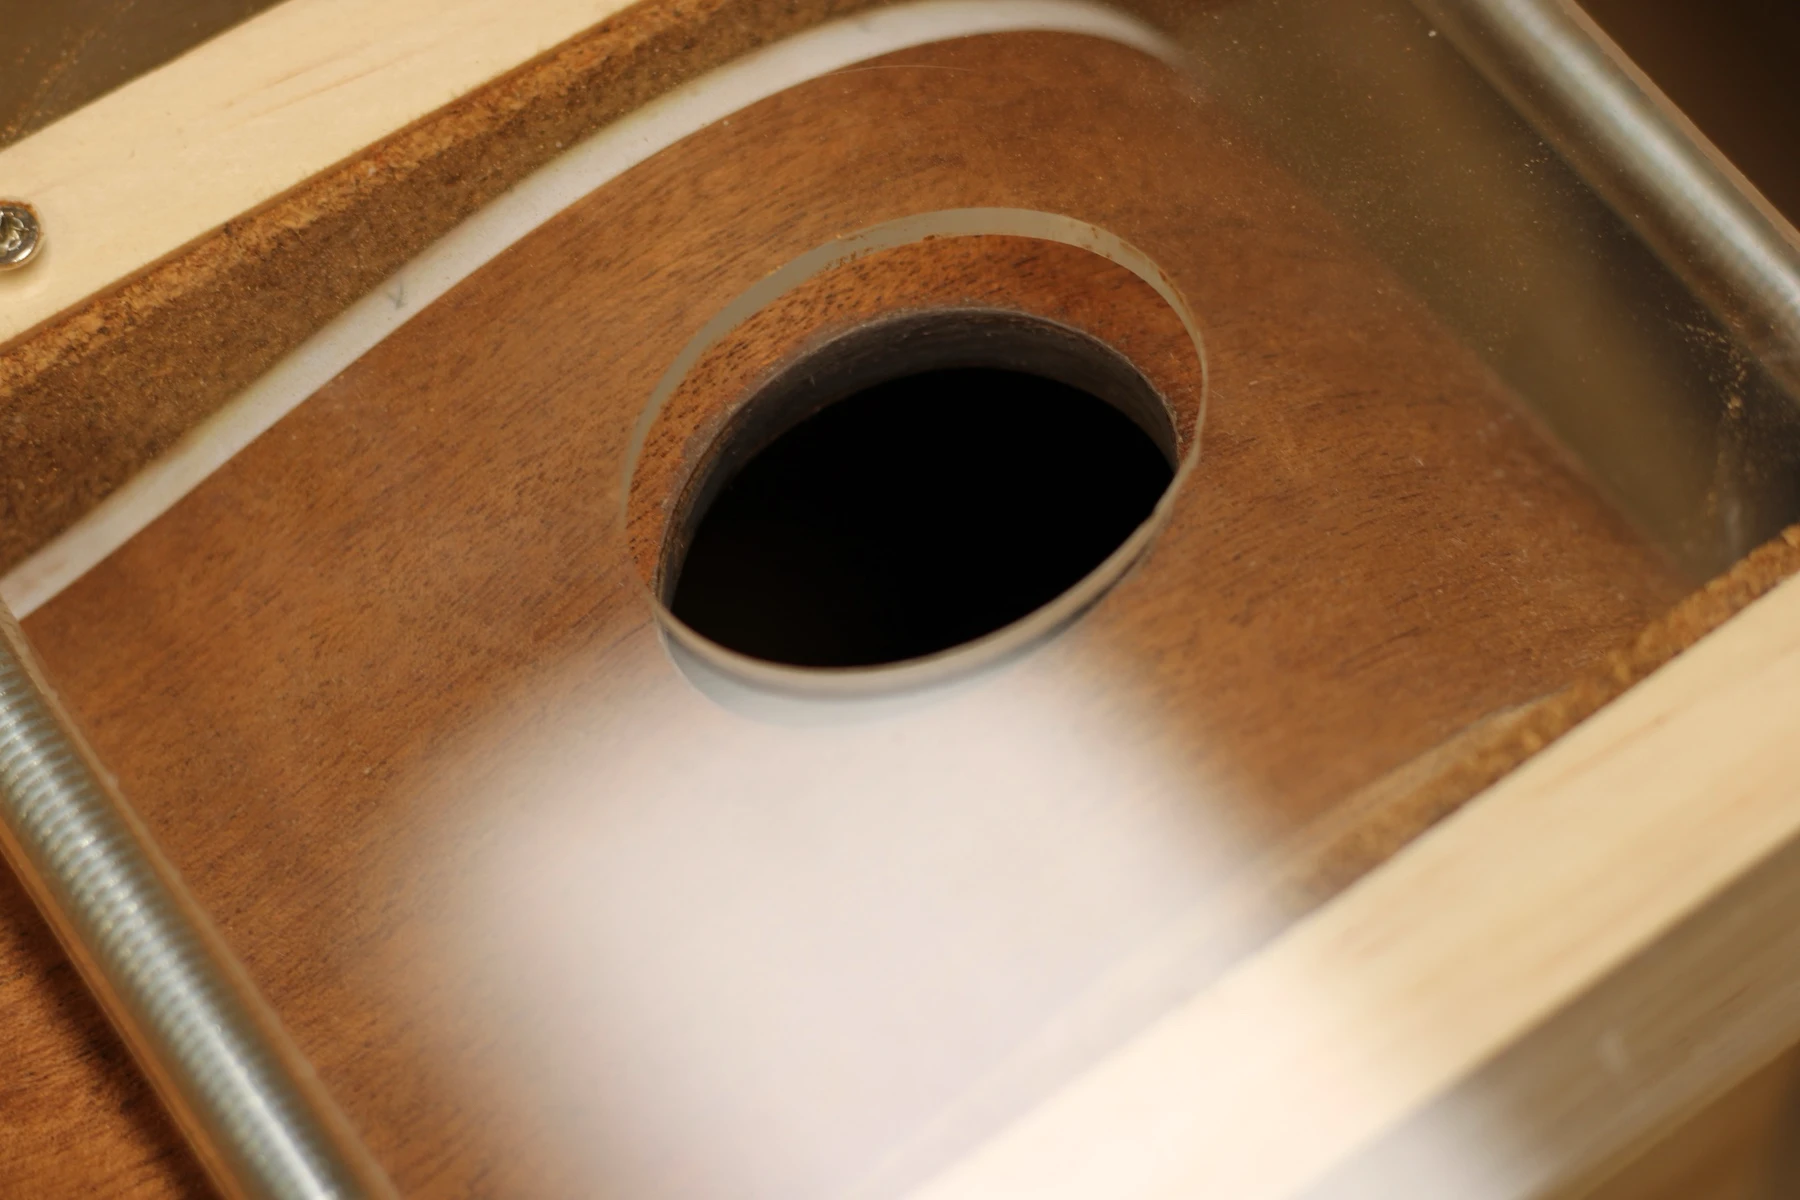
Side Port
Using the house construction analogy, the foundation has been laid, the framing is complete, the drywall is installed, taped and sanded. I am now ready to start to start the trimming out phase, adding binding and purfling.
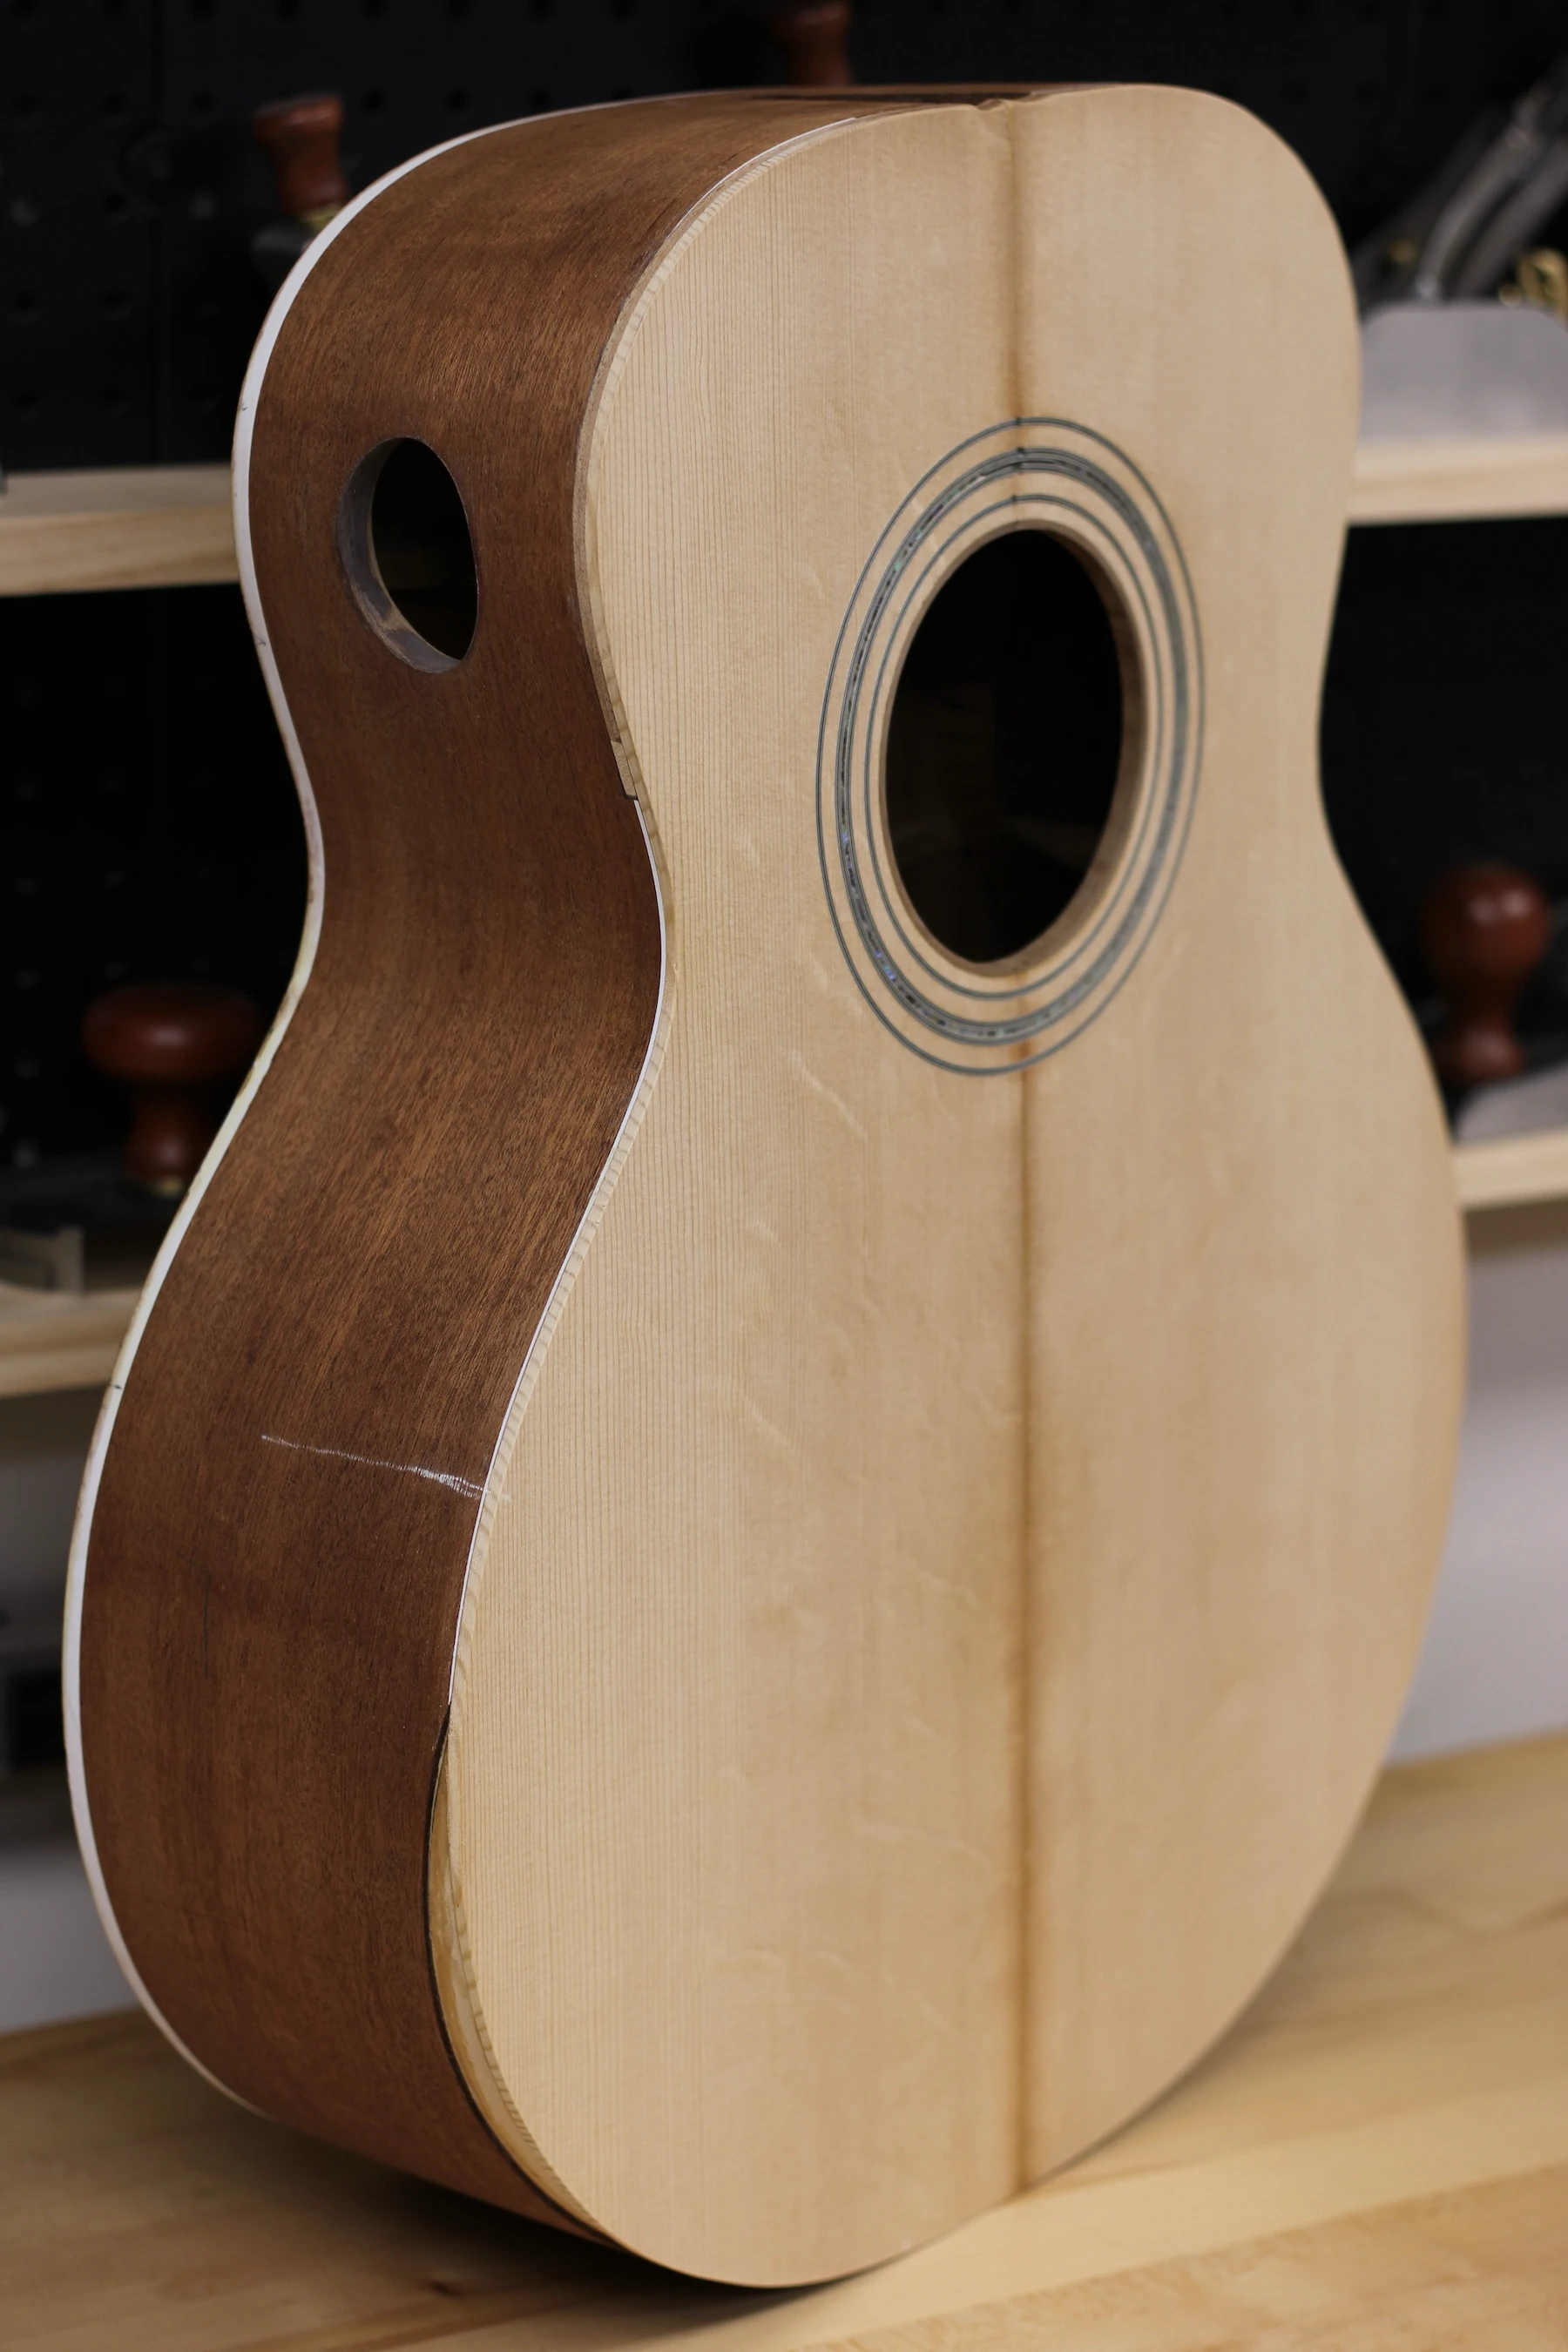
Body with Soundboard
When I bound the soundhole I committed to the decision to use Walnut for the binding. Yes, white plastic binding is traditional and yes, plastic is easier to apply and yes, plastic is even more forgiving should you happen to bump an edge against a hard surface. But I prefer to look at wood binding. And, while it is perfectly acceptable to simply wrap a piece of wood around the rims of the instrument and be done with it, if I take the time to laminate one or more veneers to my binding wood of choice first, prior to ripping off strips of binding, I am able to apply a more embellished binding/purfling combination to the sides, making for a dressier look.
Making Binding
The F-212 was a very conservatively appointed guitar, perhaps a bit on the sparse side for my taste. A Chesterfield logo on the headstock, side position dots, a 3-ring plastic rosette, and a little bit of plastic purfling around the soundboard are all the acoutrements you will find. The fretboard has no inlay. The sides and back have no purfling and feature plain plastic binding. I am not attempting to cast aspersions on the veracity of plastic binding and purfling. Newer plastics are more dimensionally stable over time than the cellulose of old, and allow for some rather intricate purfling combinations, as anyone who has paid close attention to the Guild double-line edge purfling will attest. There is no requirement to pre-bend it, as there is with wood binding. And it is relatively inexpensive. And it looks really nice. I get it.
Guild black & white plastic Binding and Purfling
Of the 17,500 serial numbers available in 1975 (from 112804 to 130304), my two F-212s were just 850 numbers apart, and yet they were appointed slightly differently:
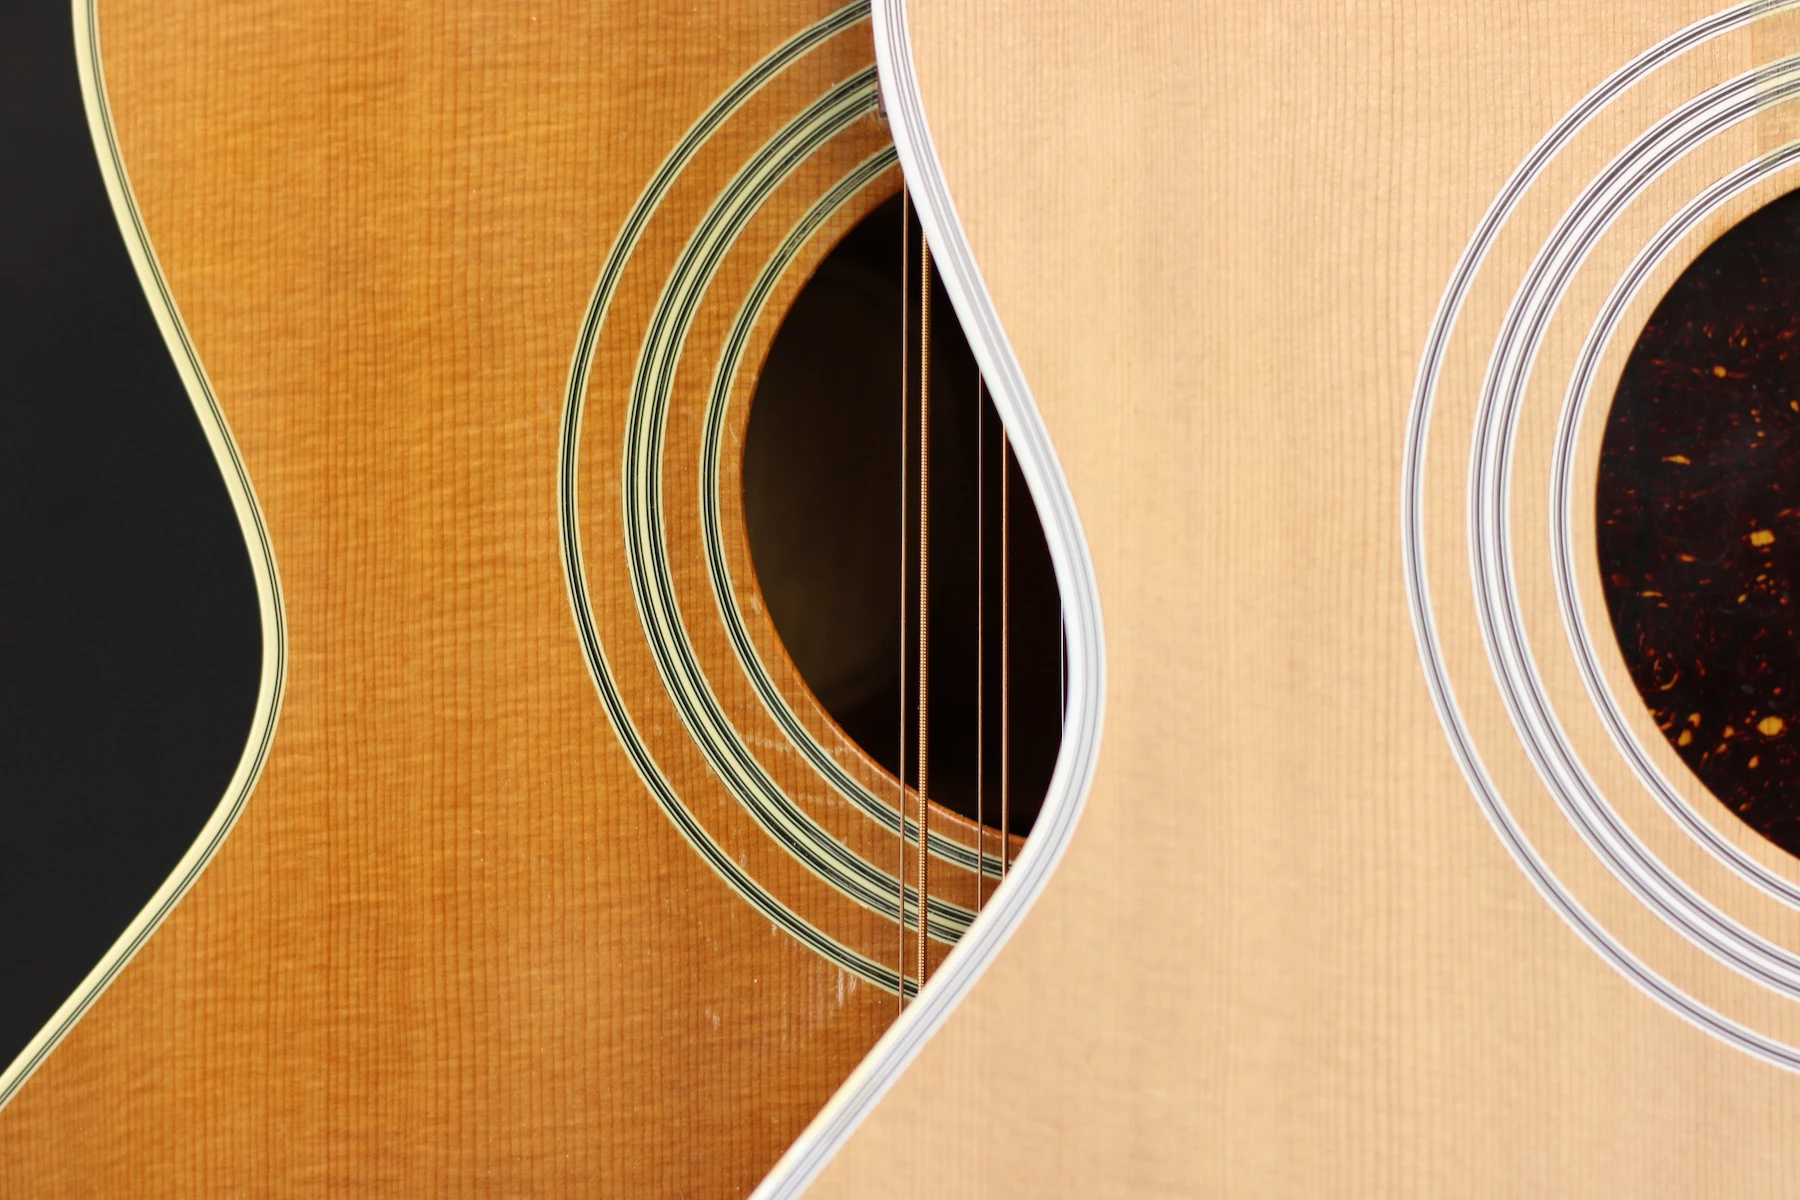
Rosette Purfling (Two different 1975 F-212s)

Edge Purfling (Two different 1975 F-212s)
You may recall me mentioning that the body sprang open when I removed the soundboard. Further inspection revealed that the body is rather misshapen on this guitar, which makes cutting the binding and purfling channels more difficult (it's easier when both front and back plate are perfectly parallel to one another.
The 12 string featured in this article is the one having the wider purfling. My guess is that either someone made a mistake when cutting the purfling channel(s), and fixed the mistake by cutting them deeper (ask me how I would know), or that misshapen body issue may have been a common enough issue that someone already knew to cut deeper purfling channels to "accommodate" (hide) it.
Rather than fight the alignment with a router and end up with uneven binding, I am cutting the channels by hand, using a graver and a chisel. Razor-sharp tools are a necessity for this task.
I intend to dress this guitar up, a bit. I have already started a theme at the soundhole, in homage to the original design. I have no plans to copy either the original or one of the more appointed siblings, such as the F-412. Those instruments are all bound with plastic and I want a different feel for this guitar, so I will carry that same look I created at the soundhole around the edge of both the front and back plates. Having integrated purfling into the binding, I am anticipating a very dressy look, but not overstated. I don't want this F-212 to look "too plain," and I don't want it to look "too bling-y." Somewhere in-between will be nice.
The builders whose F-212s (and F-212 XLs) I have seen across the span of time have all done a really great job of mating the sides at the tail block, avoiding unsightly seams. Rather than add the classic "wedge" shaped trim that you see on the F-412 and F-512, I am going to leave well enough alone and just bind the front and back edges.
Around the edges, purfling sits between the binding and the edge of the soundboard. One approach to purfling sizes the purfling to match the depth of the binding. For example, if the binding was 1/8" wide x 1/4" deep, and I wanted to add thin, 1/64" strips of contrasting light/dark colors, I might choose to cut those purfling strips to be 1/4" deep, just like the binding. With this approach, my purfling channel and my binding channel become one and the same channel. The purfling is really just a veneer/laminated layer of the binding. When using this approach, I must pay careful attention to how far I cut into the soundboard. If I go too far in from the edge, it is possible to cut my soundboard off from the kerfing ledge it is resting on.
The second approach, and the one I am using here, calls for cutting a shallow channel, more shallow than the thickness of the soundboard, deeper into the soundboard, away from the edge. This allows me to create a "wider" purfling ring around the guitar without risk of severing the soundboard off of the body. My purfling is then made up of teeny, tiny little strips of wood that rest on their own ledge.
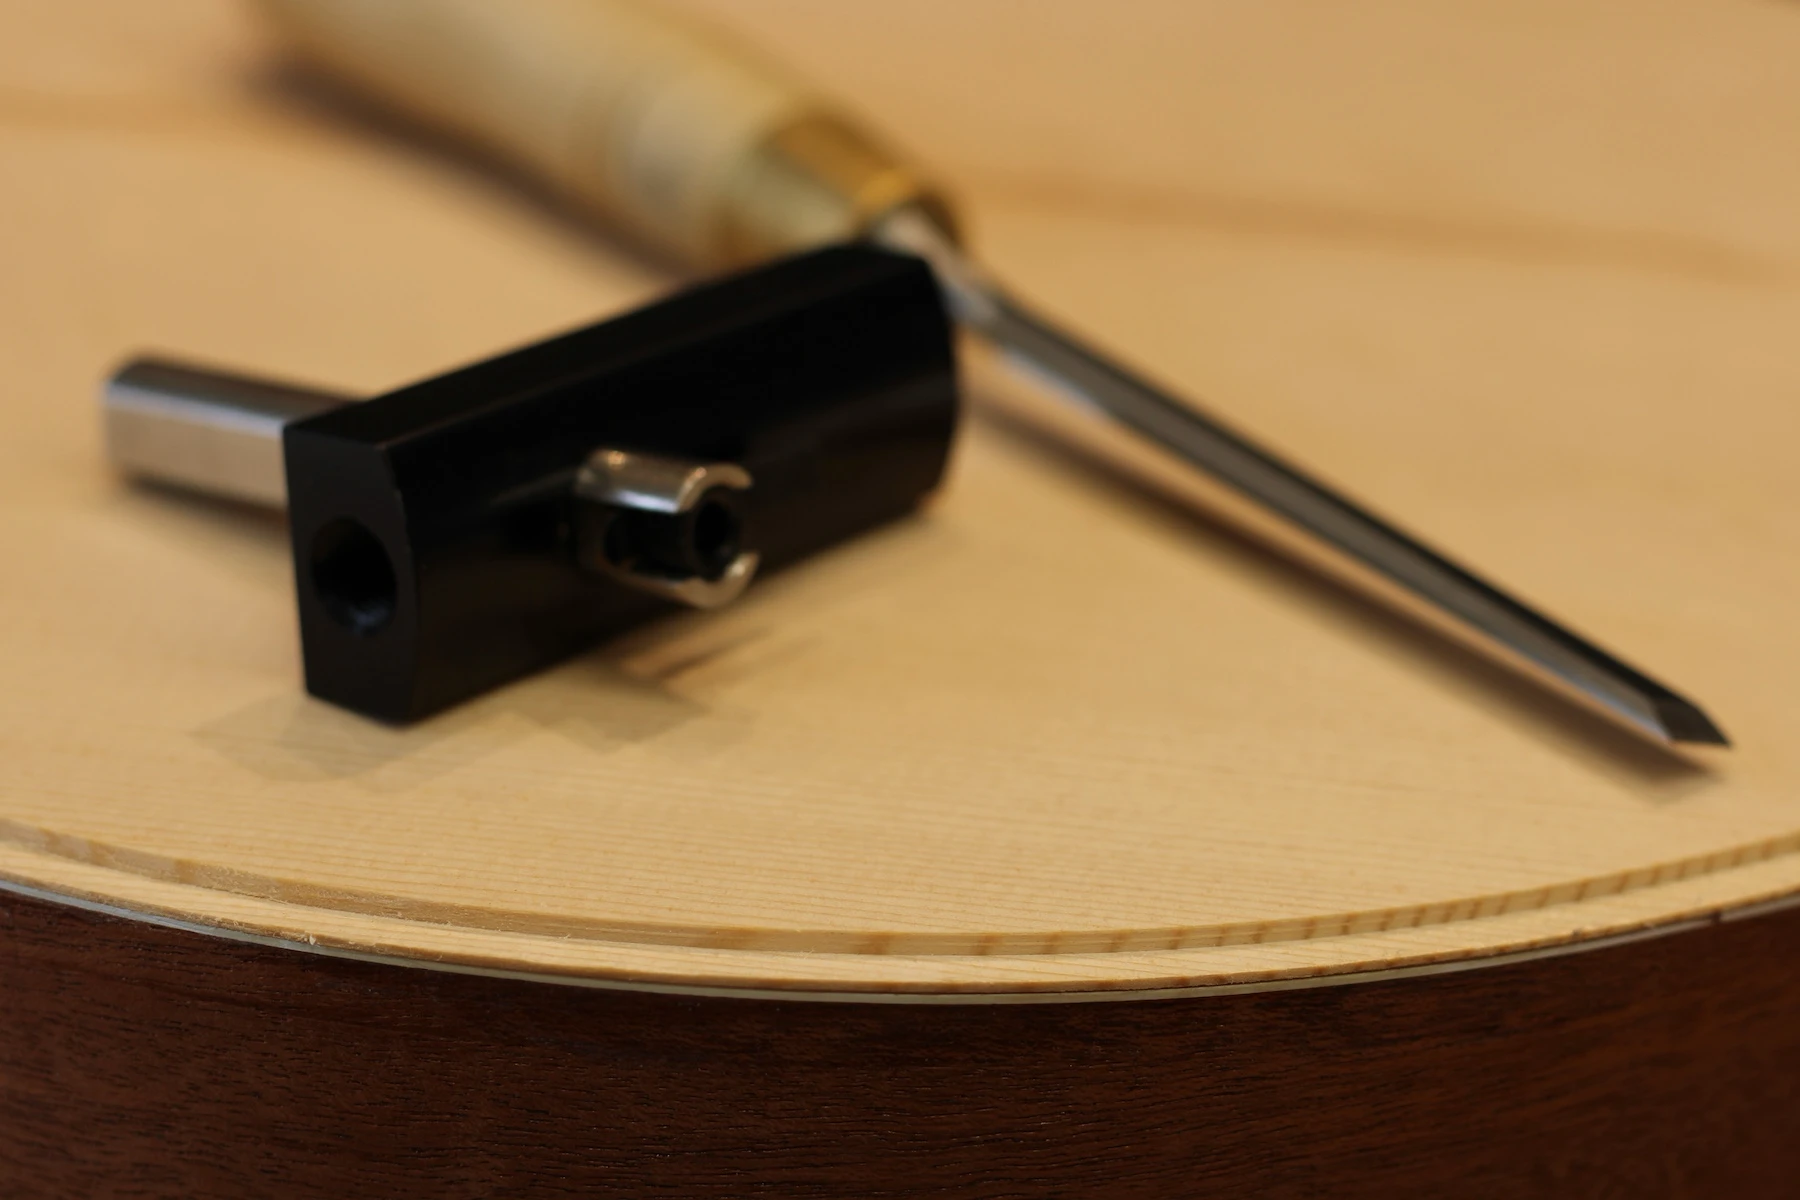
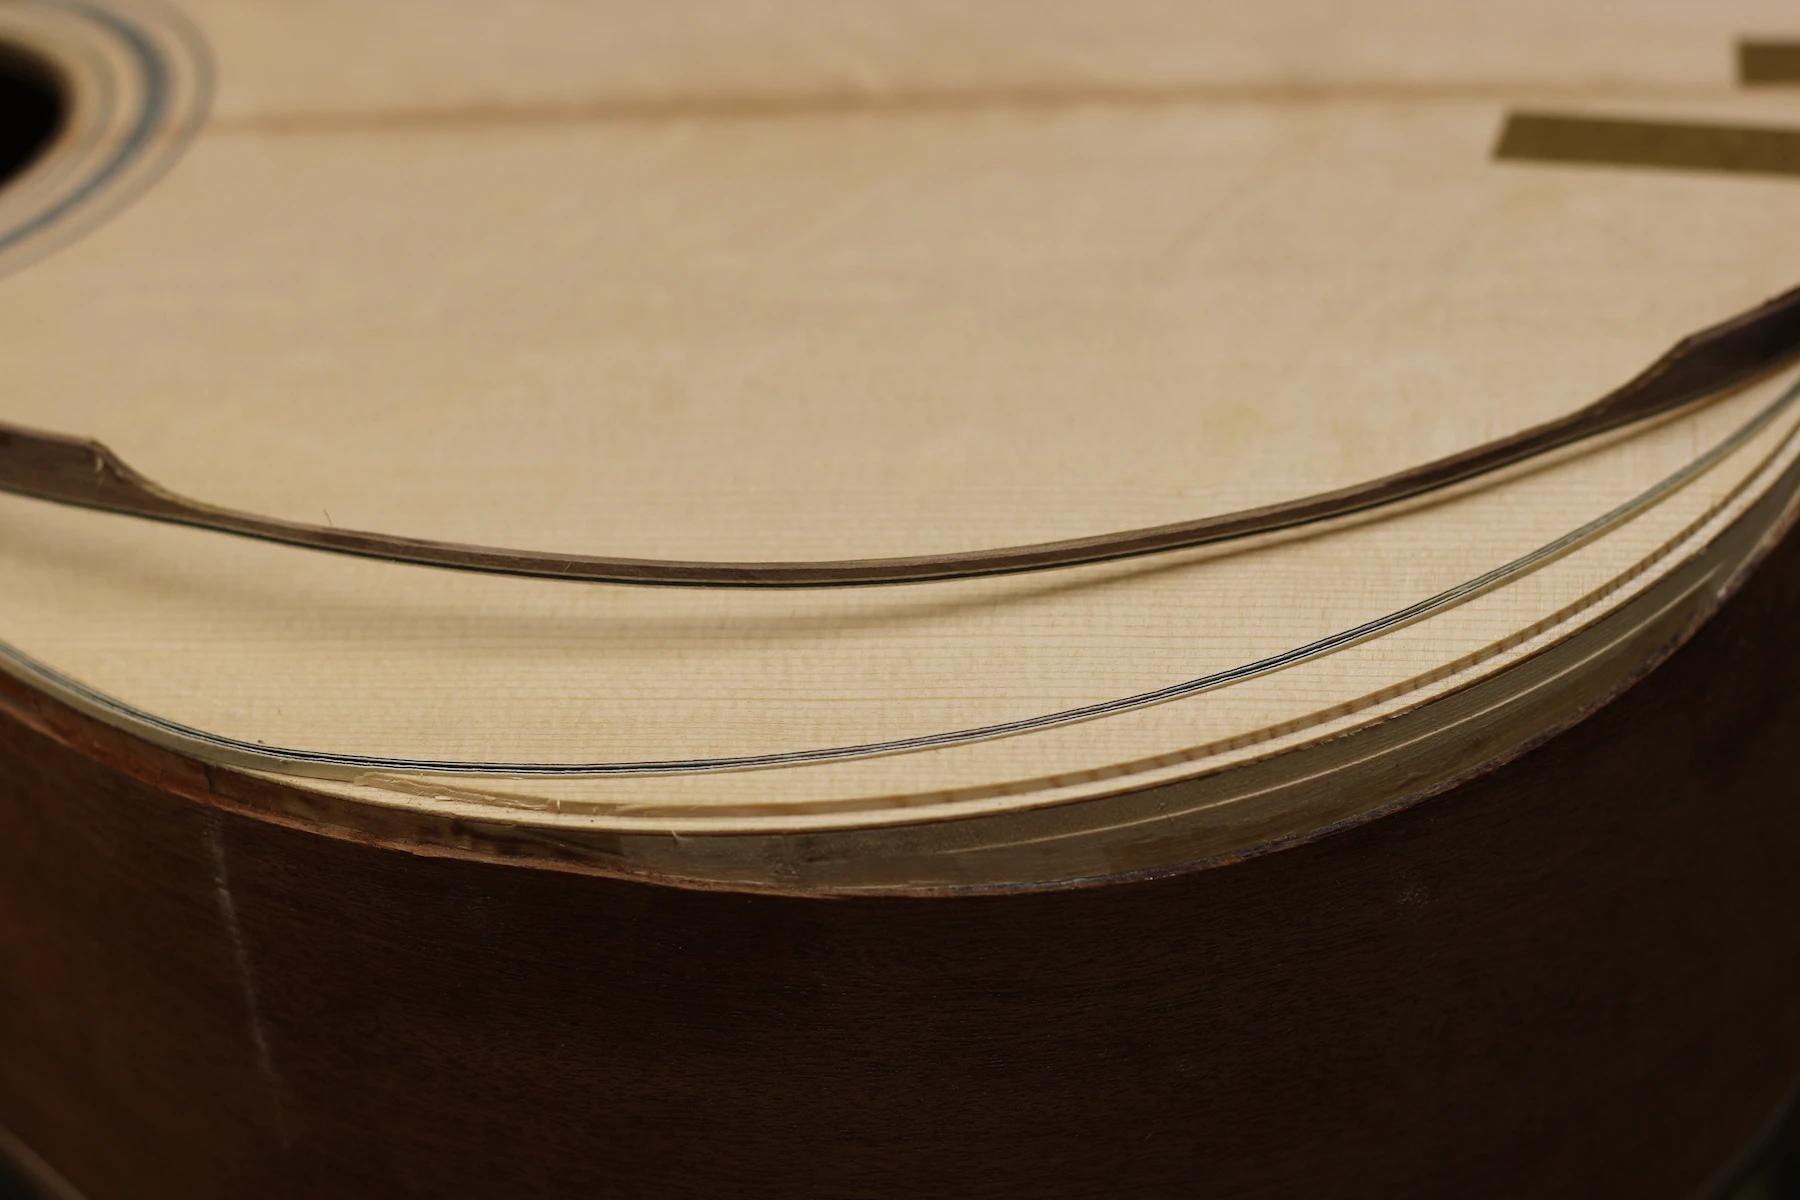
Hand-cut Purfling Channels
Once the purfling channels are cut, I can cut the channel / rebate / "rabbit” for the binding. The binding extends deeper down onto the sides than does my purfling, which will sit up on its own ledge and be pinched between the binding and the edge of the soundboard.
Hand-cut Binding Channels
I am incorporating a transitional arm bevel into this guitar. This feature “eases” the sharp edge where your forearm tends to lay across the soundboard. The design alters the established edges of the upper bout on the bass side. I have to create a new path for the purfling, separate from the binding, to unify the modification in the edge. The binding follows the side, and the purfling moves in farther into the soundboard, away from the edge. The bevel will be formed between the two.
Arm Bevel Purfling Path
I pre-bend the wooden binding using heat, primarily because it would definitely crack if I didn't, and because I do not want to introduce tension (spring back) to the instrument (which is exactly what I would get if I forced and cemented a stiff piece of wood into place around all those curves.
I reduce the height of the binding in the area that will follow the curve I had cut into the side. This height reduction allows me to bend again the already bent binding to follow the curve.
Binding Modified for Arm Bevel
Dreaming about the benefit of having three hands at a time like this, but making the best of the two I have, I fit the binding and the multiple strips of kerfing into place, each on its respective ledge, holding everything together with strips of tape, and push-pins where necessary. This is an advanced form of chewing gum and bailing wire, and we luthier types take it very seriously.
Nostalgic memory moment -
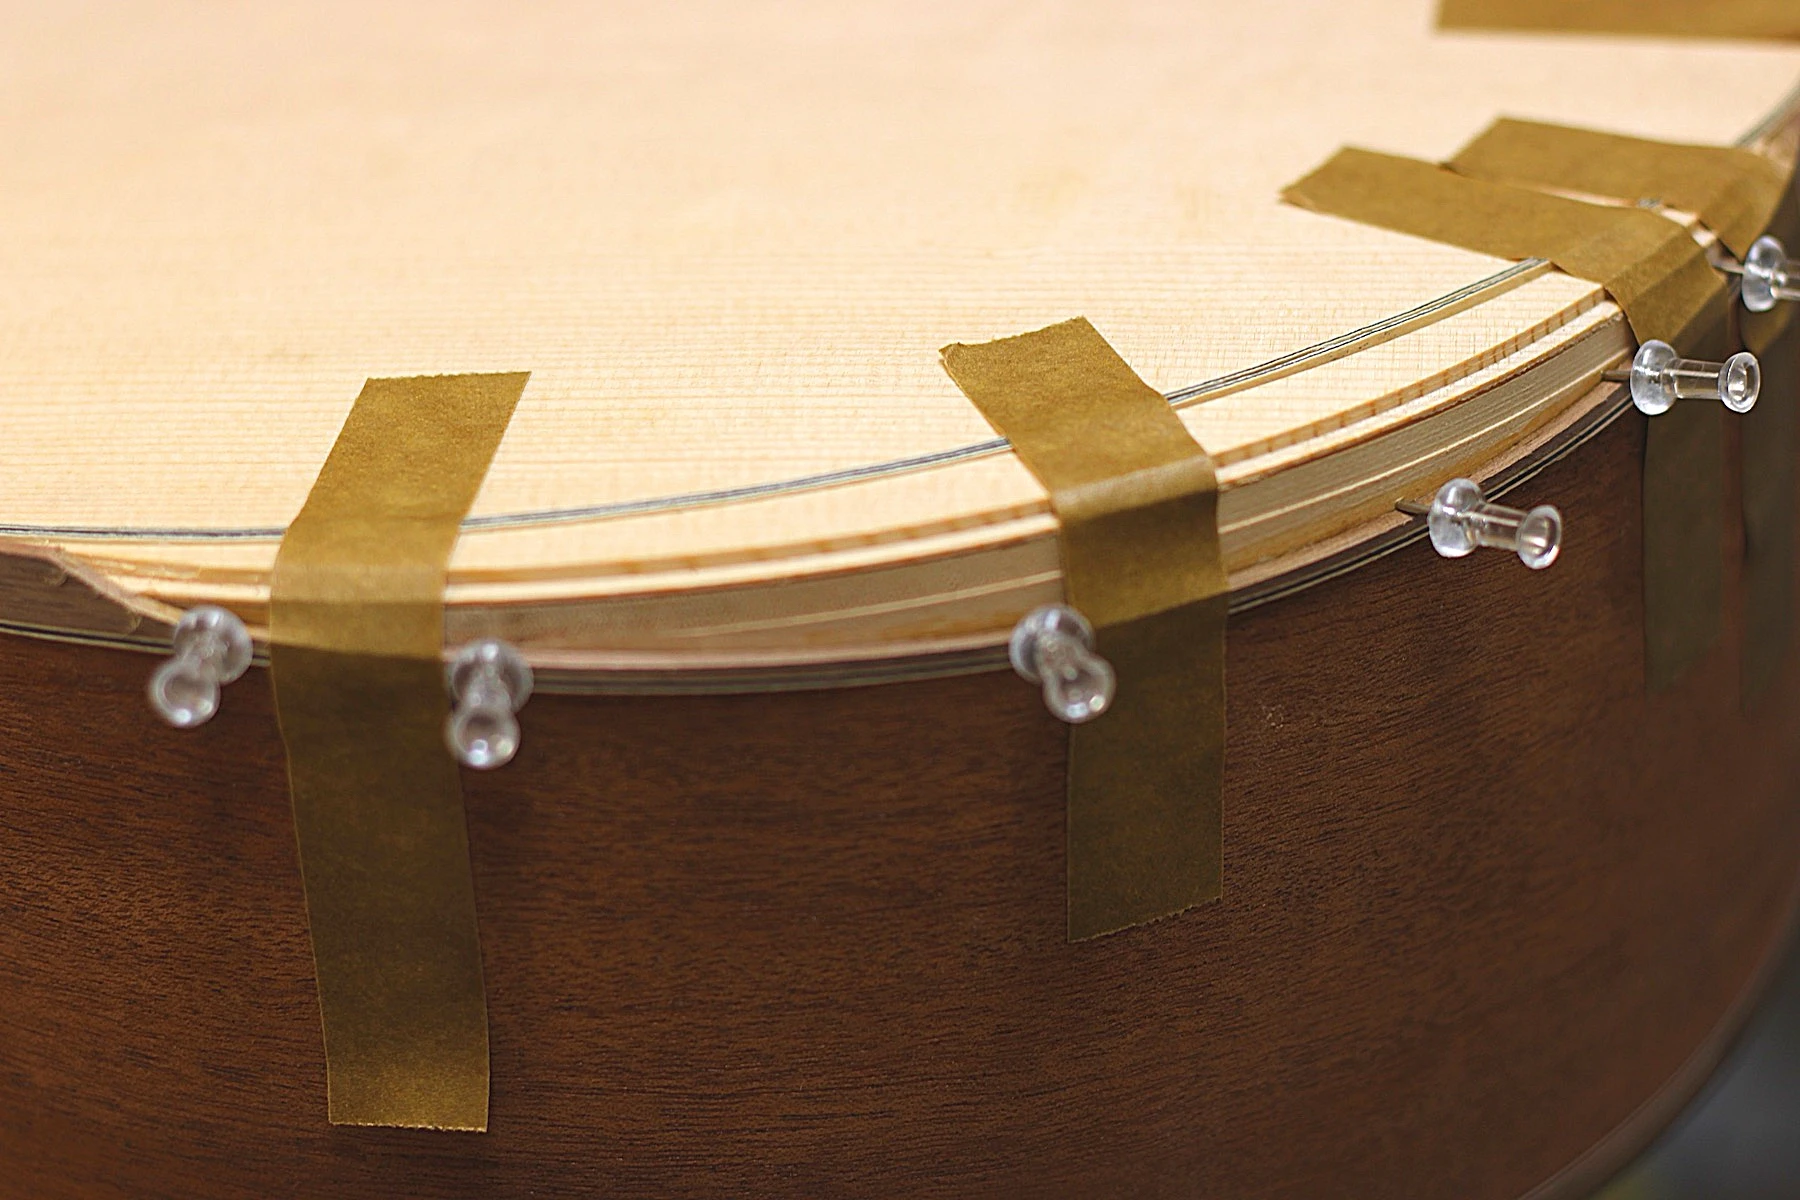
Arm Bevel Binding
Binding Glue-up
CA glue is wicked down into the purfling, binding, soundboard, side and even kerfing materials, forming a cohesive unit that becomes the decorative, protective edge of the body of my guitar.
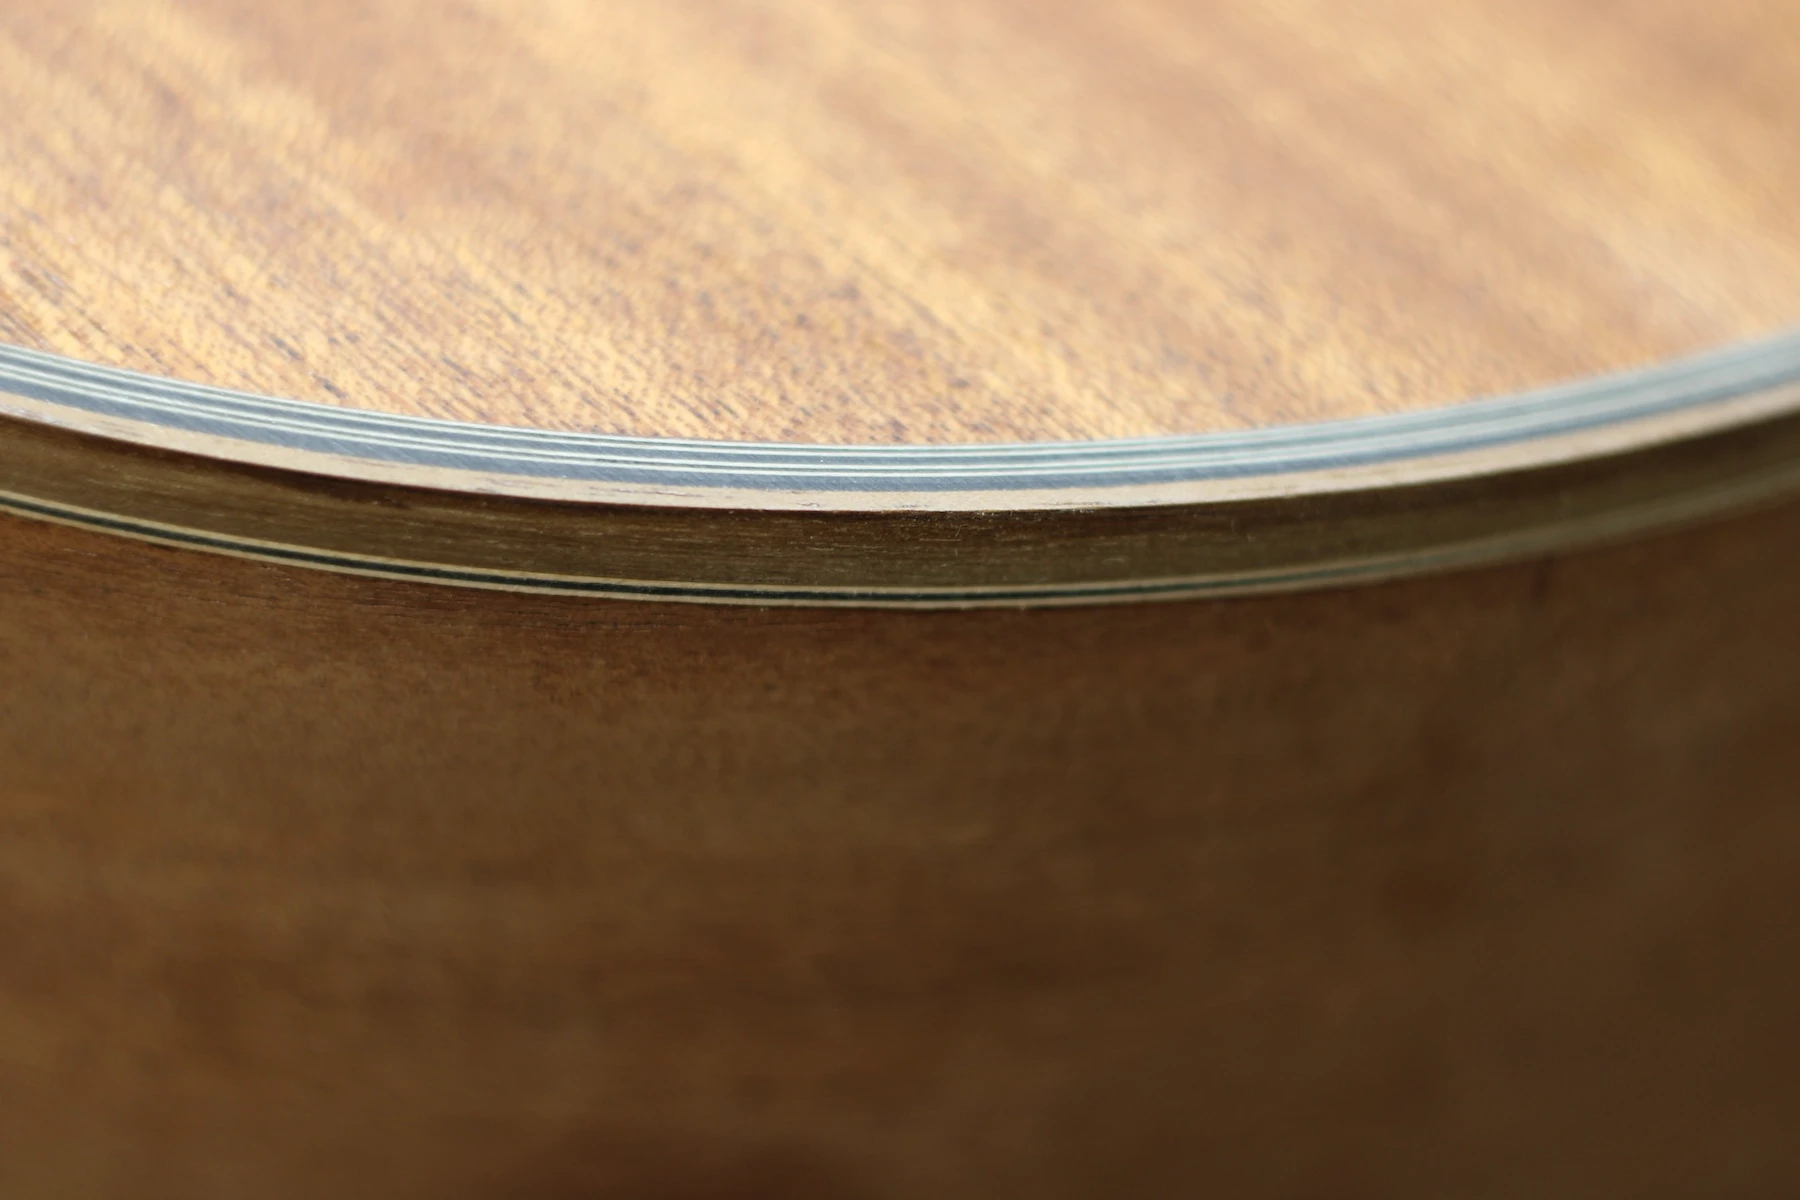
New Wooden Binding and Purfling
I am aware of three approaches to the arm bevel. The first is the "bent" or "molded" top, where the soundboard is literally bent to conform to the contour cut into the sides. I have seen this on instruments made by and musician and former luthier Mike Doolin.
Doolin Bent Top Arm Rest
The second approach is credited to Grit Laskin, Canadian luthier and inlay artist. His stylish arm bevel appears to be cut into the guitar, and is almost an independent feature.
Laskin Arm Rest
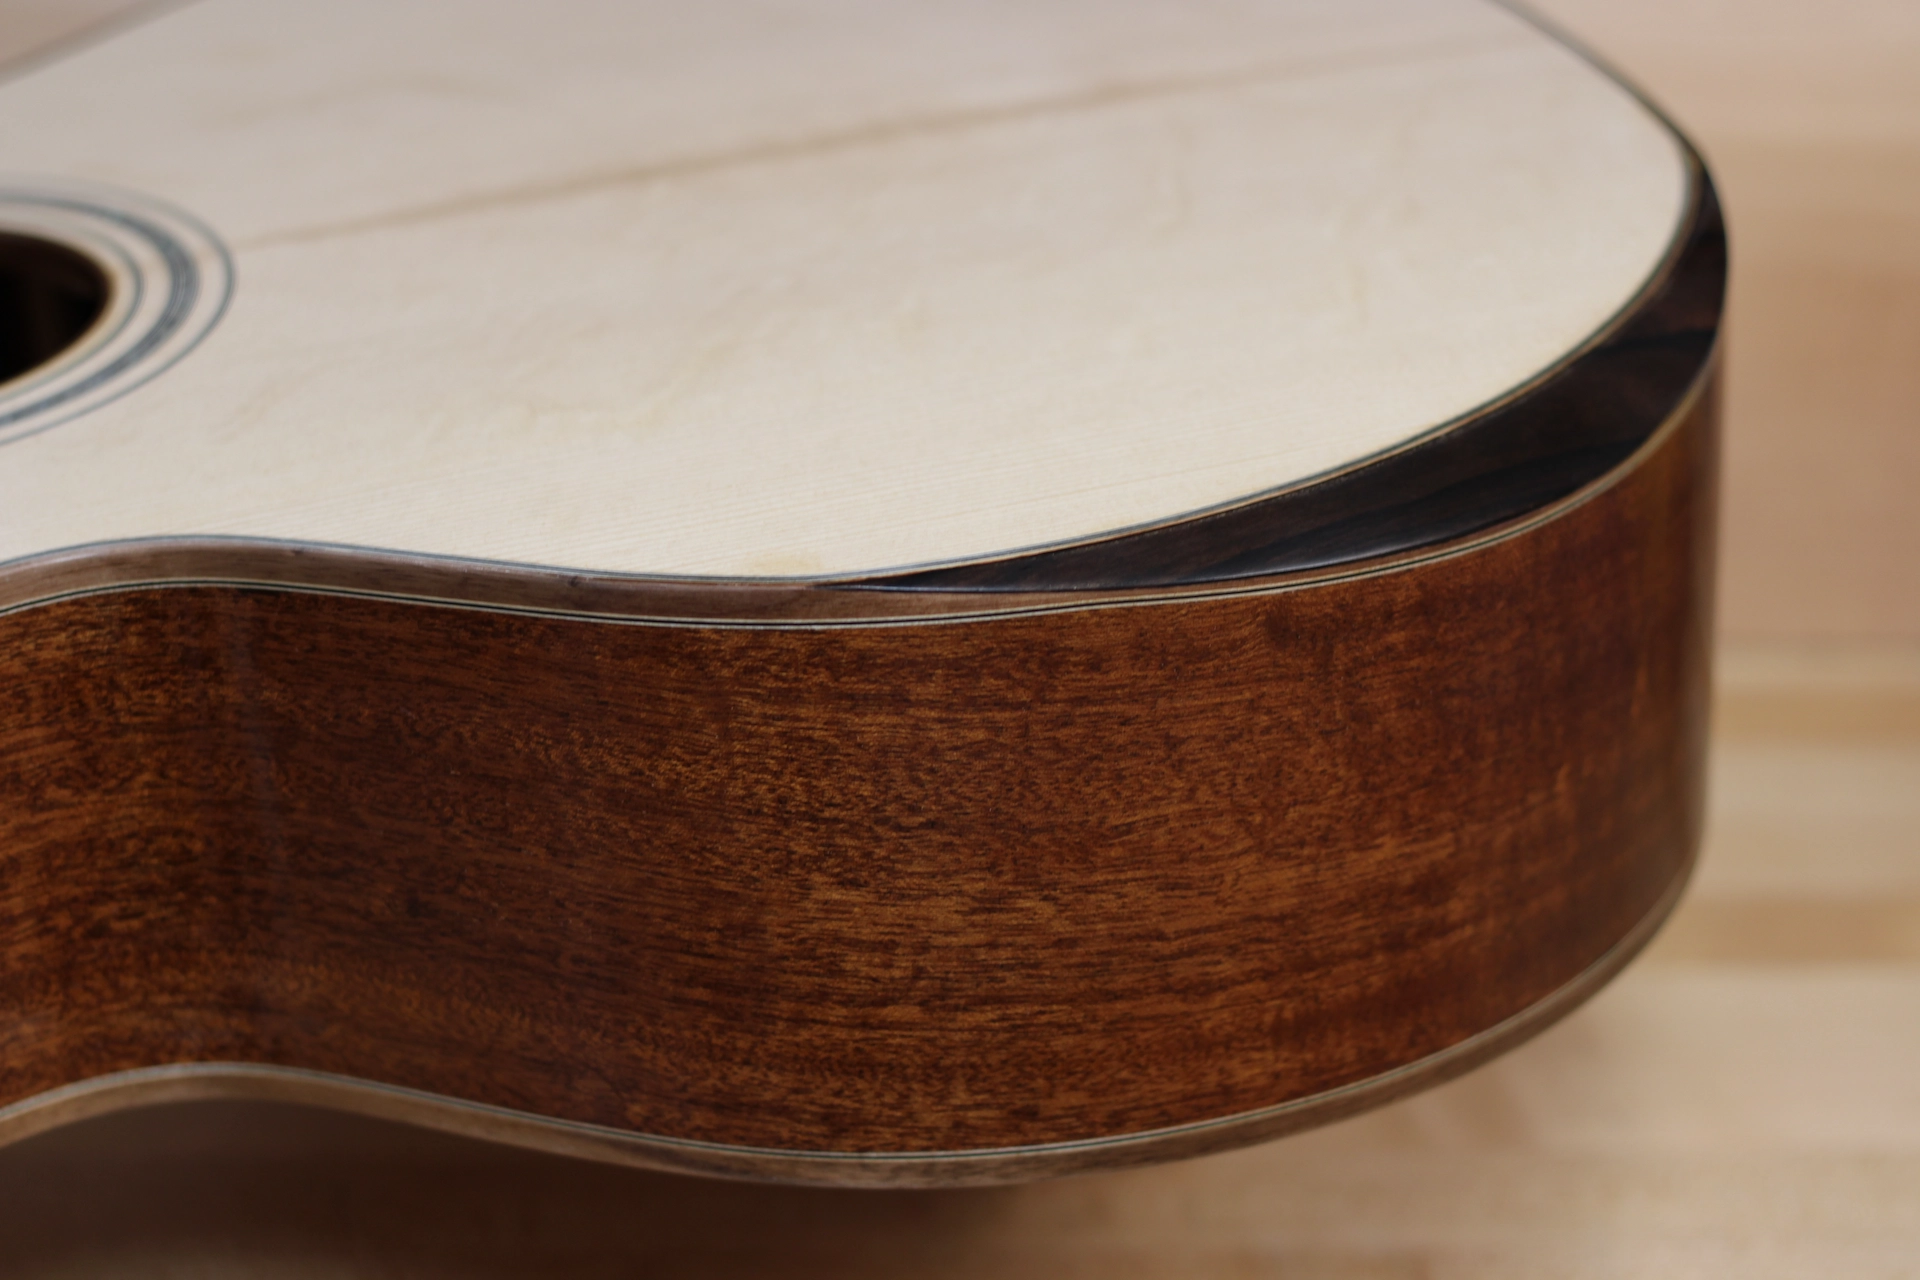
The third approach, and the one I am incorporating a variation of here, is the Everett "transitional" arm bevel. This style of arm bevel presents the appearance of simply being a wider section of the binding, having no visual interruptions, and no sharp points to run your arm into.
Everett Arm Bevel
The base of the transitional arm bevel is the basswood block that you would have seen earlier in the article, under the section titled, The Arm Bevel (Interior). Over this base I incorporate both the purfling, which follows the edge of the soundboard, and the binding, which follows the contour cut into the side. The wooden block is then shaped by hand to form a bevel. Glue is then applied to receive the veneer.
Arm Bevel Shaped and Ready for Veneer
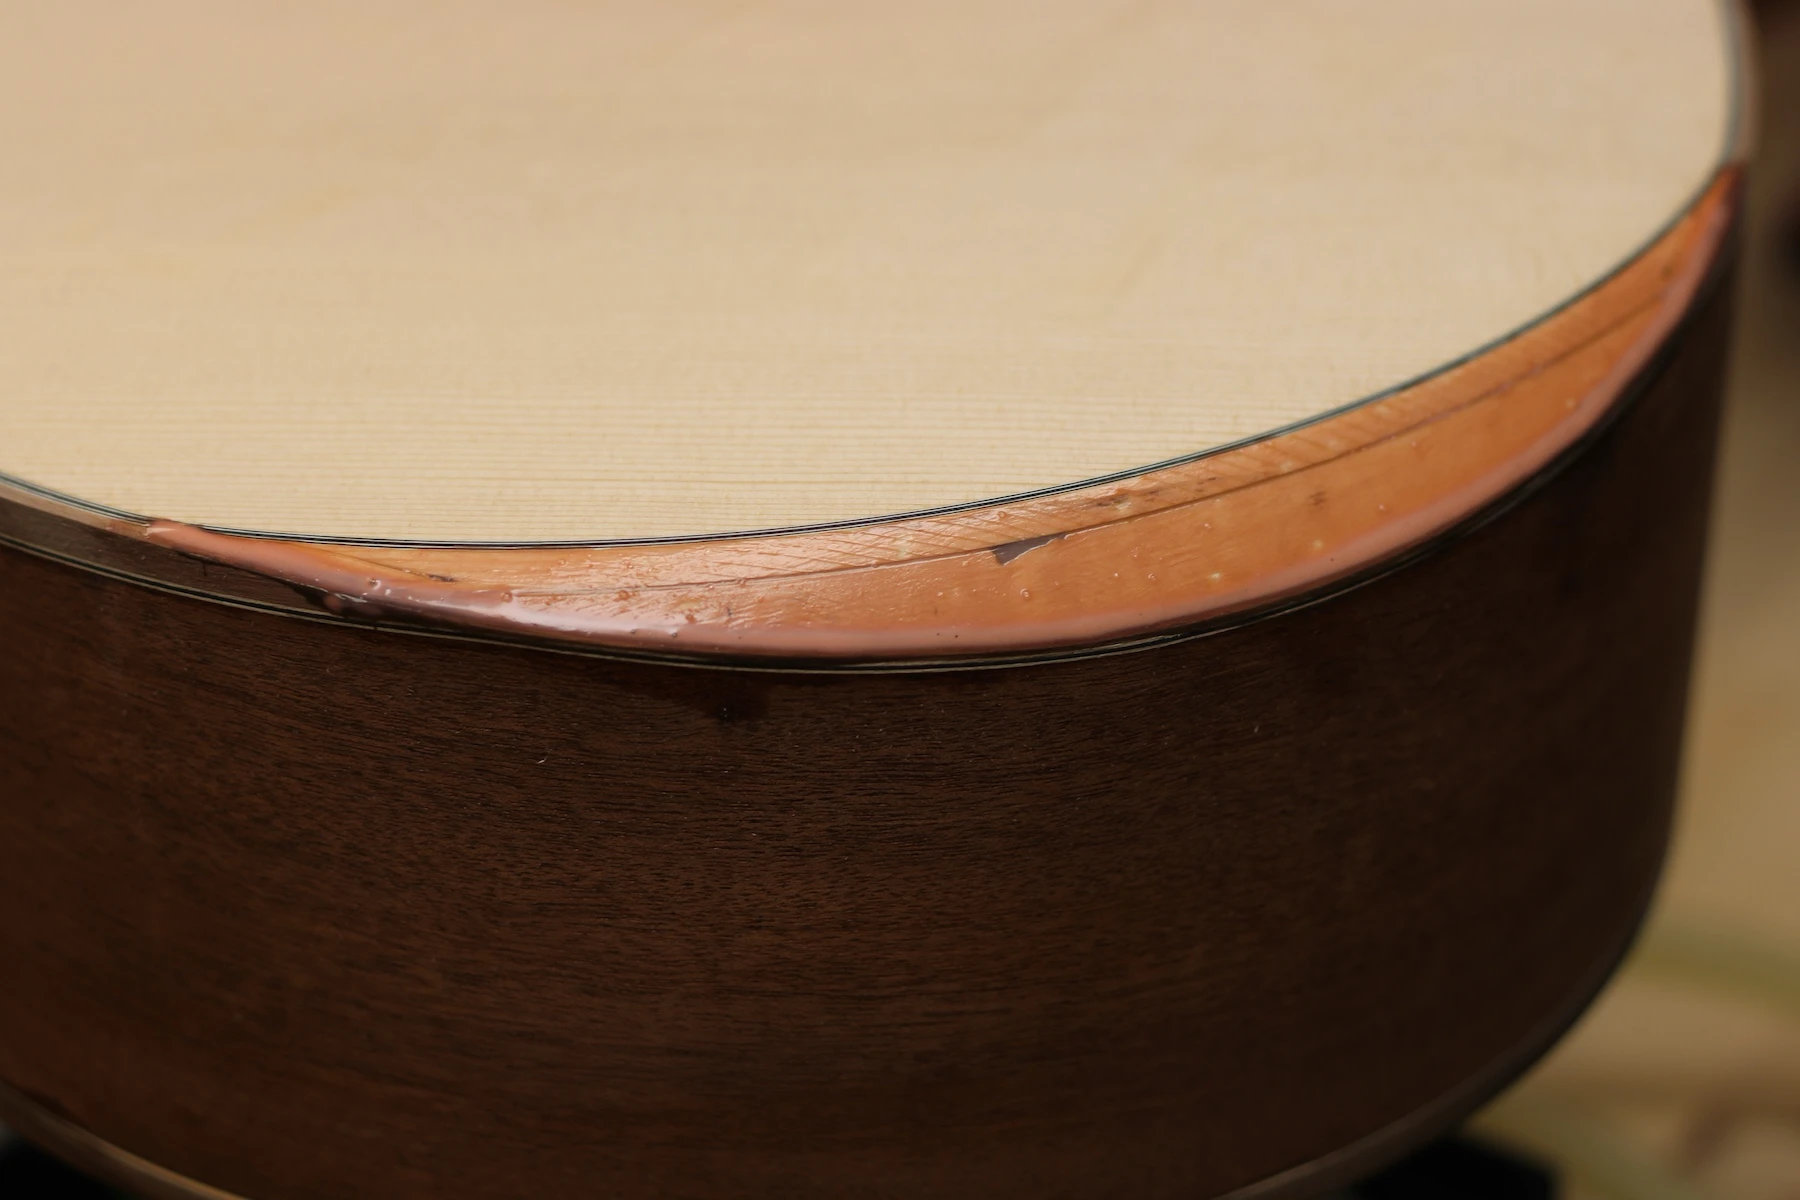
I glued on a Walnut veneer...
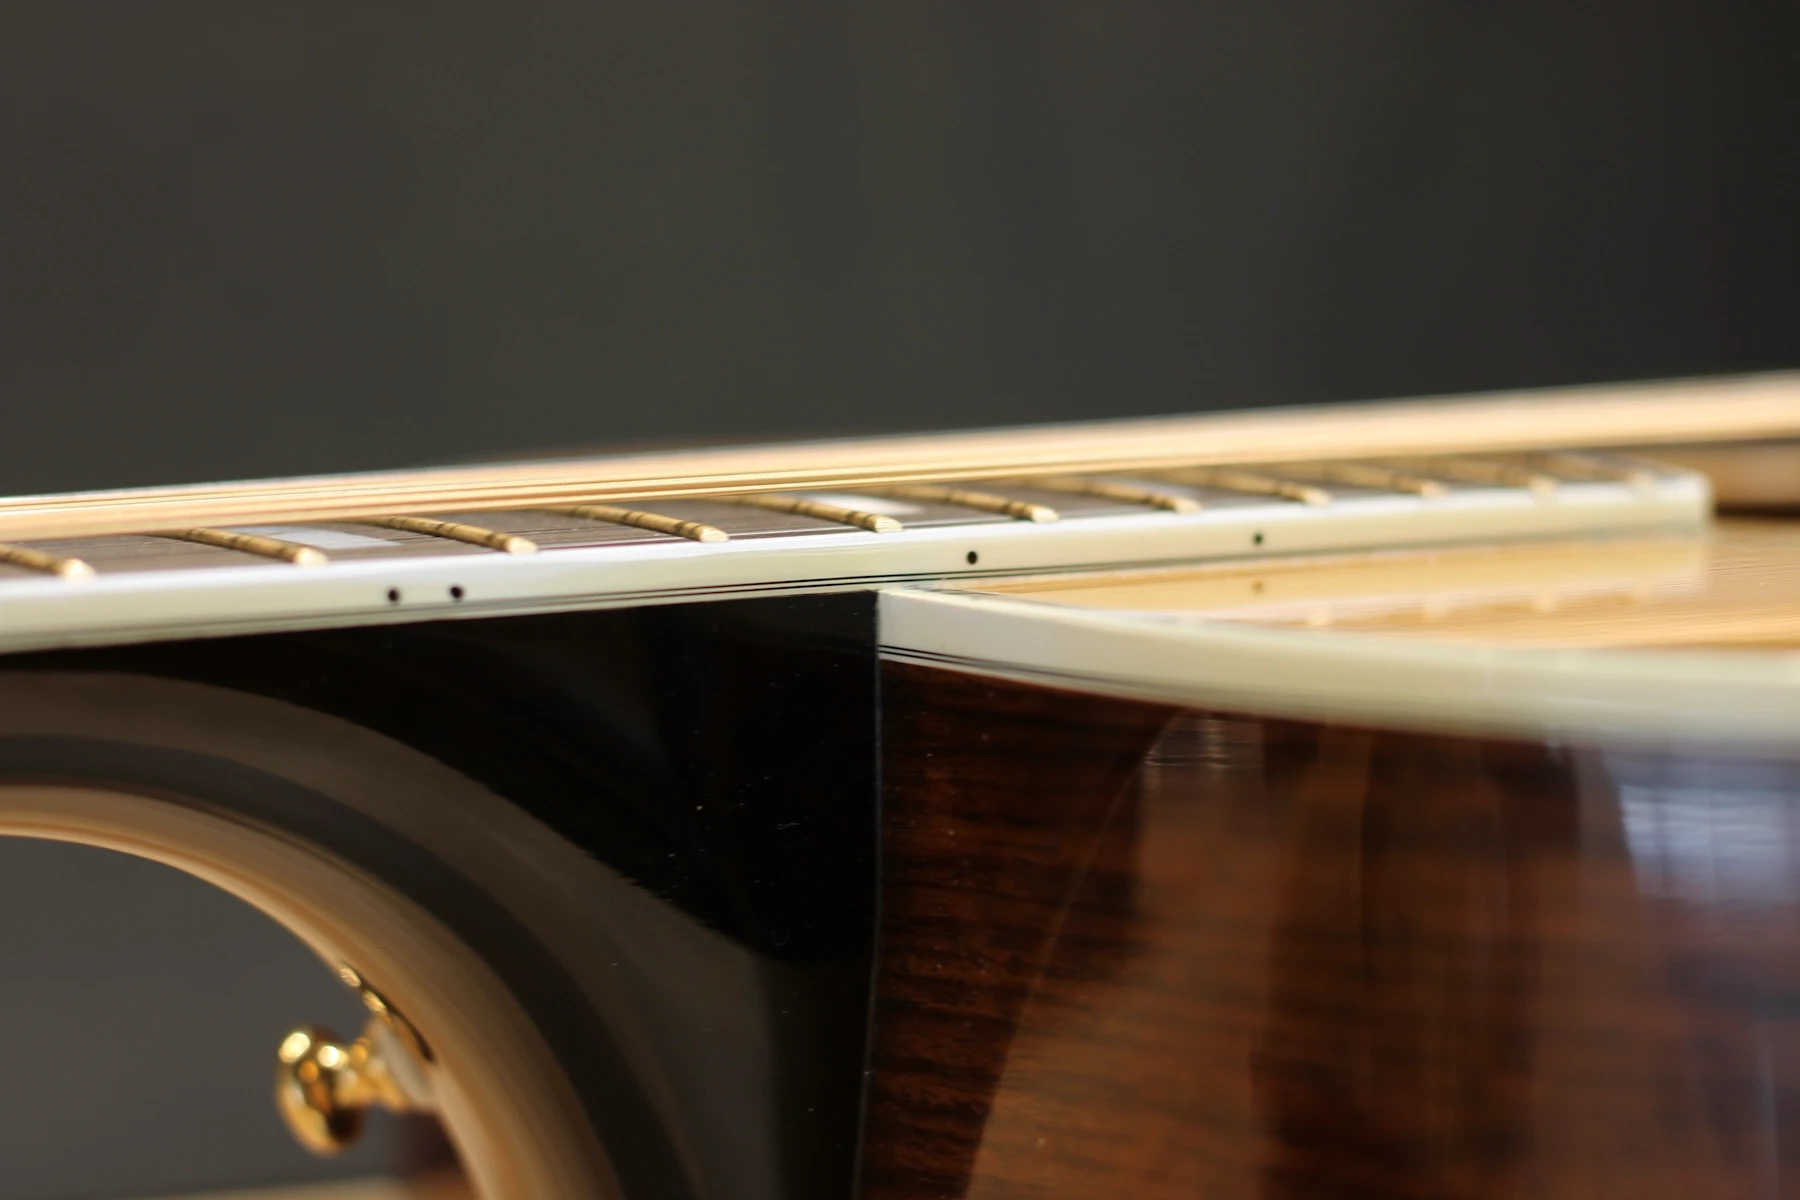
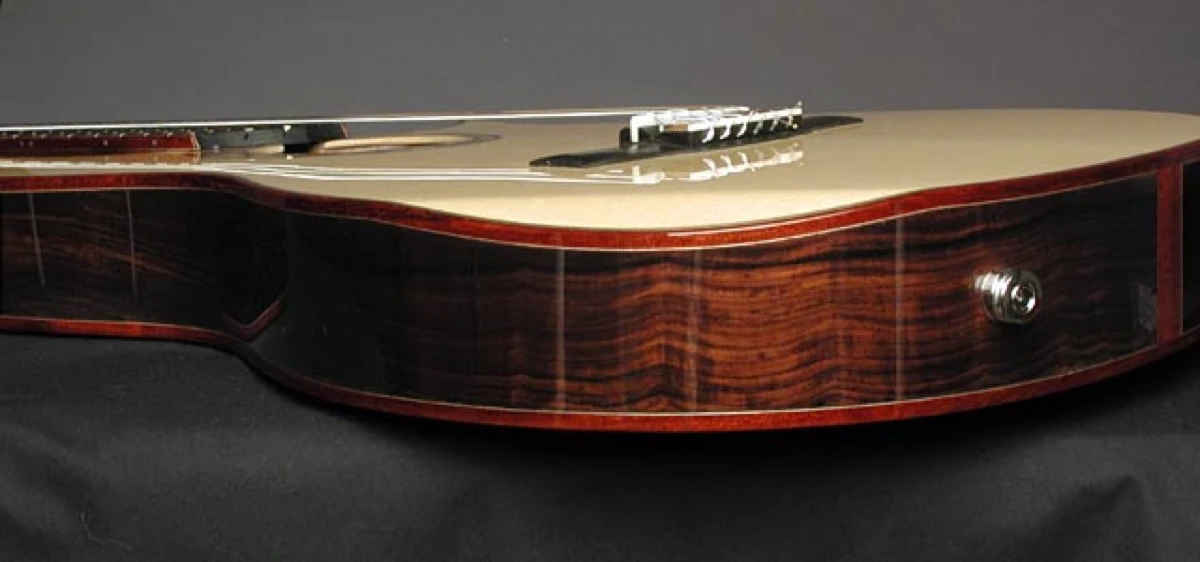
Completed Arm Bevel
... but I didn't like it. Neat. Clean. But not what this guitar needed. So I filed it back off and replaced it with Ziricote. The arm bevel is now complete.
Arm Bevel Ziricote
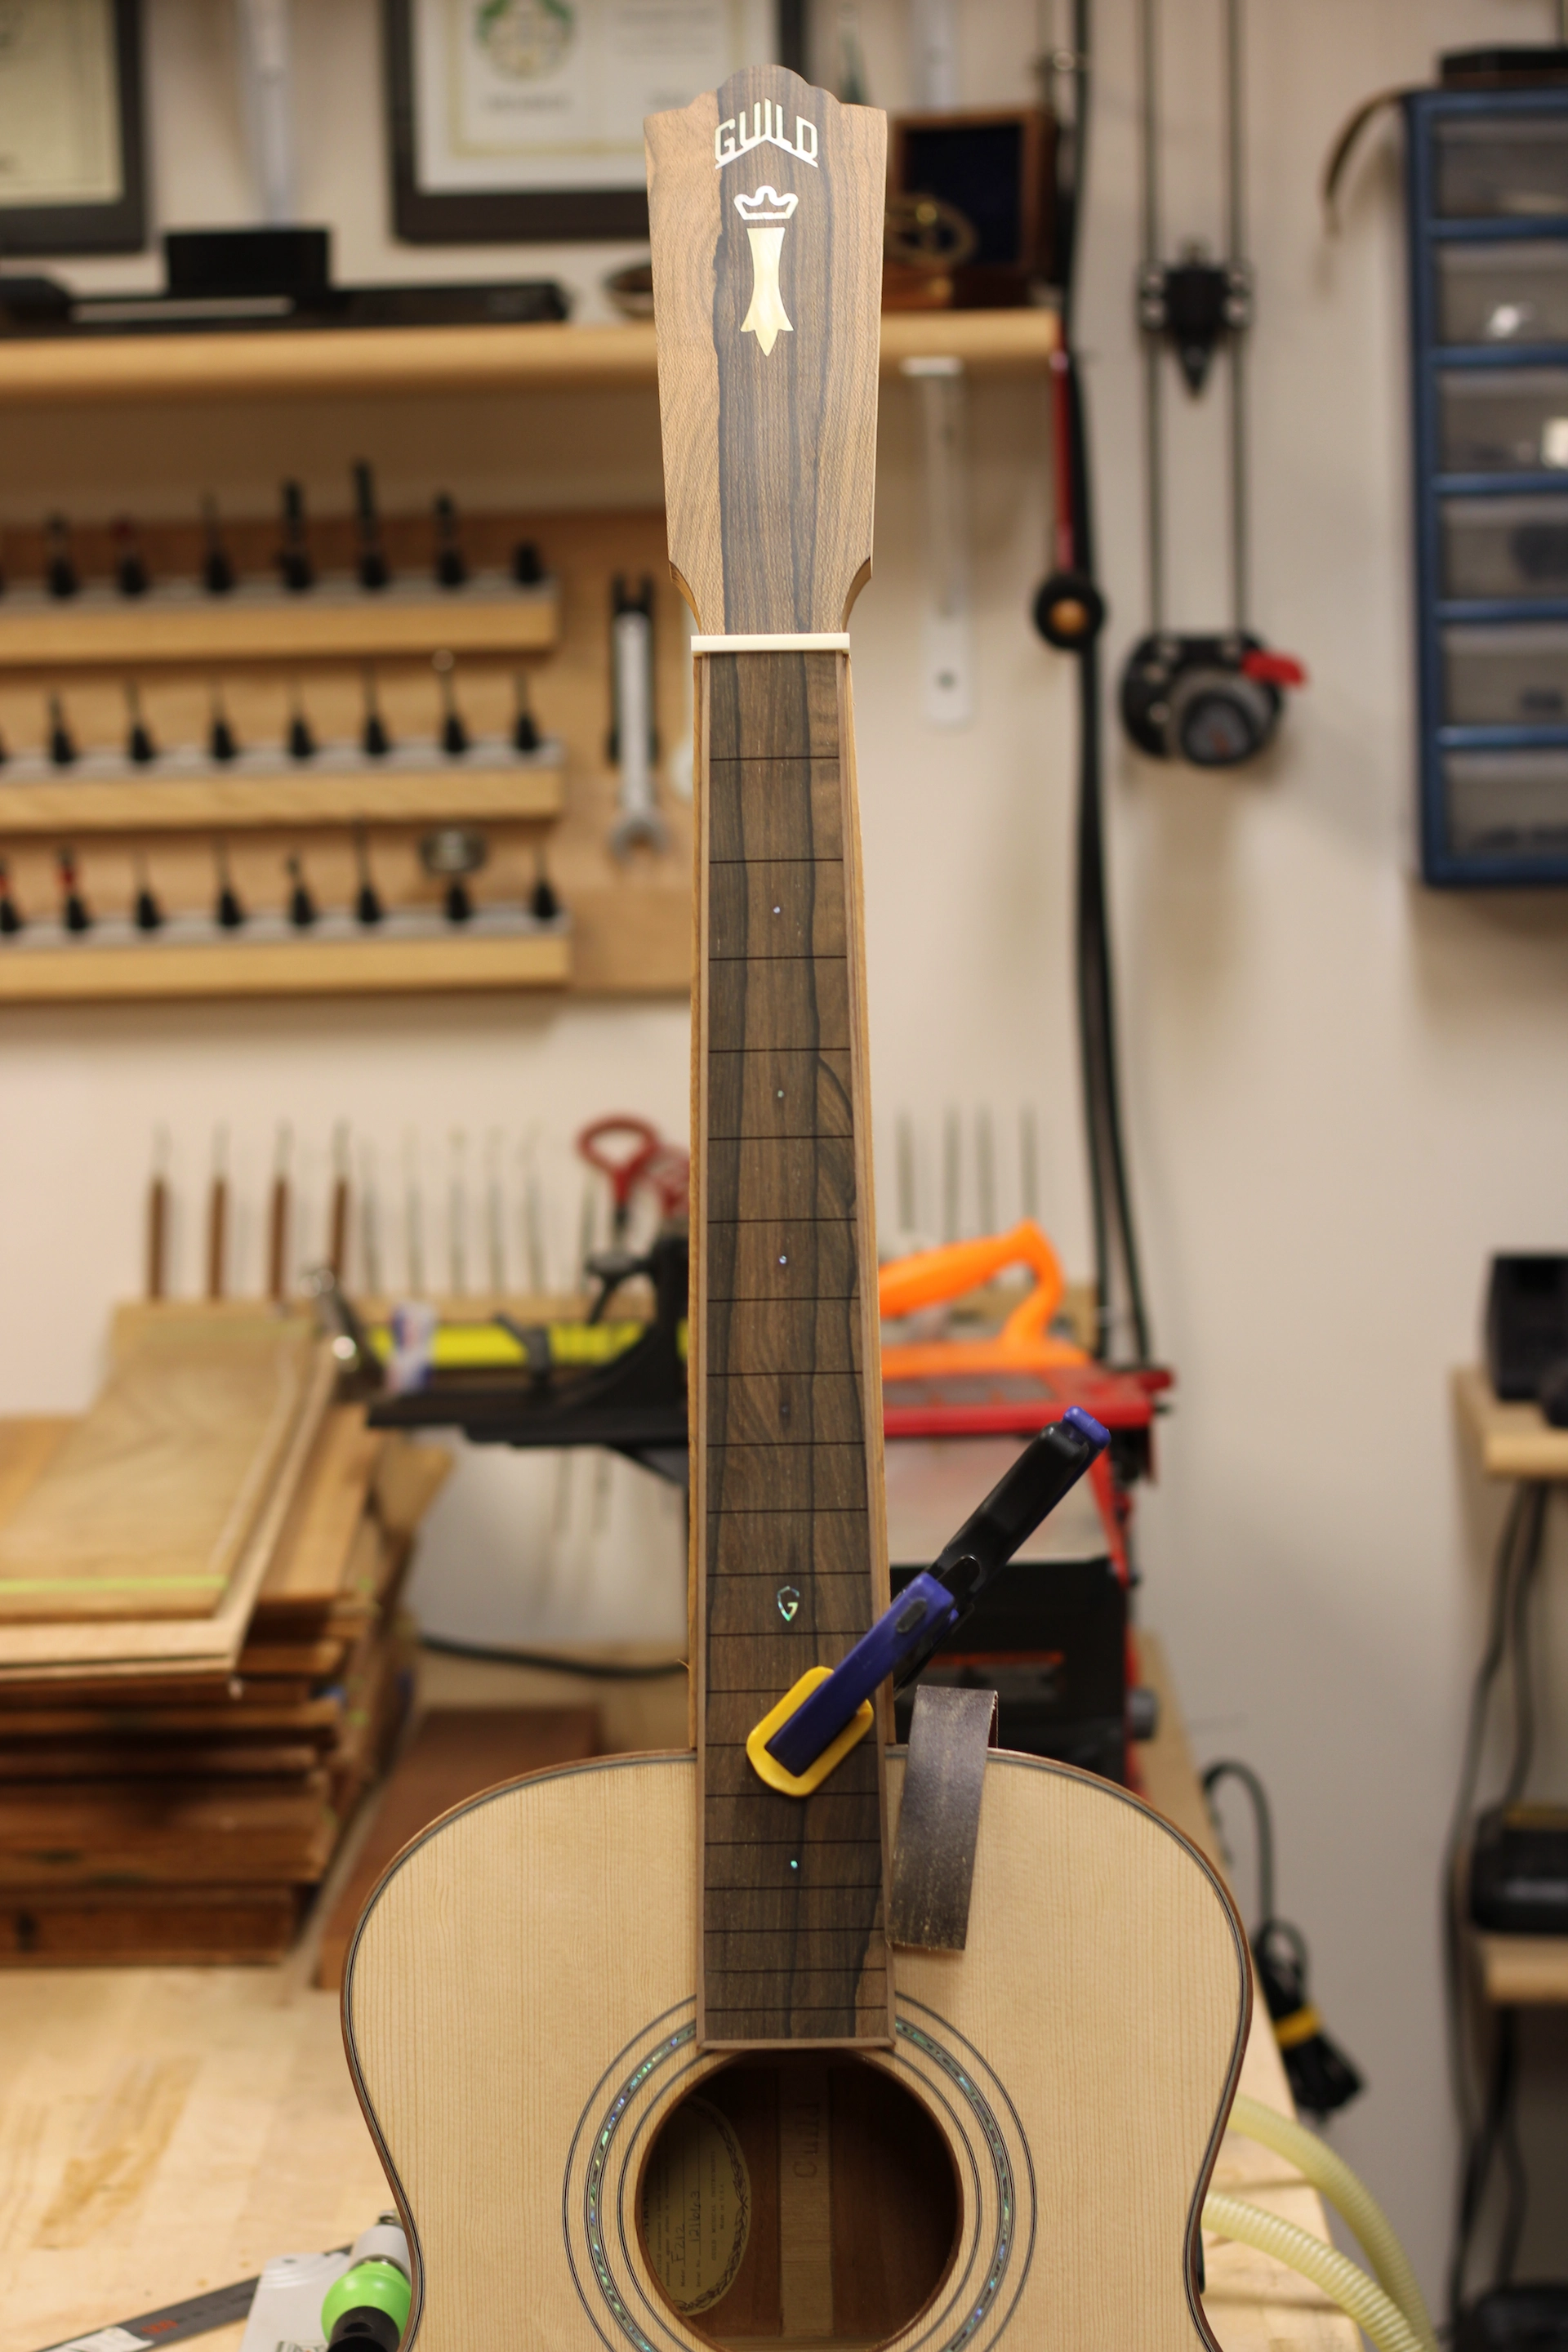
Instead of veneering black plastic onto the face of the headstock, which is what this 1975 Guild F-212 originally shipped with, or black fiberboard, which is what my 1980 Guild F-412 shipped with, I am adding a Ziricote headplate (headstock faceplate) to coordinate with the fretboard, bridge and arm bevel. I am inlaying the Guild Chesterfield logo cut from Mother of Pearl to honor the original.
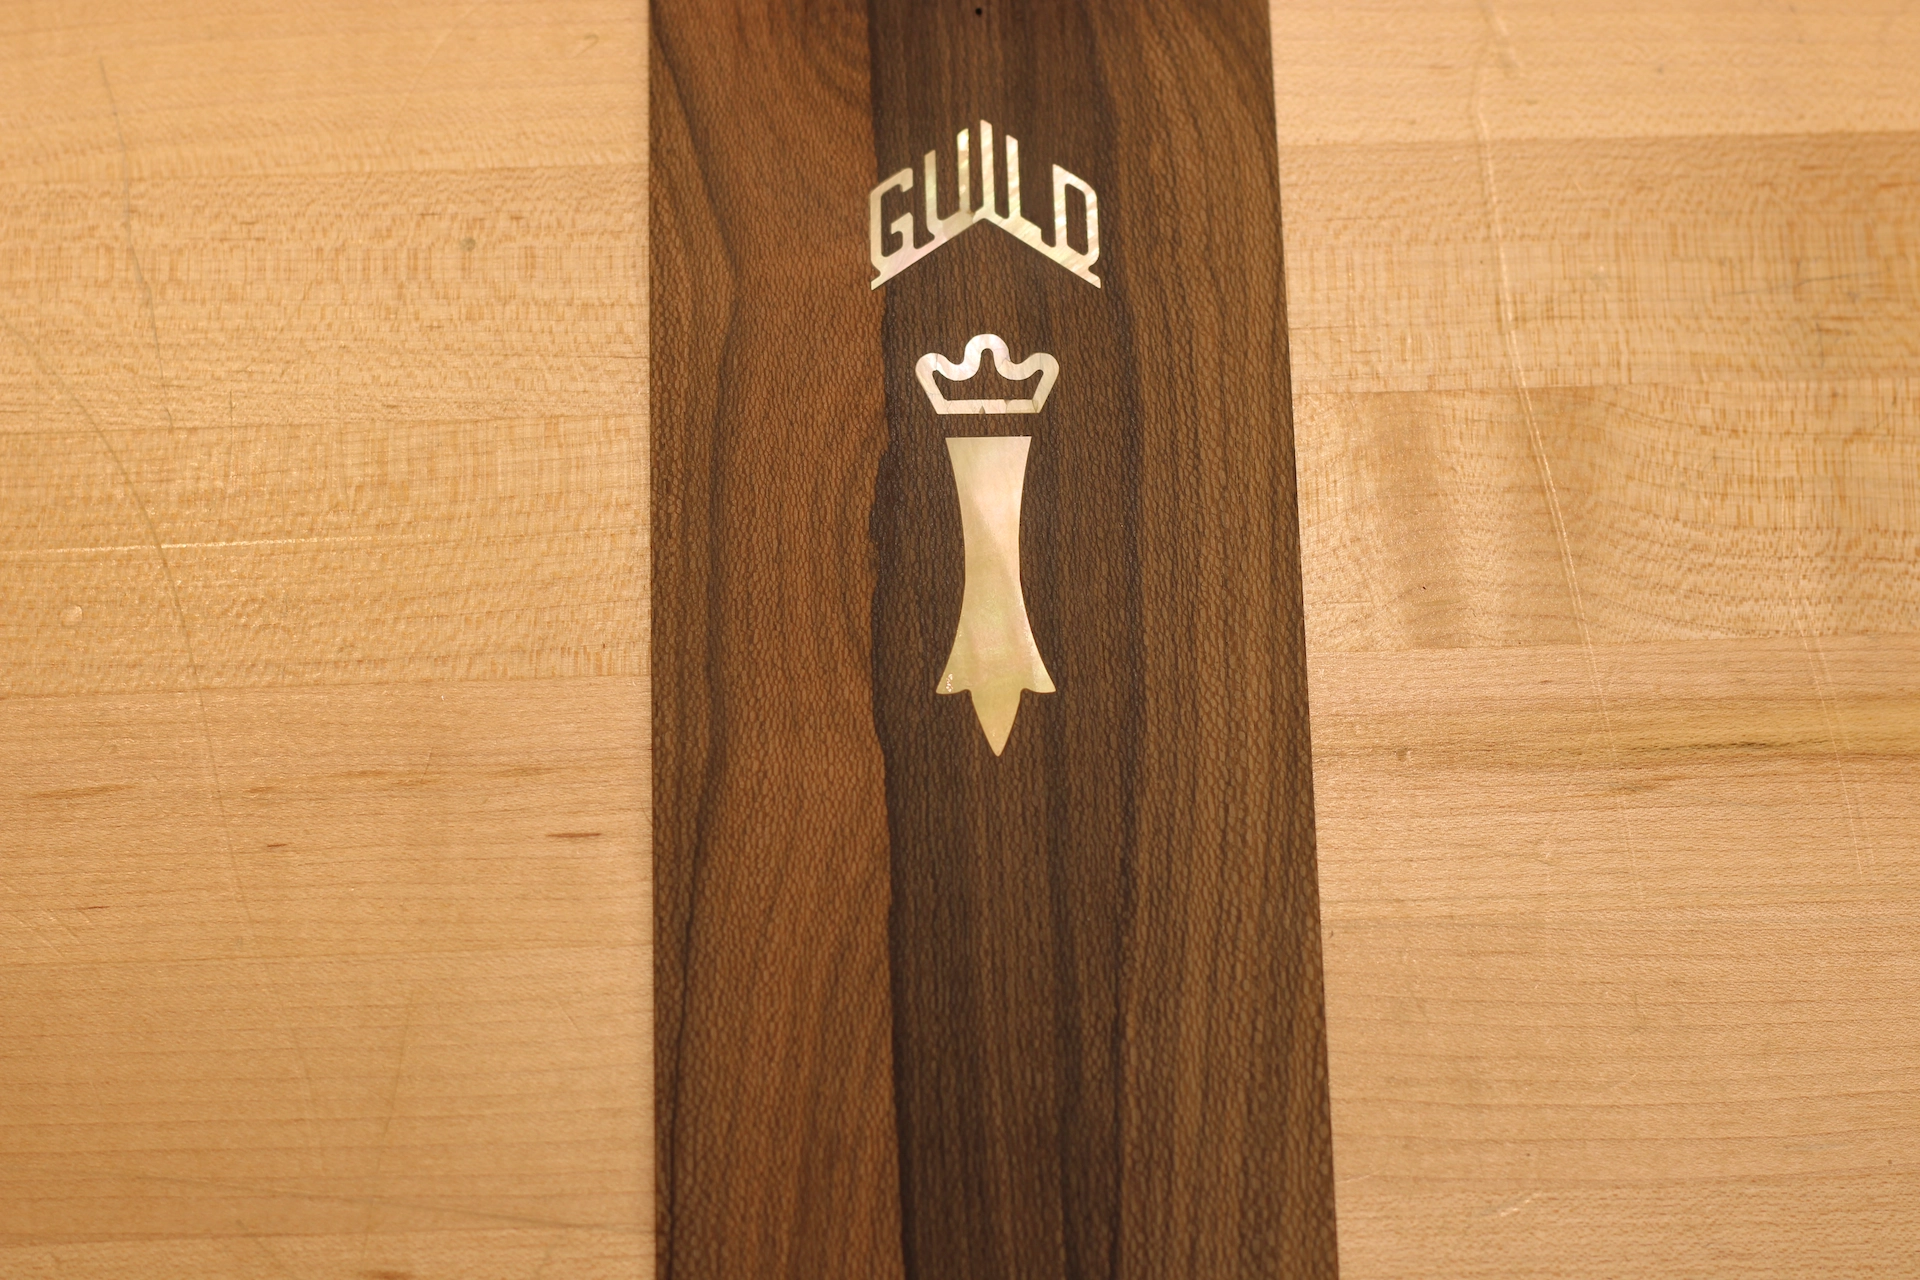
Guild Chesterfield Logo (Mother of Pearl in Ziricote)
I have repaired and modified many a Guild neck, but this will be the first one I have constructed from scratch. The design of the neck is pretty much dictated by the original. This neck will feature a 3-piece lamination, a Guild staple. I had briefly flirted with the idea of a 5-piece neck, but abandoned the notion after viewing a mock-up. While the original Mahogany neck had a Maple stripe down the center, a Walnut stripe will be more pleasing to look at on this guitar.
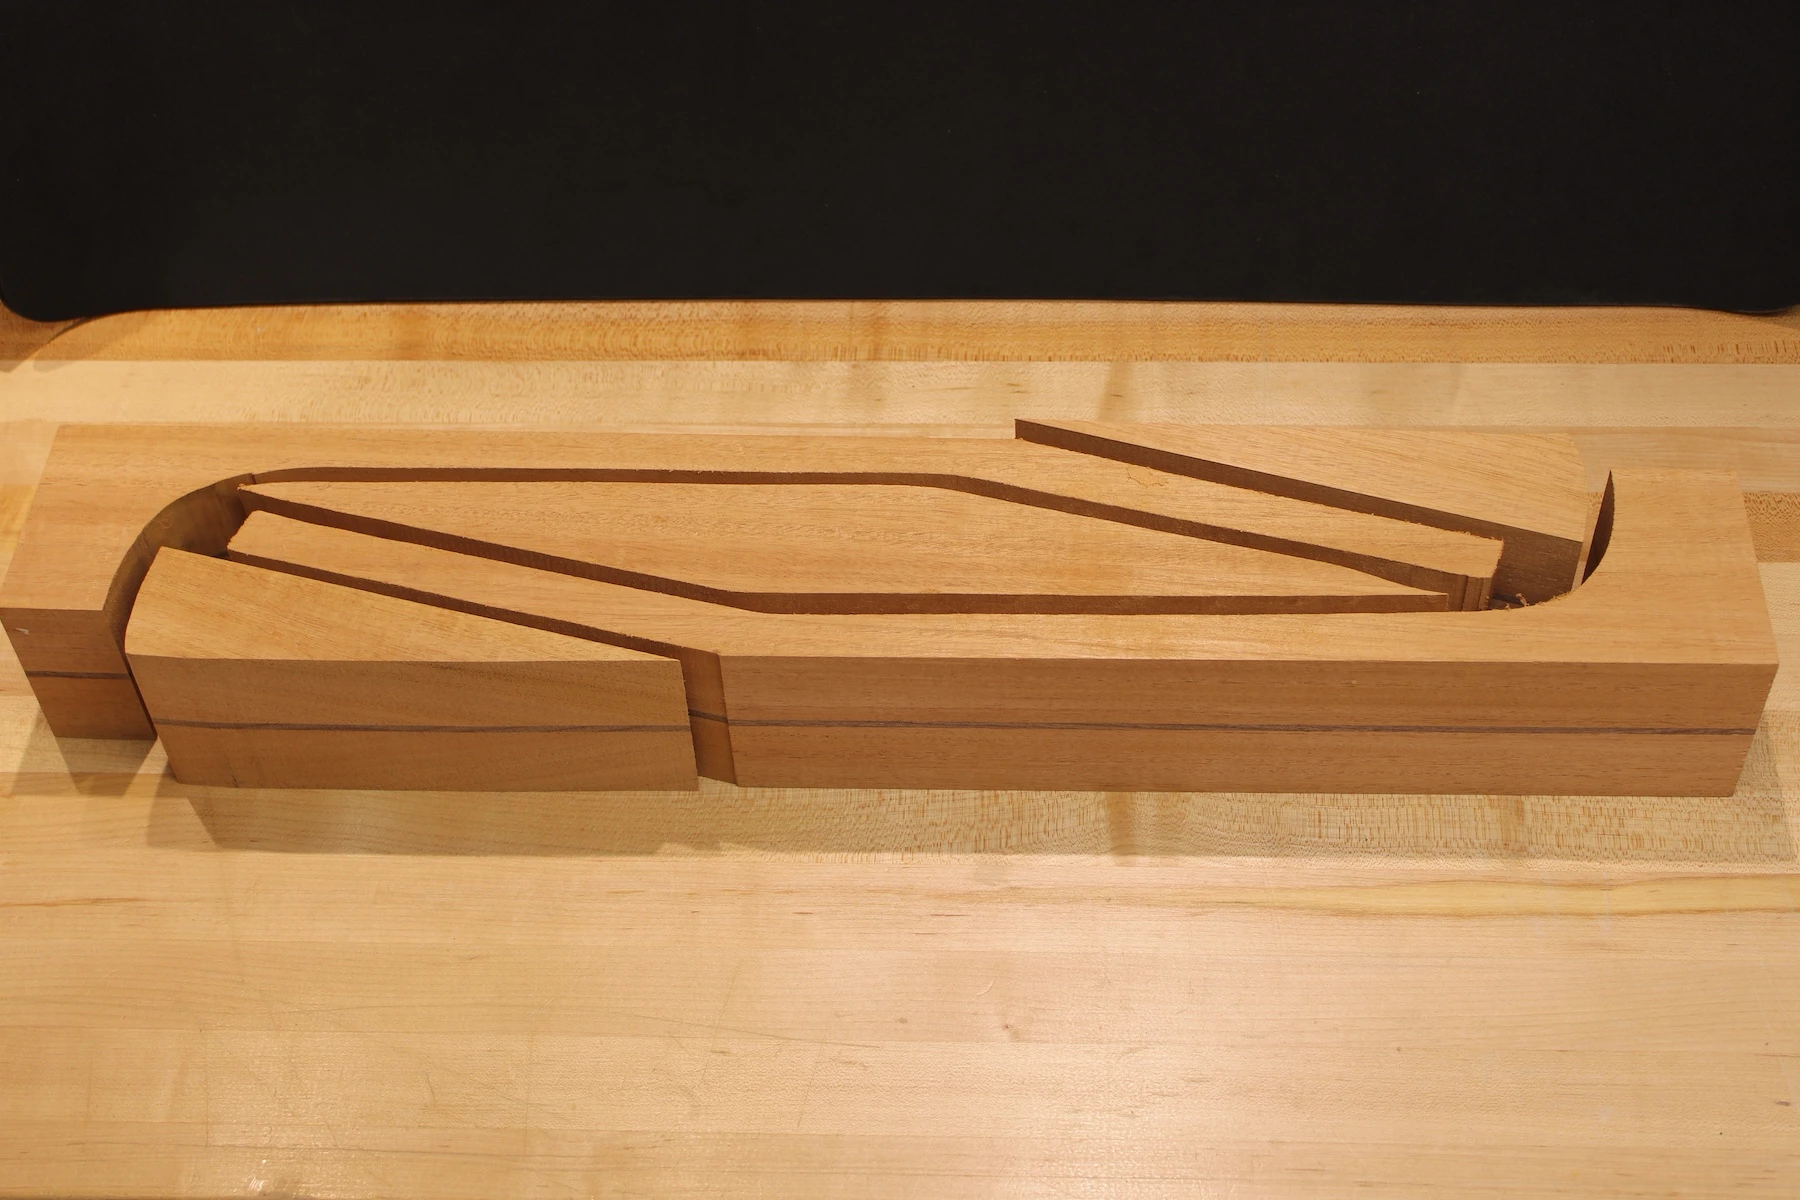
Guild Style 3-Piece Necks
Additionally, I am altering the width of the center stripe, increasing it from the stock 1/8" to 5/32", just enough to give the stripe a bit more visual prominence. This wider center stripe is not without precedent, mind you. See this image of the back of the headstock of an F-212 from 1968:
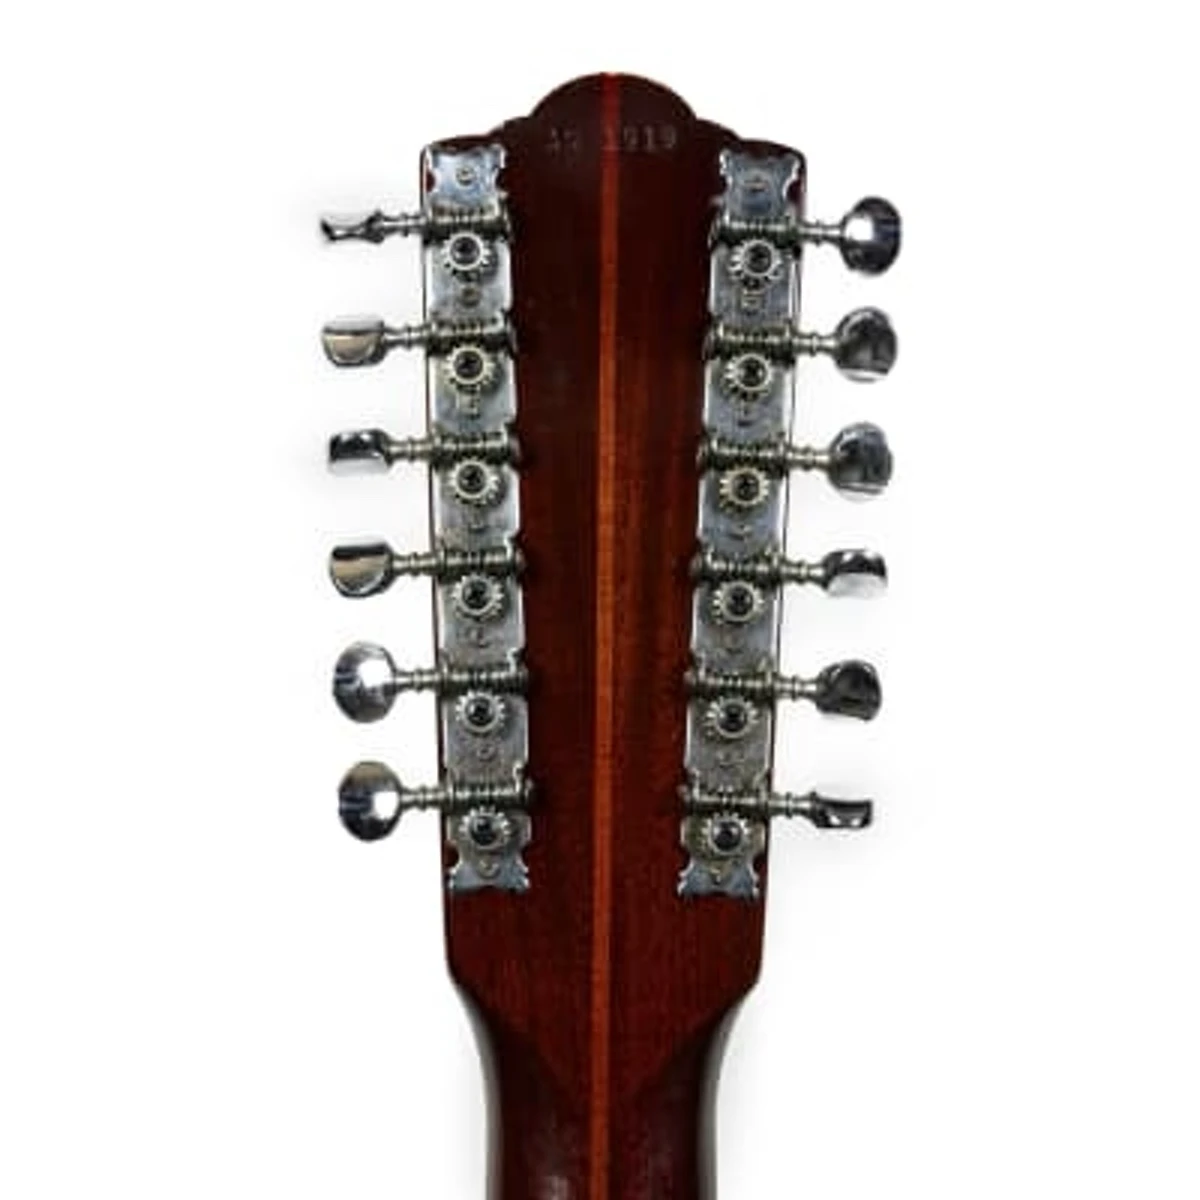
1968 Guild F-212
I have used Mahogany that is wide enough to avoid having to glue on extensions ("ears" or "wings") to the headstock. Like the original, this new neck is not scarfed; it is a continual piece of wood from end-to-end, band-sawn out of my laminated block.
Roughed-out Mahogany Neck (Walnut vs Maple stripe)
Unlike the original, there is no danger of snapping the neck at the headstock. Breakage is prevented by the method of reinforcement I use. A carbon fiber D-Tube from DragonPlate sits in place of the old twin steel compression rods, and prevents the neck from bowing, either forward or back. An added benefit is the stability it lends to one of the weakest sections of an acoustic guitar: the thin neck at the nut. If you'd like to read more about this, I have an entire article devoted to the topic. Go to my article » DragonPlate D-Tube Neck Beam - Truss Rod Alternative
Neck fitted with D-Tube
I centered the headplate on the headstock, clamped it in place, and drilled for wooden pins. I then glued, pinned, and clamped the headplate to the headstock and let it dry overnight. Using a template I had fashioned from phenolic, I was able to rout the uniques Guild headstock shape with a flush-trim bit.
Headstock Template
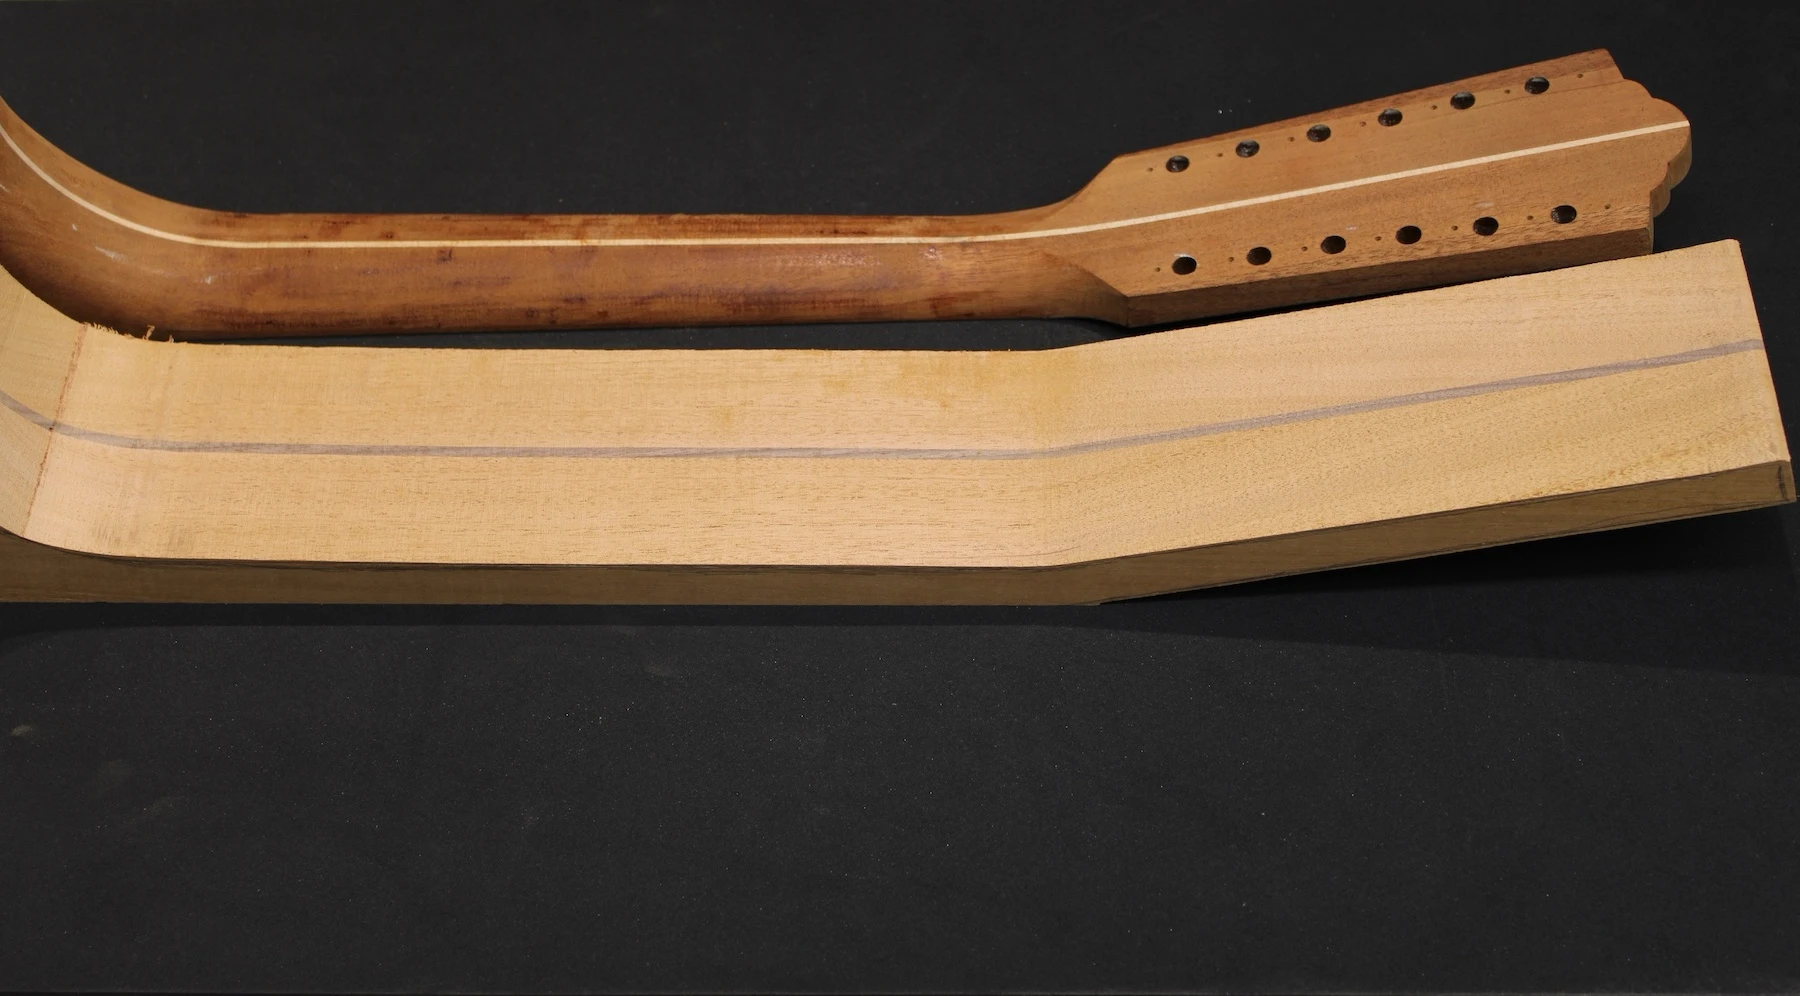
I trimmed the width of the neck close to final dimensions at the bandsaw. Using a spokeshave and a scraper, I worked the back of the headstock down to proper thickness.
Spokeshave and Scraper to thickness the Headstock
I had plugged the original dovetail mortise, as it is not always known where the new mortise will be cut. The mortise on this guitar was off-center and had been cut rather shallow.
Old Dovetail Mortise
The new mortise is properly centered, is deeper, and the walls of the dovetail joint are at a steeper angle.
New Dovetail Mortise
The F-212 was so very conservatively appointed, featuring a simple plastic rosette and plastic binding. The fretboard was no exception, as it was unbound and only featured small plastic side dots. Having bound the body of the new guitar with Walnut, I find it necessary to continue the binding around the fretboard.
I prepared a billet of Ziricote, cutting it to size while trying to encase the figure in such a way as to both showcase the stunning grain patterns as well as provide a visual reference on the fretboard at the 5th fret.
Guild guitars, at least from the 1970s and through the end of the Fender ownership era, use a 650 mm scale (aka “Classical” scale, or just under 25-5/8″). These instruments are often misrepresented as being 25.5″ scale. I assure you, they are not, though the difference between the two would be difficult to detect for the average player, even using a tape measure. However, the difference is huge when addressing intonation. Recut a saddle slot based on 25.5 instead of the proper 25.6 and see what I mean.
After cutting the new fret slots, I then cut the shape of the board, making allowances for the binding. After the binding is glued on, I radius the board. My first Guild came with a 12″ radius, and it was so comfortable to play. On my acoustic necks, I have experimented with everything from 9″ to 20″, including compound radii. I am making this board 12″ throughout.
My target dimensions for the F-212 fretboard are based on the existing fretboard dimensions of two separate guitars from 1975. They both measure 2-1/2″ wide at the 20th fret and slightly more than 1-13/16th″ at the nut. They are both 18″ long.
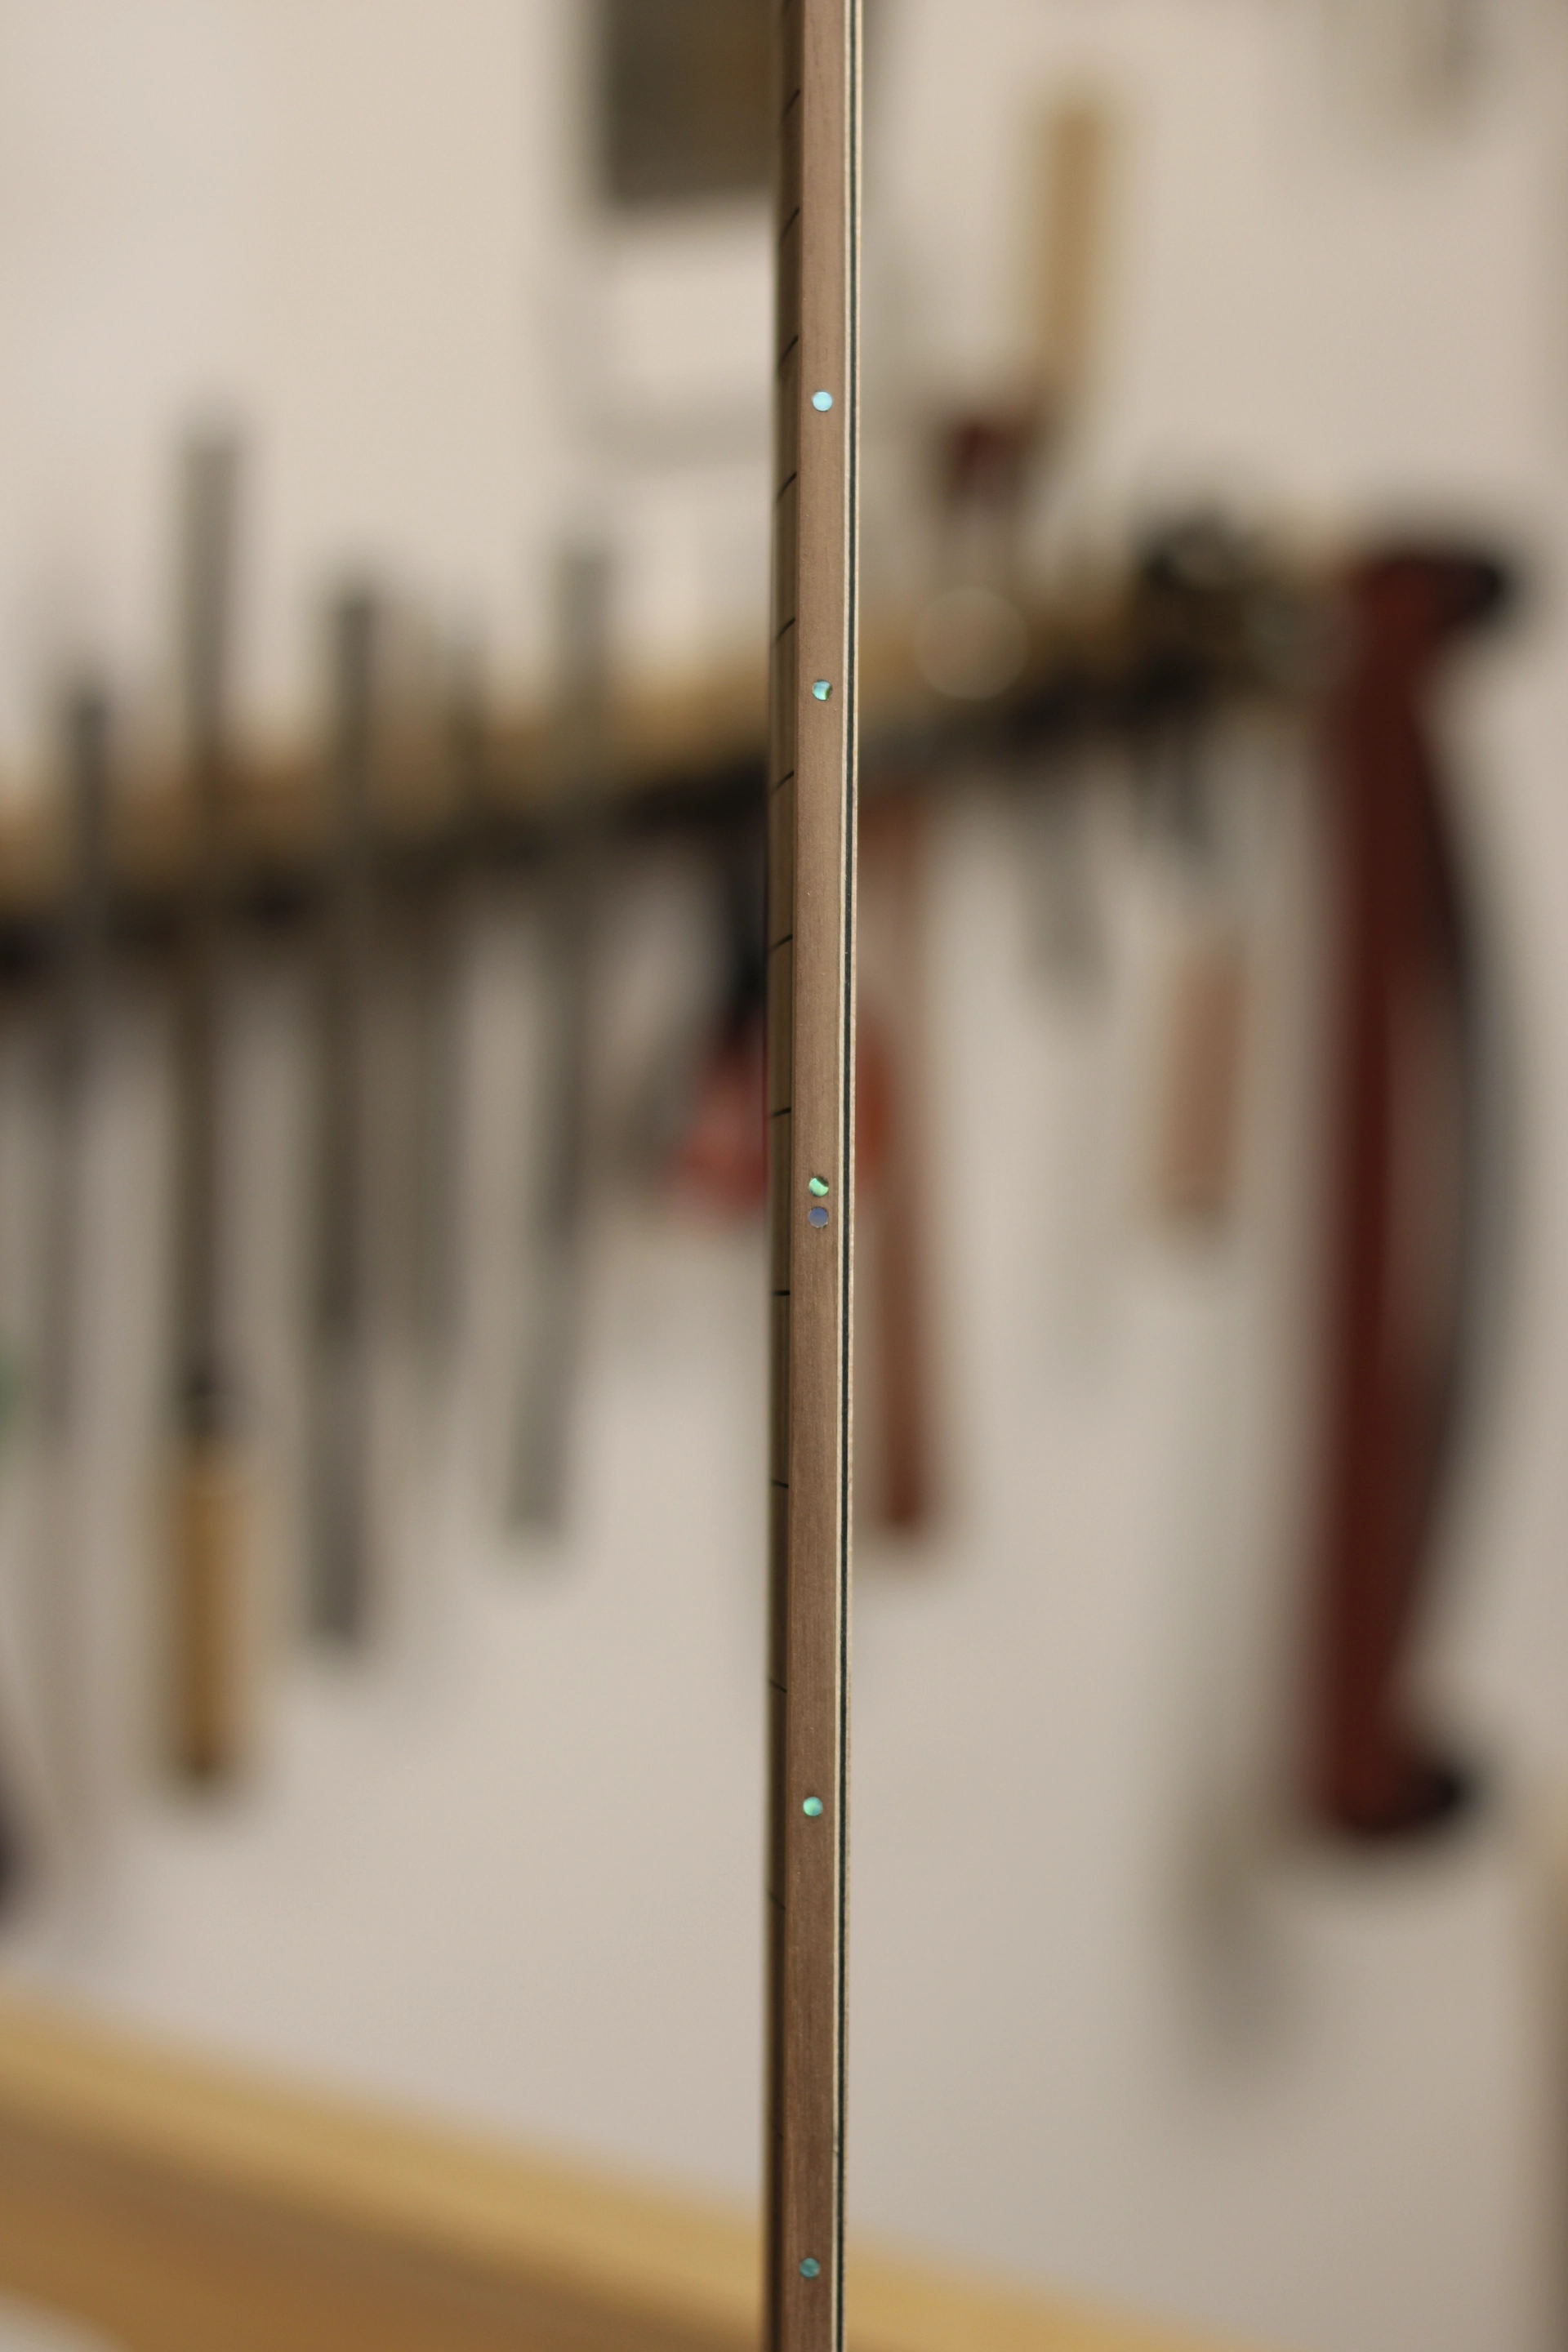
New Fretboard Side-Dots
I have added Paua side dots at 3, 5, 7, 9, 12, 15, and 17 for player comfort.
The original fretboard was austere... it was completely devoid of inlay. To appoint or not to appoint; that is the question. After vacillating over the issue for months, I finally decided to add position markers and a surprise inlay at the 12th fret. I chose tiny Paua dots for 3, 5, 7, 9, 15, and 17 to keep the look dressy, but not gaudy. I like how it turned out!
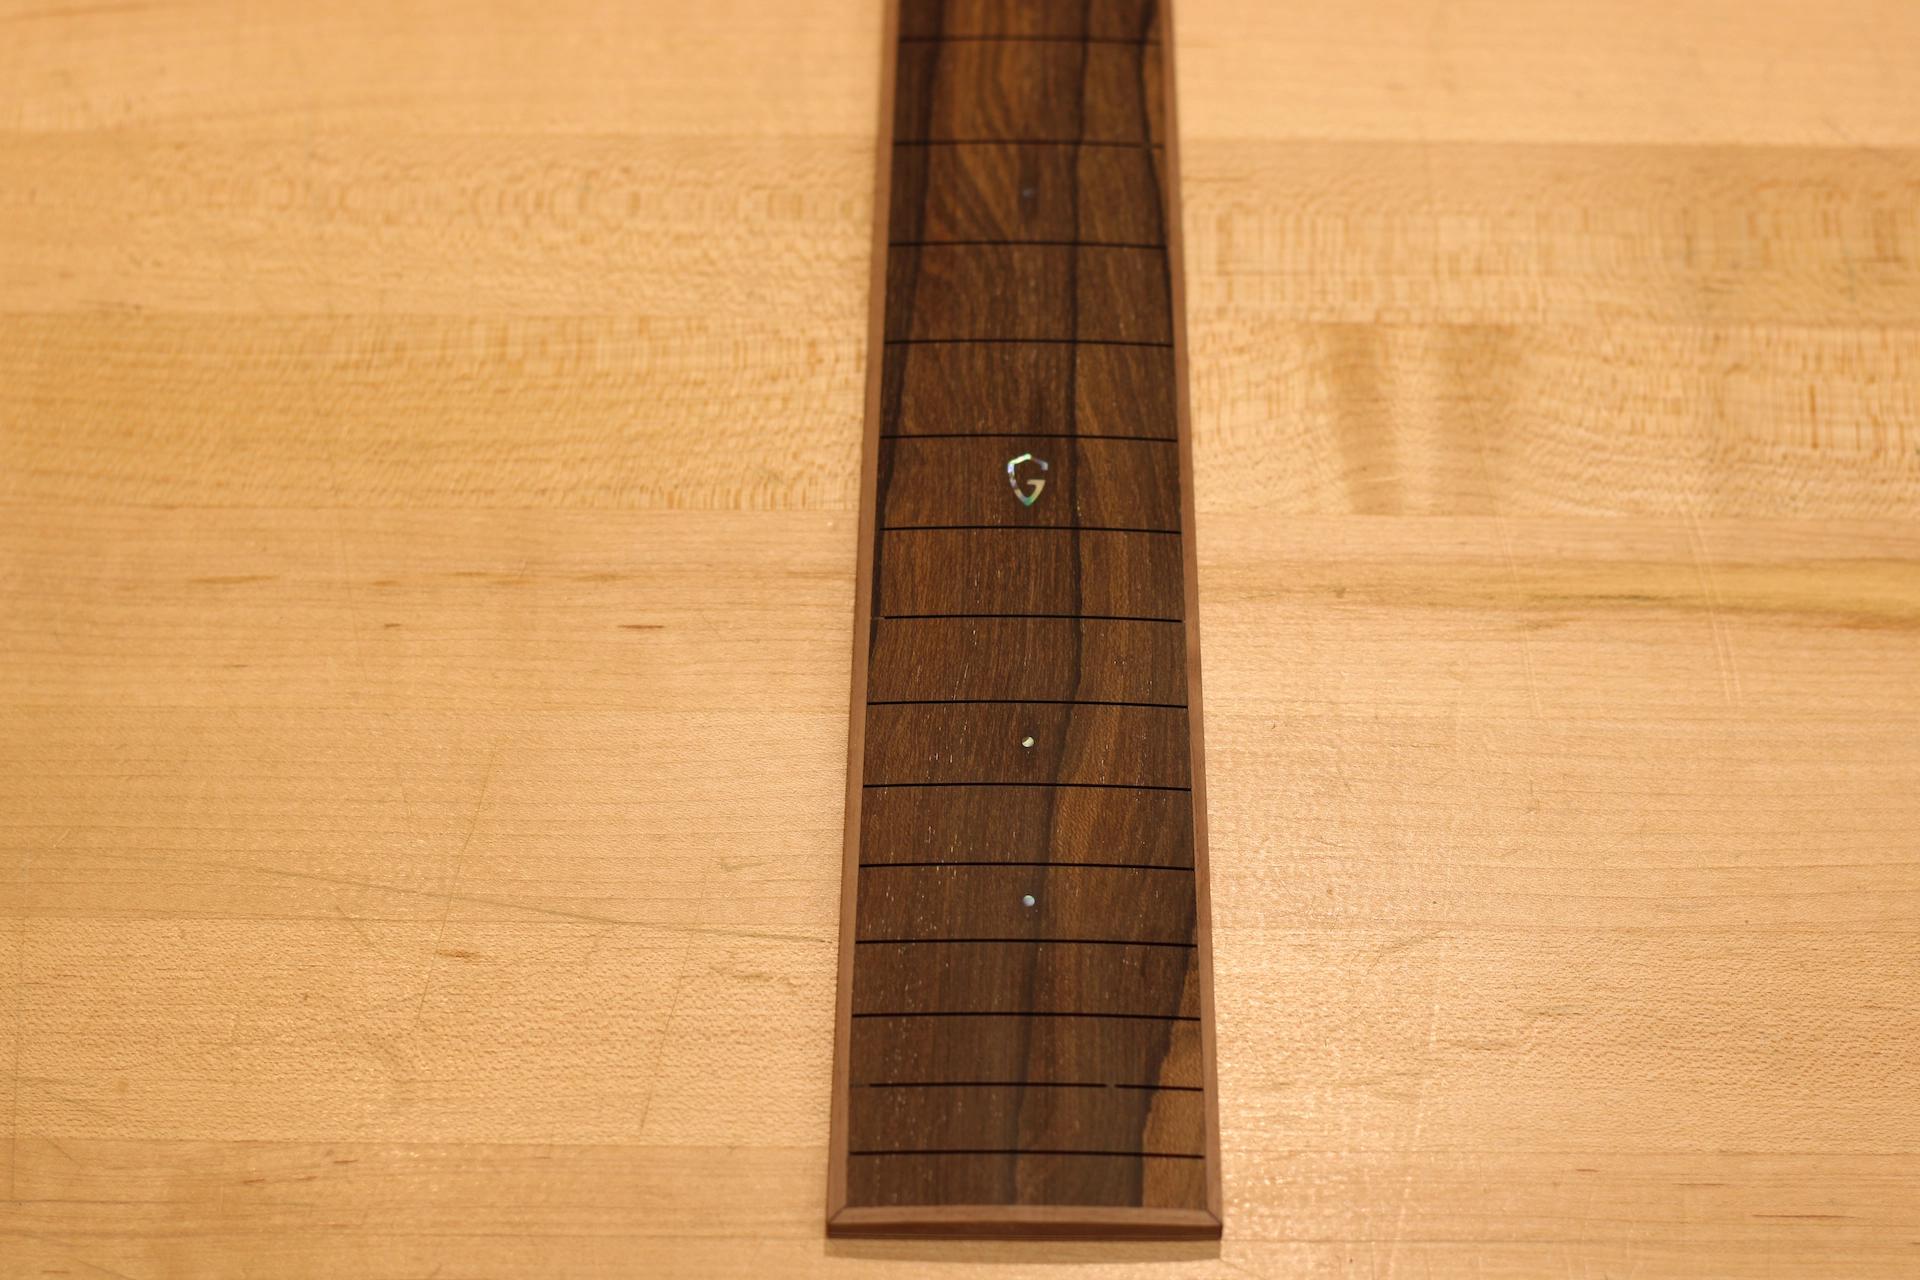
New Fretboard Inlay
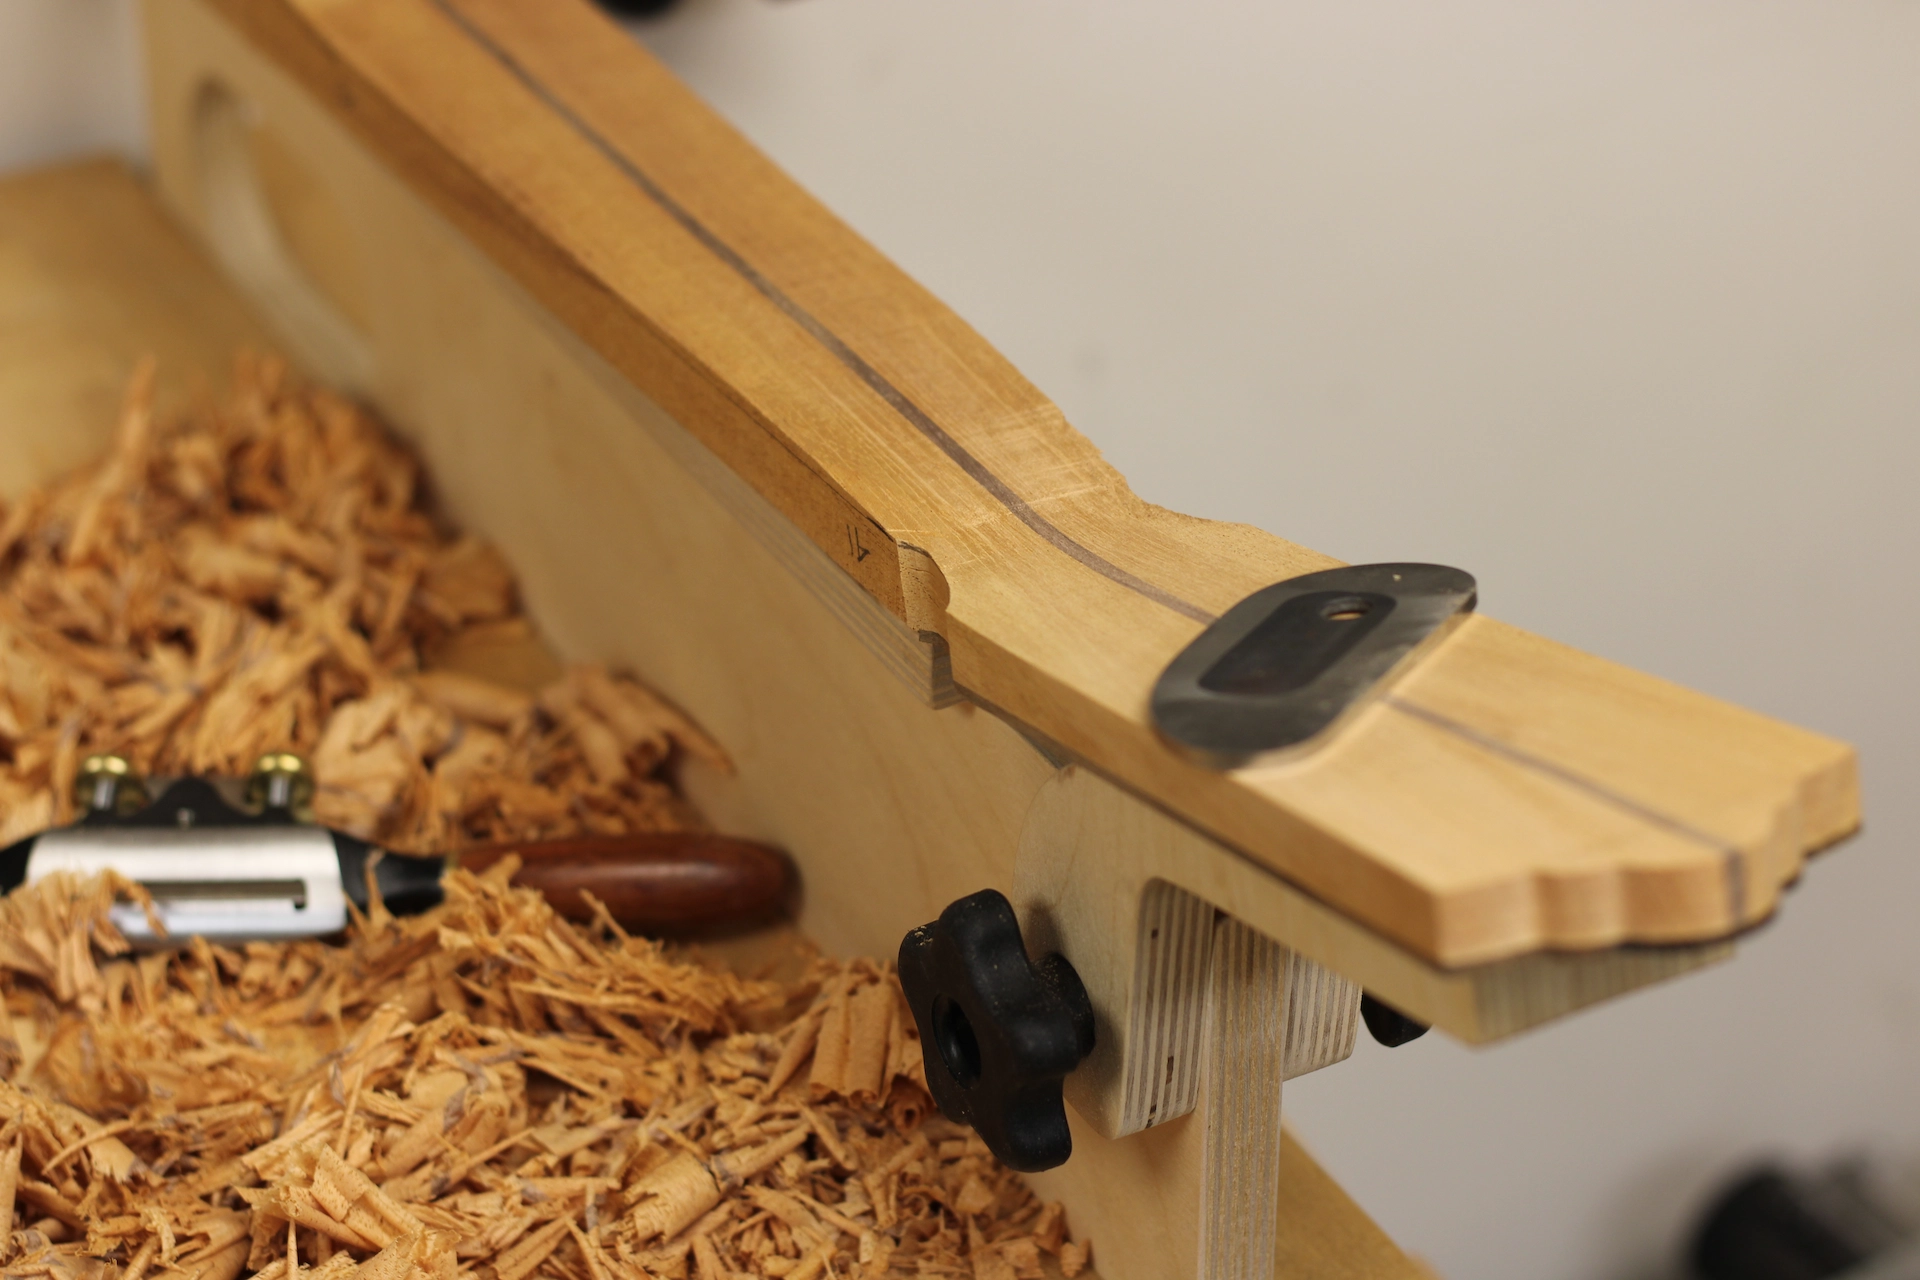
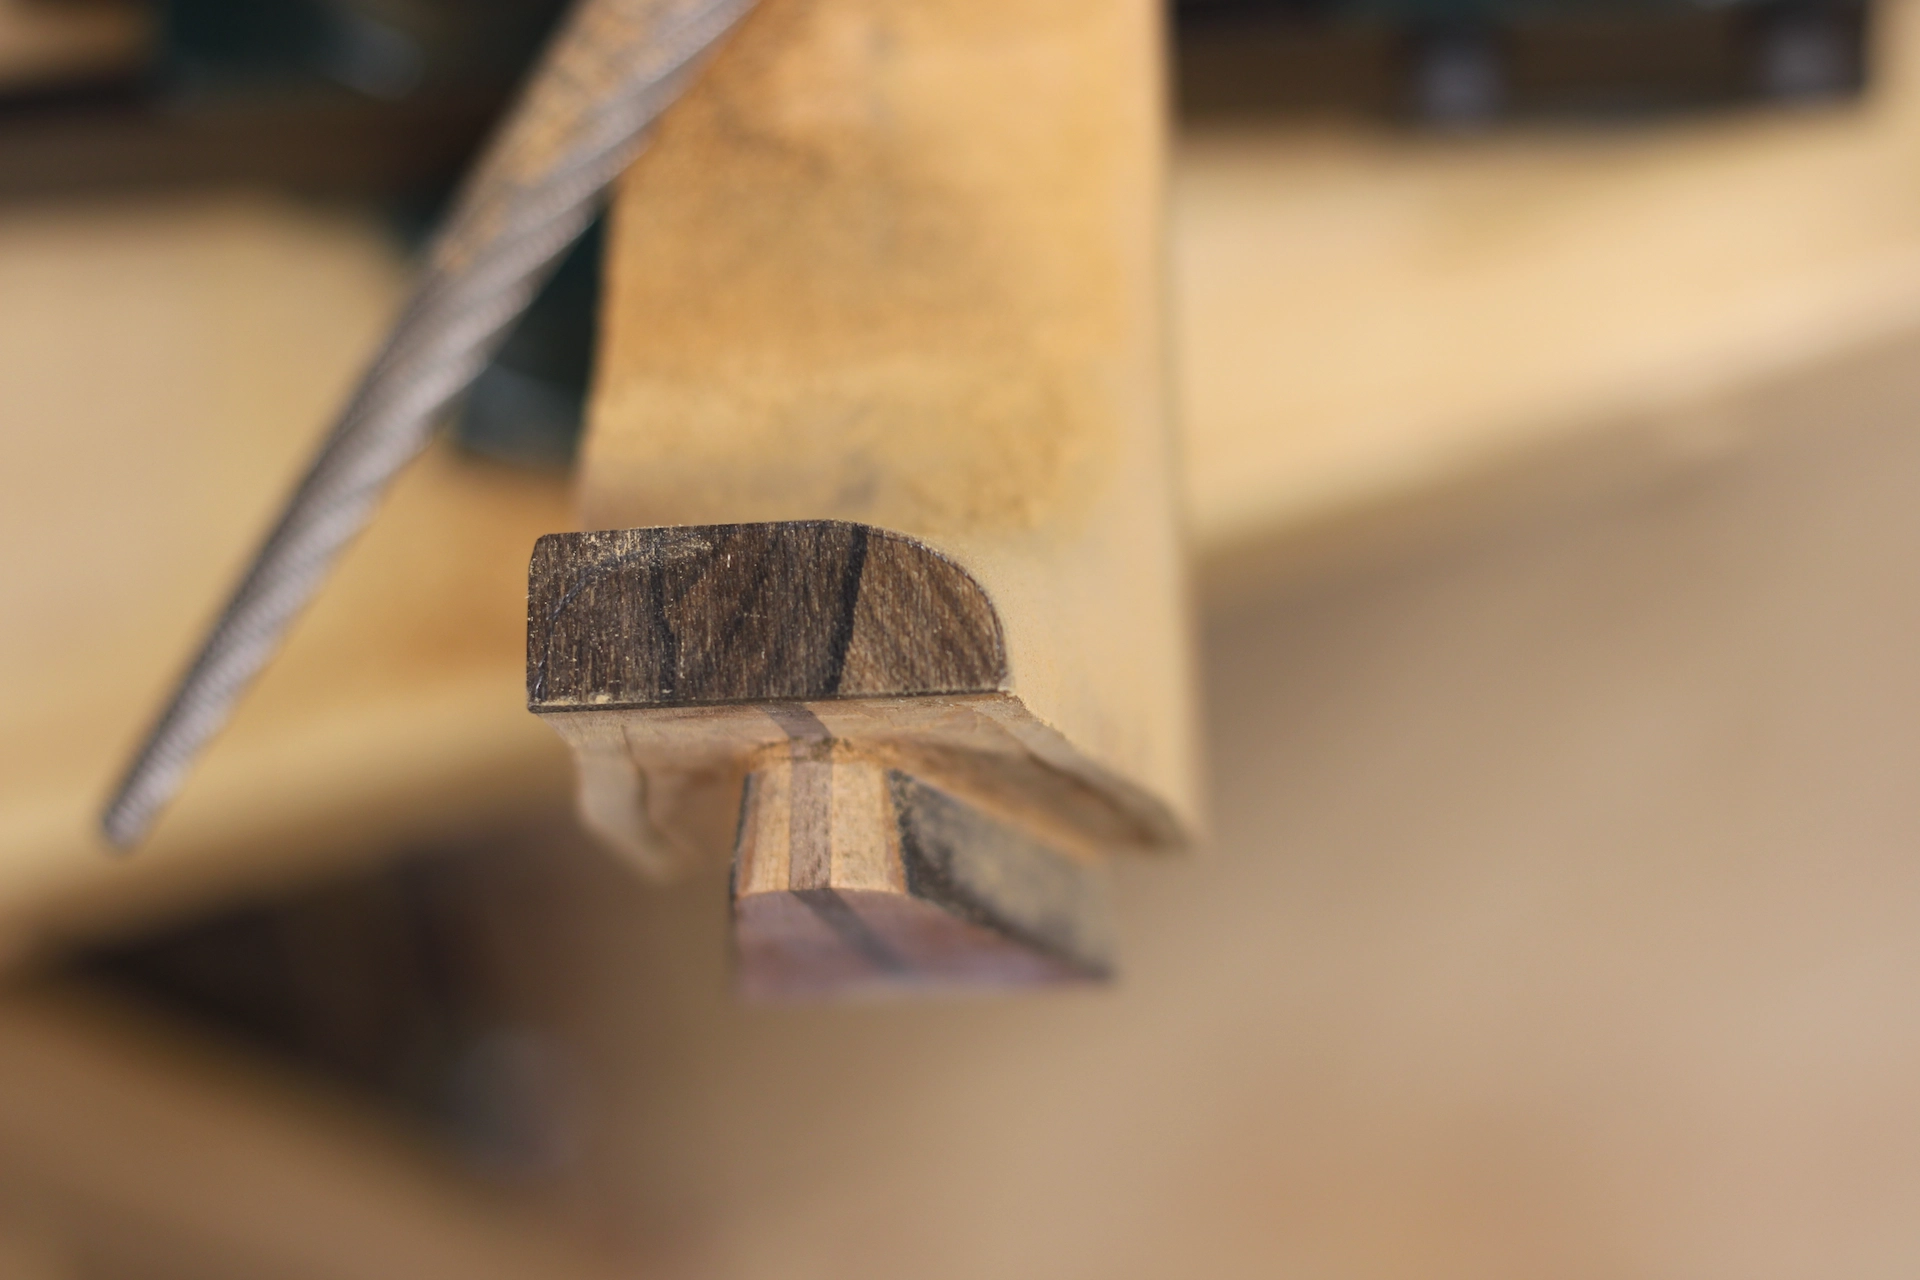
Fitting the neck involves adjusting the surface of neck heel to mate perfectly with the surface of the body.
The neck needs to be perfectly centered, and it needs to lay back at that perfect angle, and the dovetail joint needs to be perfectly tight. This is a process that is performed by anyone attaching a dovetail neck, be it the original builder or a technician doing a neck reset. The objective is to only need to add a small amount of glue along the steep, angled sides of the dovetail tenon, just enough to prevent the neck from sliding forward and out of the joint.
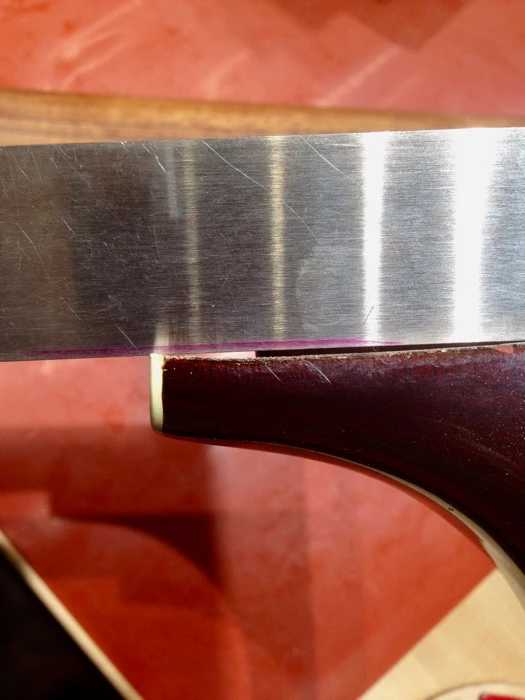
To that end, there is an iterative (back and forth) set of steps that are taken to properly fit the neck. That little strip of cloth-backed sandpaper you see in the photo below (next to the clamp temporarily holding fretboard on) gets pinched between the neck heel and the body, sandy side up. The neck is held tightly in the joint, and the sandpaper is drawn out from between the neck and the body, alternating between both sides of the neck. By maintaining constant pressure on the neck, holding it against the body while the sandpaper scrapes against the heel, it is possible to form the perfect union between the neck and the body, as the joint is fitted tightly, and the neck geometry is maintained.
Test Fitting the Neck
I have seen many approaches to automating some or all of the shaping of an acoustic guitar neck, including the use of Pin Routers, Router Tables, Shapers, CNCs and even stationary Belt Sanders.
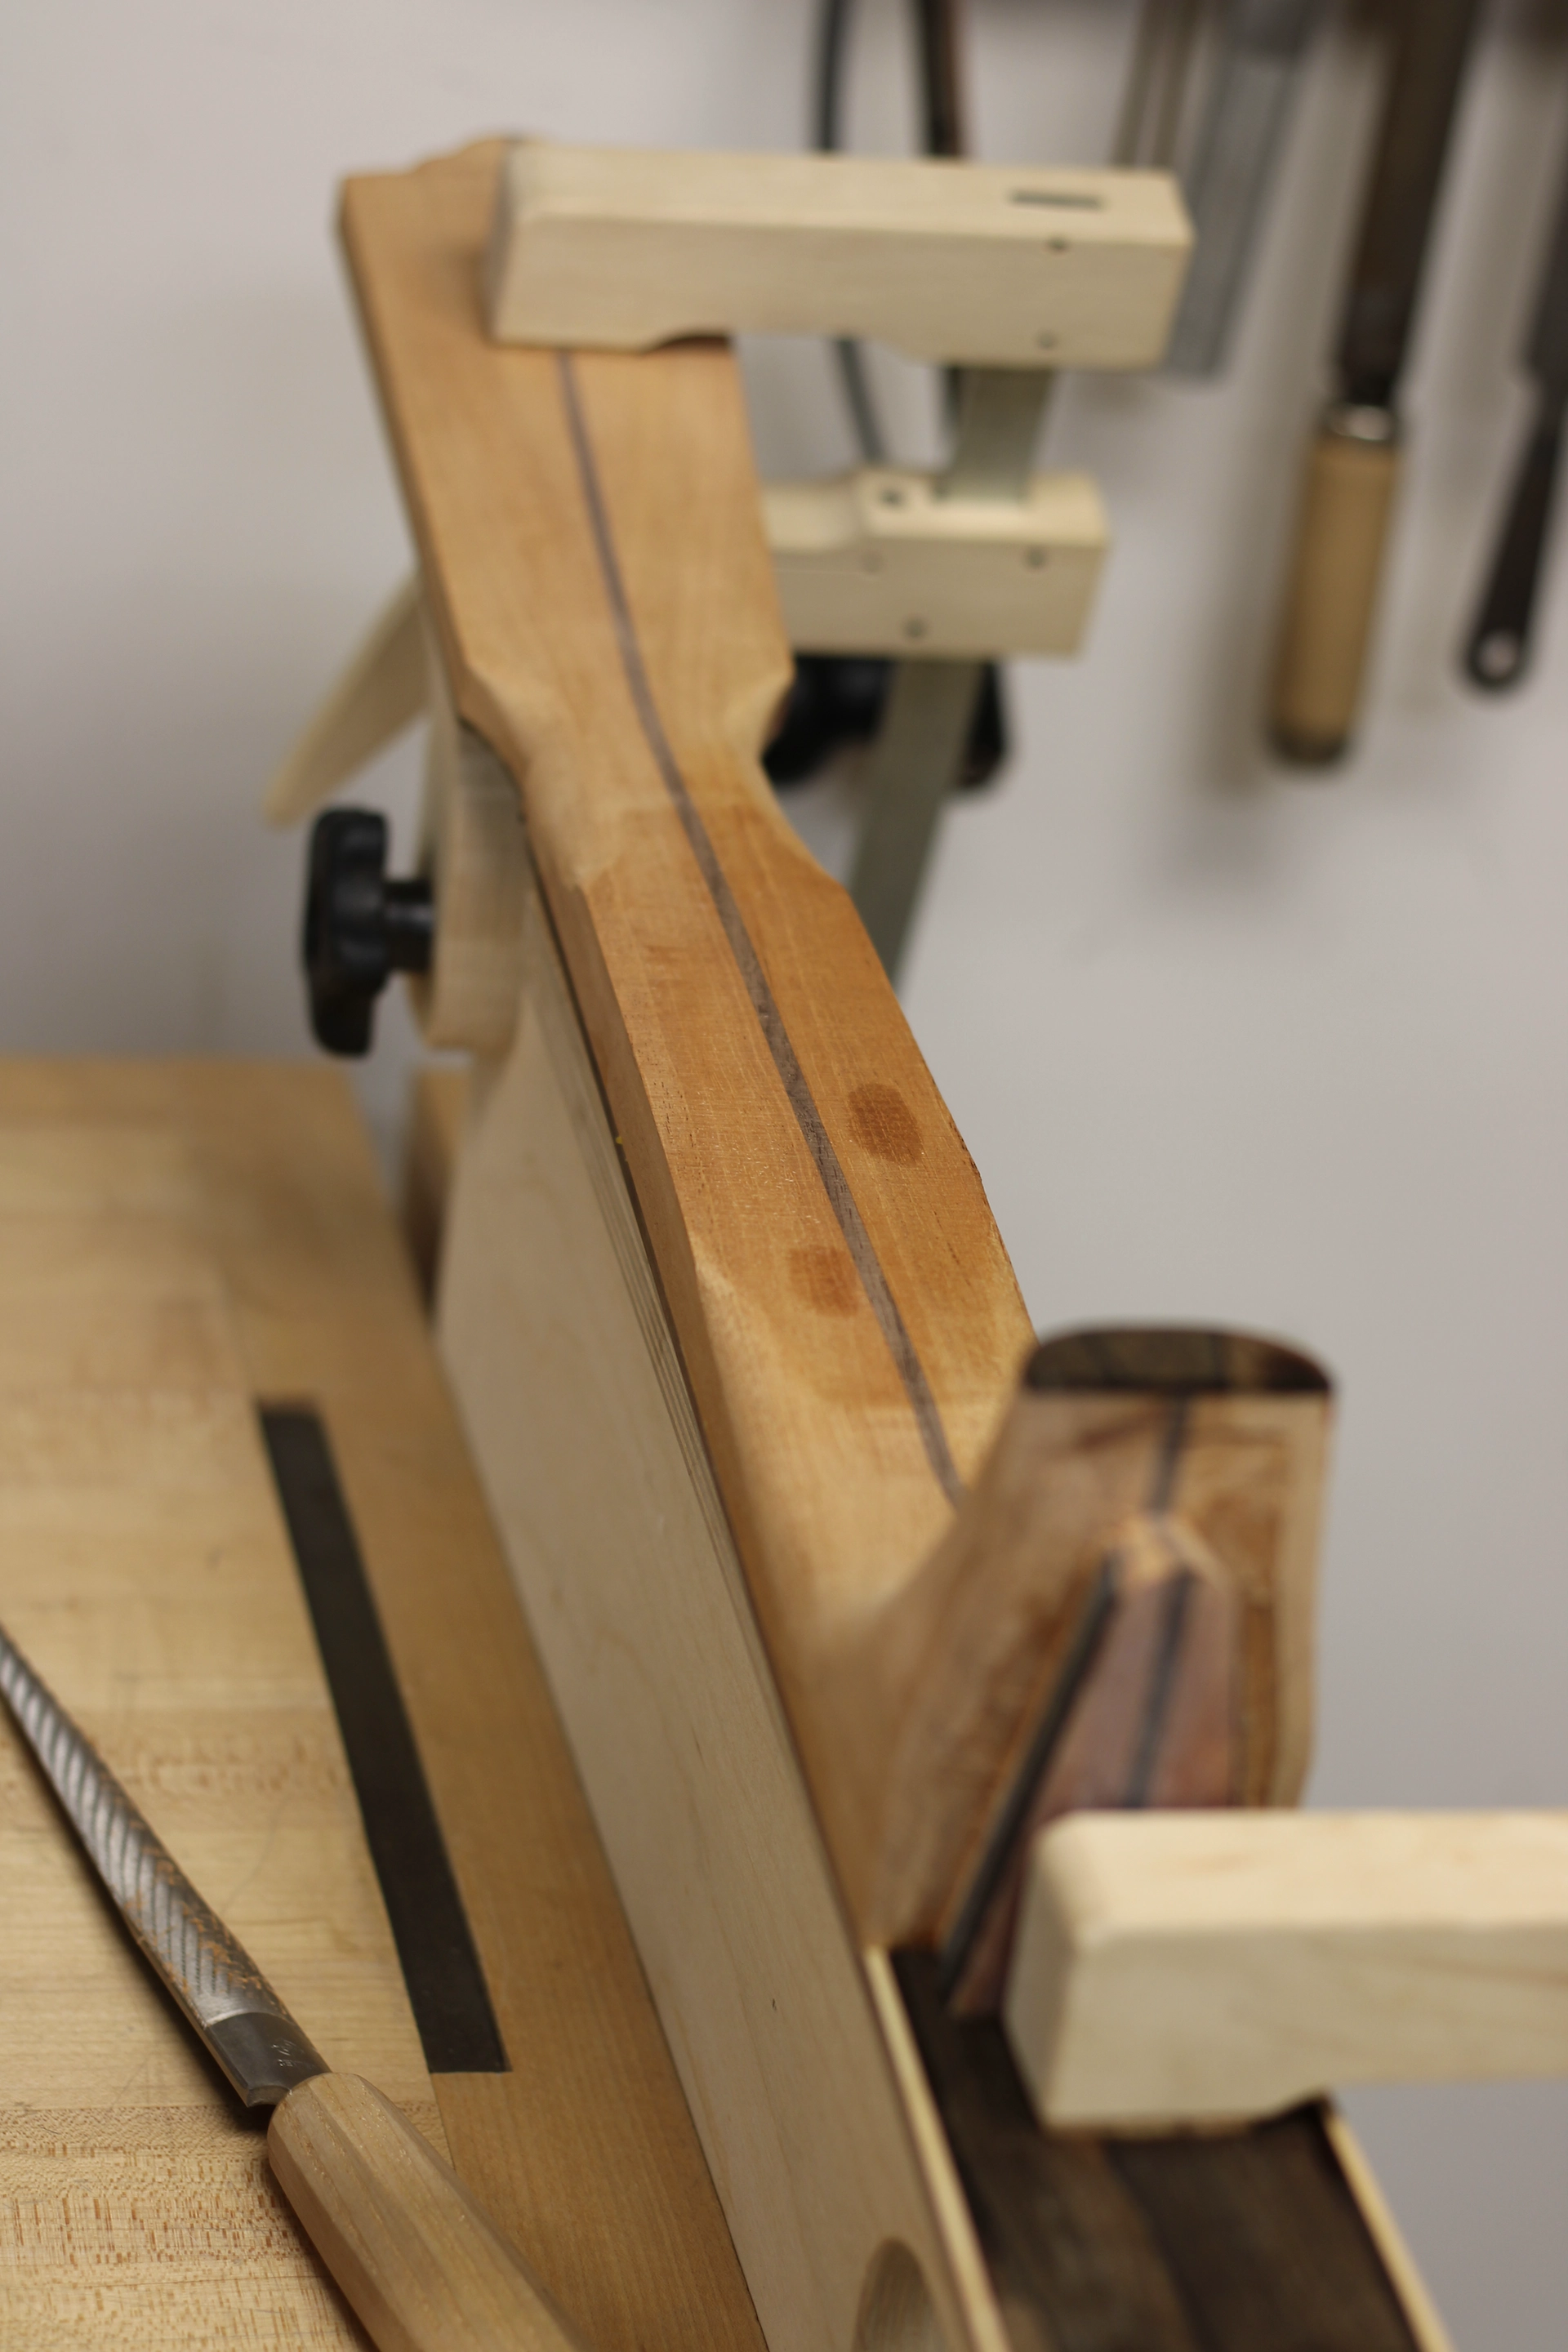
I rough out the basic shape of my necks at the Bandsaw. I still do all of the contouring of the back of the neck and heel by hand using a Spokeshave, Japanese Rasp, and Sandpaper. I use a series of contour templates to ensure uniformity across necks. The work is verified by feel. I will secure the neck in a vise, remove material, take the neck out of the vise and feel the neck in my hand. Back to vise it will go, and the process gets repeated until the neck is ready for finishing.
Shaping the Heel
At this stage, the width of the neck is dictated by the width of the fretboard. Both the thickness of the neck and the contour across the back of the neck determine its comfort and ultimately, its playability. Many years ago Canadian guitarmaker Robert Godin gained a reputation for making extremely comfortable necks. Godin was subsequently eclipsed by Robert Taylor, whose instrument necks have been handled and adored in nearly every nation across the Earth. While I always found Guild necks to be more to my liking than Martin or Gibson necks, I never found Guild necks to be as comfortable as a Godin or a Taylor.
I am shaping this neck away from the more flat, almost blocky necks of older Guild 12 strings, and more to my liking of the ever-so-slightly rounder profile that is more common today.
Shaping the Neck
This Guild gets a CA finish. I use a formulation from GluBoost specifically designed for the the task, called Fill N Finish. As the finish is applied by hand, it is more comparable to a French Polished Shellac than to a sprayed-on NitroCellulose Lacquer. But that is where the similarity ends. Unlike Shellac, the finish builds quickly. Unlike Lacquer, a guitar can be completely finished in a day or two.
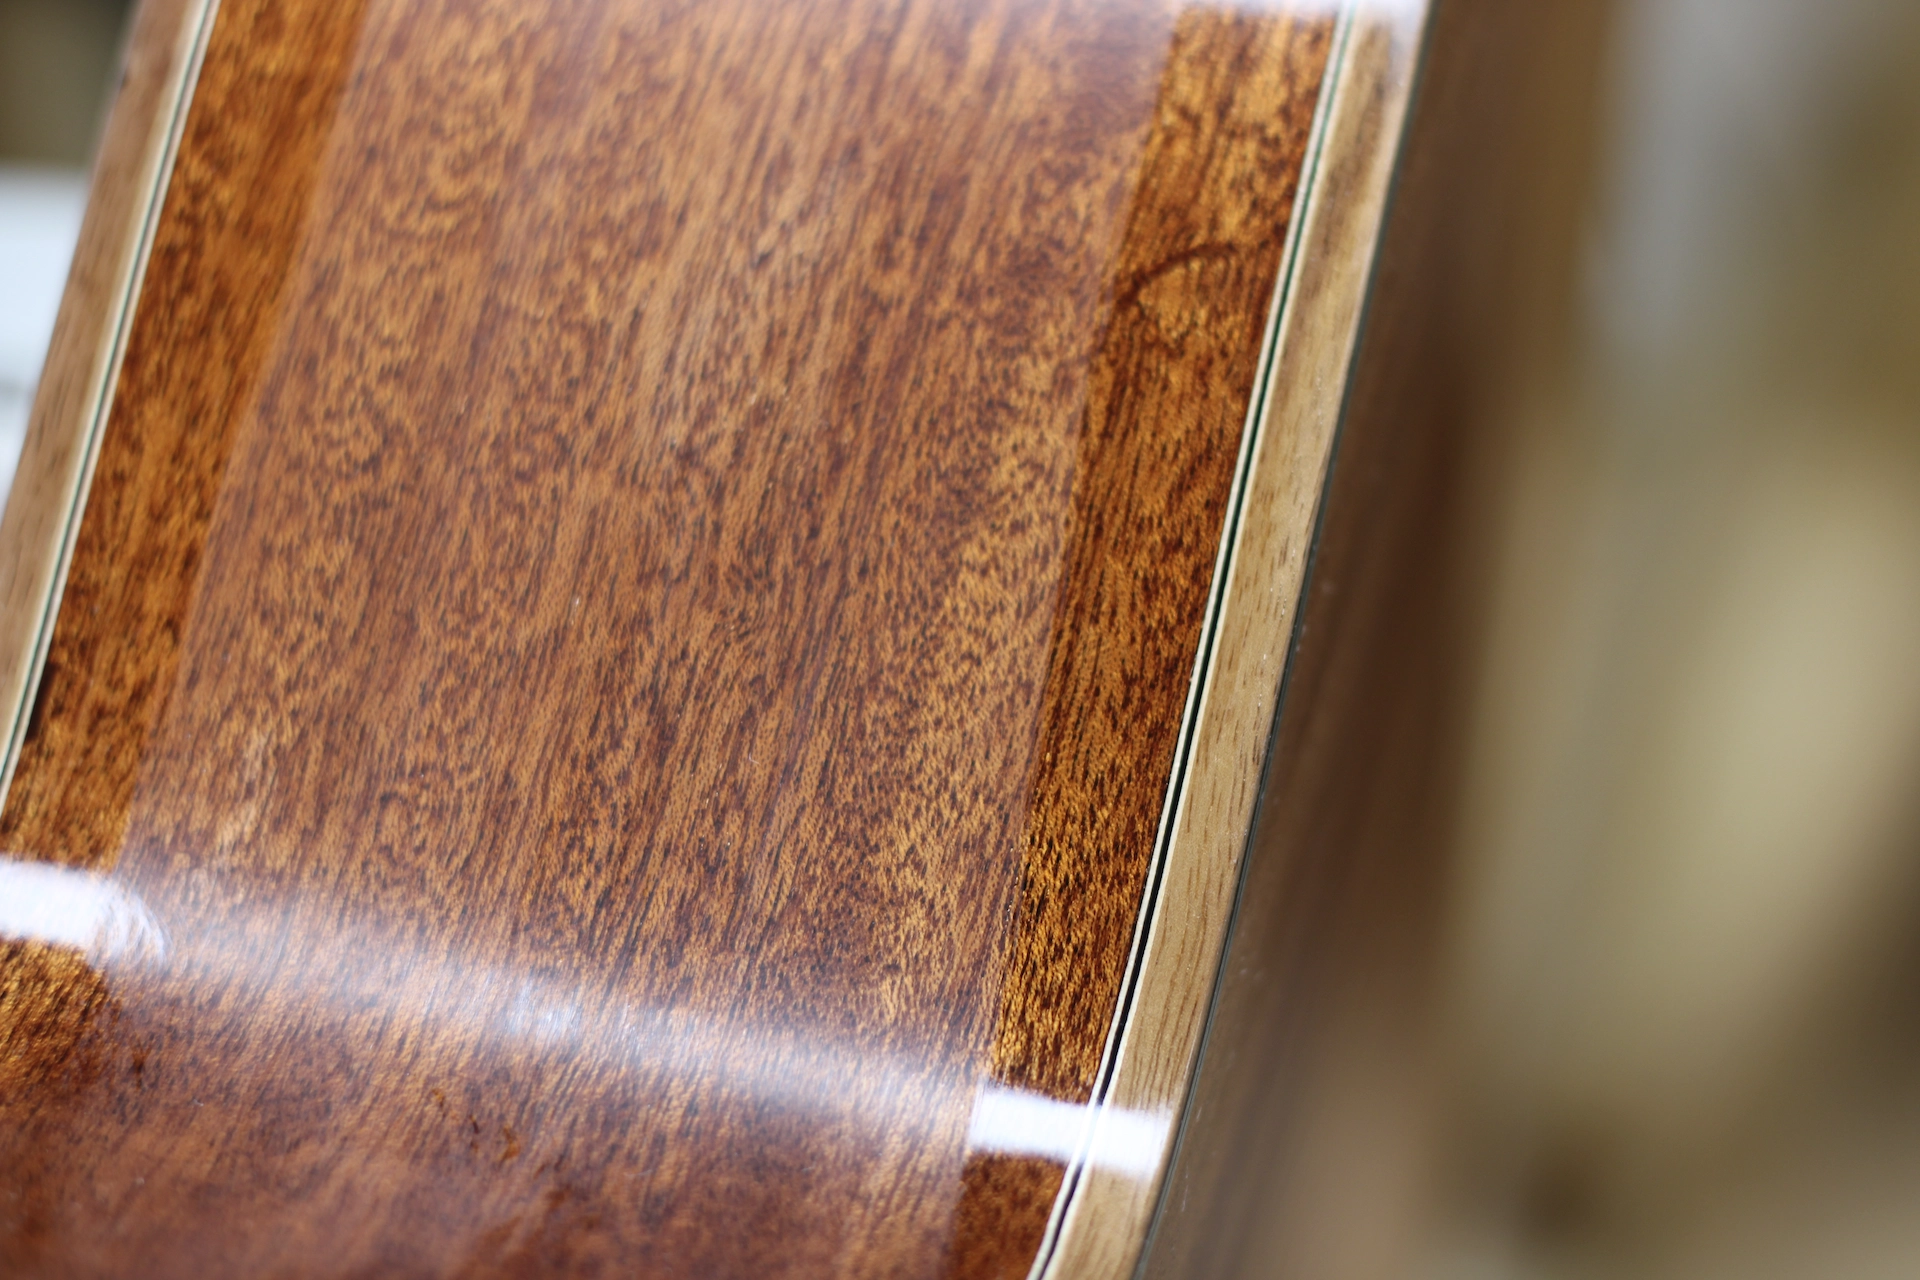
CA Finish - Gloss vs Satin
The finish dries glossy, but when I level sand it, it dulls slightly. The degree of gloss is then controlled by the amount of polishing I put into it. Here is the body of the guitar at just below semi-gloss level. I can stop here or take it on up to a high-gloss.
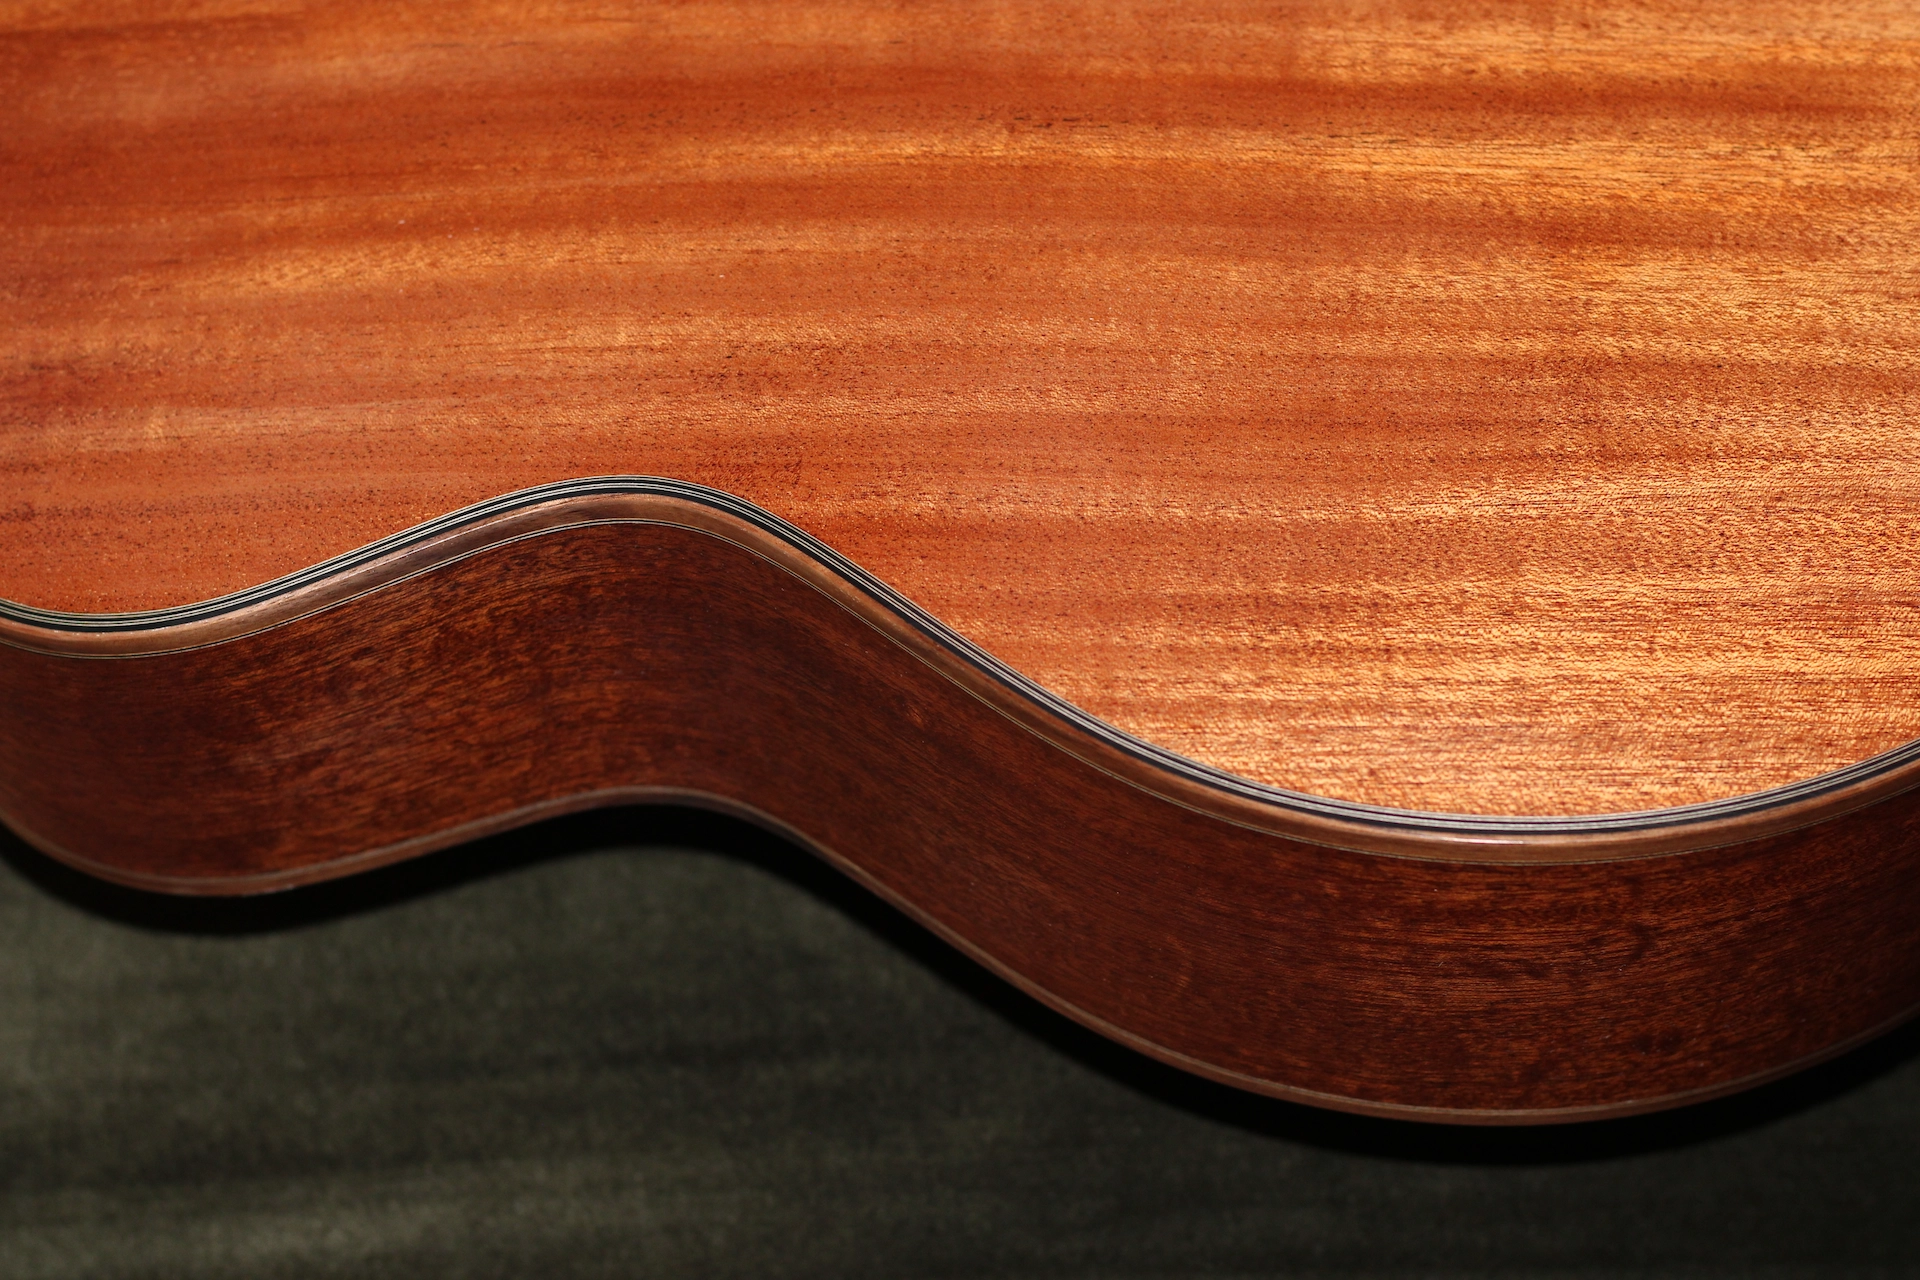
CA Finish - Body at Semi-Gloss
The bridge is fashioned from Ziricote. I have several templates of Guild 12 string bridges from guitars that span more than 40 years, all drawn directly from the bottom of the bridges removed from those same guitars. I have yet to encounter two that are identical in size and shape! They are all "close" but they are not identical. The only explanation I can offer is that these bridges were hand sanded/hand shaped (just like the one I am fashioning for this 12 string).
Another notable fact regarding Guild bridges is the varying height that could (still can) be found on brand new guitars. I have measured bridges that would have needed shims just to make it to 1/4″ (6.3 mm, closer to Taylor territory). I have also found bridges as tall as 3/8″ (9.5 mm, closer to my liking). To Guild builders, bridge height was arbitrary. Necks would be set to (what I would assume to have been) an approximate target angle and, rather than invest the significant amount of time required to hand fit each and every neck to match an exact bridge height, workers would simply resize the bridge(s) to fit the neck plane.
Amongst those builders who do chose to set the necks to a fixed bridge height, many have used a general ("popular") measurement of 5/16″ (8 mm), and then cut a saddle to measure 3/16″ (4.8 mm) above that bridge. Players of these instruments invariably have their saddles lowered (to lower the action), and you are considered fortunate if you have 1/8″ (3.2 mm) remaining above the bridge.
So what's the big deal regarding bridge height? Change the dimensions and alter the sound. The bridge is a brace, a critical brace that directly impacts the sonic potential of a given guitar. It happens to be the only brace found on the exterior of the body of the guitar, but it is a brace. There are plenty of builders who would never consider arbitrarily altering the dimensions of an interior brace; in fact, they would terminate an employee for doing so. And yet, for what I can only assume to be a lack of understanding, they will shape and size a bridge as though it was an afterthought, or an ornament.
On a given day, there are enough discussions ("arguments") regarding string brand to fuel an all-out war. Additionally, arguments ensue regarding string gauge. And then there are arguments over the ideal break angle (the angle of the string, measured from the back of the saddle to where the string encounters the bridge). These issues pale in comparison to an almost disregarded factor where strings are involved, one that exceeds any other factor in importance: string height.
Increasing the string height above the soundboard has a profoundly positive impact on the volume and quality of the tone of any given acoustic guitar. Sadly, one cannot simply make a taller saddle, as saddle height directly impacts action and can render a guitar unplayable. Additionally, too tall a saddle will likely split the bridge at the front edge of the saddle slot. Simply increasing the height of the bridge to support a saddle that is higher off the soundboard will also raise the action too high, so the neck must be reset. However, increasing the height of the bridge without taking into account its overall mass in relation to the strength and mass of the soundboard and the bracing, including the bridgeplate, will result in either overdriving the top or damping (deadening) the sound.
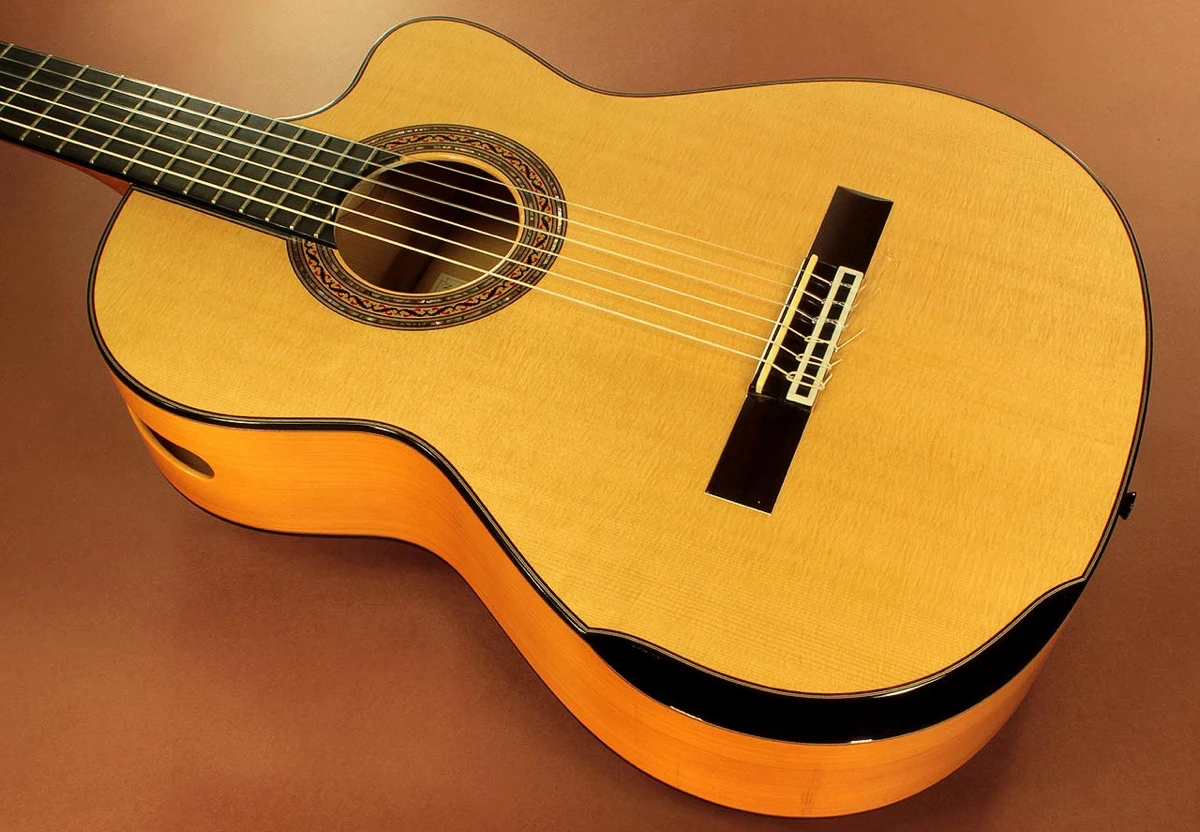
Averaging the length and width of several bridges, my target dimensions for this F-212 are 6-1/32″ x 1-21/32″ x 3/8″.
Almost there...Coming soon...
Dimensions:
Weight: